D-Link DAP-1820 User Manual - Page 35
Network Settings
 |
View all D-Link DAP-1820 manuals
Add to My Manuals
Save this manual to your list of manuals |
Page 35 highlights
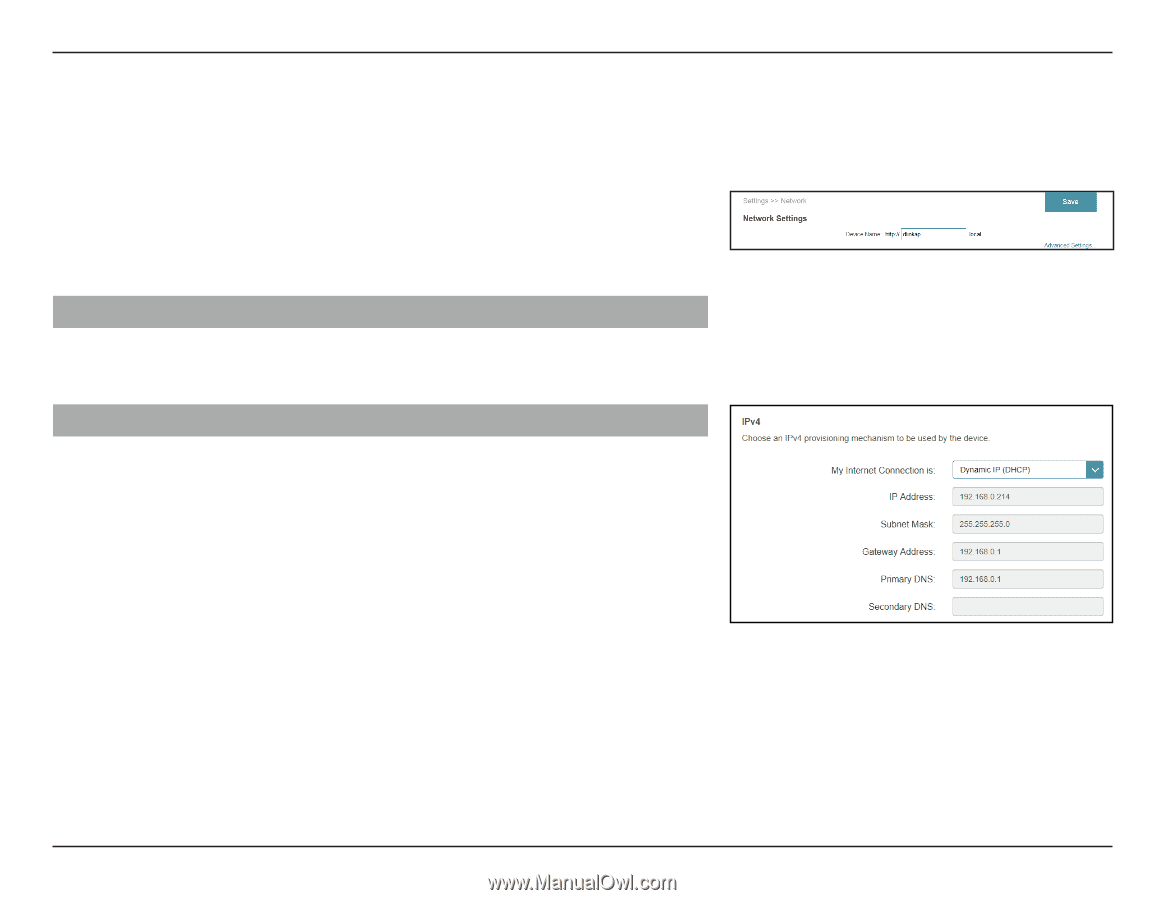
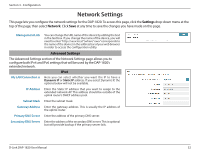
Section 3 - Configuration Network Settings This page lets you configure the network settings for the DAP-1820. To access this page, click the Settings drop-down menu at the top of the page, then select Network. Click Save at any time to save the changes you have made on this page. Management Link You can change the URL name of the device by editing the text in the text box. If you change the name of the device, you will need to enter"http://xxxx.local."(where"xxxx"corresponds to the name of the device) in the address bar of your web browser in order to access the configuration utility. Advanced Settings The Advanced Settings section of the Network Settings page allows you to configure both IPv4 and IPv6 settings that will be used by the DAP-1820's extended network. My LAN Connection is IPv4 Here you can select whether you want the IP to have a Dynamic IP or Static IP address. If you select Dynamic IP, the options below will not be available. IP Address Enter the Static IP address that you want to assign to the extended network AP. This address should be outside of the uplink router's DHCP address pool. Subnet Mask Enter the subnet mask. Gateway Address Enter the gateway address. This is usually the IP address of the uplink router. Primary DNS Server Enter the address of the primary DNS server. Secondary DNS Server Enter the address of the secondary DNS server. This is optional but will provide backup if the primary server fails. D-Link DAP-1820 User Manual 32
-
 1
1 -
2
-
3
-
4
-
5
-
6
-
7
-
8
-
9
-
10
-
11
-
12
-
13
-
14
-
15
-
16
-
17
-
18
-
19
-
20
-
21
-
22
-
23
-
24
-
25
-
26
-
27
-
28
-
29
-
 30
30 -
 31
31 -
 32
32 -
 33
33 -
 34
34 -
 35
35 -
 36
36 -
 37
37 -
 38
38 -
 39
39 -
 40
40 -
41
-
42
-
43
-
44
-
45
-
46
-
47
-
48
-
49
-
50
-
51
-
52
-
53
-
54
-
55
-
56
-
57
-
58
-
59
-
60
-
61
-
62
-
63
-
64
-
65
-
66
-
67
-
68
-
69
-
70
-
71
-
72
-
73
-
74
-
75
-
76
-
77
-
78
-
79
-
80
-
81
-
82
-
83
-
84
-
85
-
86
-
87
-
88
-
89
-
90
 |
 |