D-Link DCS-6004L User Manual - Page 11
Hardware Installation, Connect the Ethernet Cable, Attach the External Power Supply
 |
View all D-Link DCS-6004L manuals
Add to My Manuals
Save this manual to your list of manuals |
Page 11 highlights
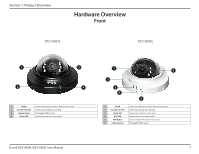
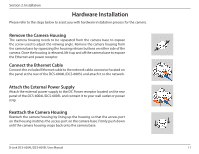
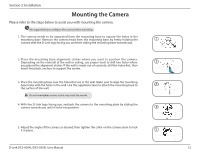
Section 2: Installation Hardware Installation Please refer to the steps below to assist you with hardware installation process for the camera. Remove the Camera Housing The camera housing needs to be separated from the camera base to expose the screw used to adjust the viewing angle. Remove the camera housing from the camera base by squeezing the housing release buttons on either side of the camera. Once the housing is released, lift it up and off the camera base to expose the Ethernet and power receptor. Connect the Ethernet Cable Connect the included Ethernet cable to the network cable connector located on the panel at the rear of the DCS-6004L/DCS-6005L and attach it to the network. Attach the External Power Supply Attach the external power supply to the DC Power receptor located on the rear panel of the DCS-6004L/DCS-6005L and connect it to your wall outlet or power strip. Reattach the Camera Housing Reattach the camera housing by lining up the housing so that the access port on the housing matches the access port on the camera base. Firmly push down until the camera housing snaps back onto the camera base. D-Link DCS-6004L/DCS-6005L User Manual 11
-
 1
1 -
2
-
3
-
4
-
5
-
 6
6 -
 7
7 -
 8
8 -
 9
9 -
 10
10 -
 11
11 -
 12
12 -
 13
13 -
 14
14 -
 15
15 -
 16
16 -
17
-
18
-
19
-
20
-
21
-
22
-
23
-
24
-
25
-
26
-
27
-
28
-
29
-
30
-
31
-
32
-
33
-
34
-
35
-
36
-
37
-
38
-
39
-
40
-
41
-
42
-
43
-
44
-
45
-
46
-
47
-
48
-
49
-
50
-
51
-
52
-
53
-
54
-
55
-
56
-
57
-
58
-
59
 |
 |
