D-Link DES 6000 Product Manual - Page 89
Port Configuration, Con Port window
 |
UPC - 790069239328
View all D-Link DES 6000 manuals
Add to My Manuals
Save this manual to your list of manuals |
Page 89 highlights
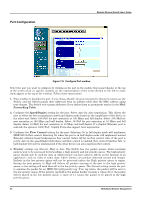
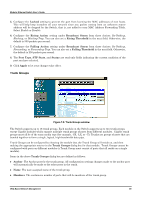
Port Configuration Modular Ethernet Switch User's Guide Figure 7-8. Configure Port window Select the port you want to configure by clicking on the port in the module front panel display at the top of the screen (click on specific modules on the representation of the entire Switch to the left to make them appear at the top of the window). Follow these instructions: 1. State enables or disables the port. If you choose Disable, devices connected to that port cannot use the Switch, and the Switch purges their addresses from its address table after the MAC address aging time elapses. The Switch won't purge addresses if you define them as permanent entries in the MAC Forwarding Table. 2. Configure the Speed/Duplex setting for the port. Select Auto for Auto-negotiation. This allows the port to select the best transmission speed and duplex mode based on the capabilities of the device at the other end. Select 100/Full for port operation at 100 Mbps and full duplex. Select 100/Half for port operation at 100 Mbps and half duplex. Select 10/Full for port operation at 10 Mbps and full duplex. Select 10/Half for port operation at 10 Mbps and half duplex. If a Gigabit Ethernet port is selected, the option is 1000/Full. Gigabit Ports also support Auto-negotiation. 3. Configure the Flow Control setting for the port. Selecting On in full-duplex mode will implement IEEE 802.3x flow control. Selecting On when the port is in half duplex mode will implement normal Ethernet collision-based backpressure flow control. Select Off for no flow control. Also, if the port is set for Auto in the speed/duplex field above and flow control is enabled, flow control (whether full- or half-duplex) will only be implemented if the other device can auto-negotiate flow control. 4. Priority settings are Normal, High or Low. The Switch has two packet queues where incoming packets wait to be processed for forwarding; a high priority and low priority queue. The high priority queue should only be used for data in which latency can have adverse affects on the function of an application, such as video or audio data, where latency can produce distorted sounds and images. Packets in the low priority queue will not be processed unless the High priority queue is empty. Setting the port priority to High will deliver all packets arriving at the port to the high priority queue, a Low setting will send them all to the low priority queue. The Normal setting causes the port to examine the packet for an IEEE 802.1p/Q priority tag. If no tag exists, the packet will be sent to the low priority queue. If the priority tag field in the packet header contains a value of 0-3, the packet will be placed in the low priority queue; a value of 4-7 causes the packet to be placed in the high priority queue. 84 Web-Based Network Management
-
 1
1 -
2
-
3
-
4
-
5
-
6
-
7
-
8
-
9
-
10
-
11
-
12
-
13
-
14
-
15
-
16
-
17
-
18
-
19
-
20
-
21
-
22
-
23
-
24
-
25
-
26
-
27
-
28
-
29
-
30
-
31
-
32
-
33
-
34
-
35
-
36
-
37
-
38
-
39
-
40
-
41
-
42
-
43
-
44
-
45
-
46
-
47
-
48
-
49
-
50
-
51
-
52
-
53
-
54
-
55
-
56
-
57
-
58
-
59
-
60
-
61
-
62
-
63
-
64
-
65
-
66
-
67
-
68
-
69
-
70
-
71
-
72
-
73
-
74
-
75
-
76
-
77
-
78
-
79
-
80
-
81
-
82
-
83
-
 84
84 -
 85
85 -
 86
86 -
 87
87 -
 88
88 -
 89
89 -
 90
90 -
 91
91 -
 92
92 -
 93
93 -
 94
94 -
95
-
96
-
97
-
98
-
99
-
100
-
101
-
102
-
103
-
104
-
105
-
106
-
107
-
108
-
109
-
110
-
111
-
112
-
113
-
114
-
115
-
116
-
117
-
118
-
119
-
120
-
121
-
122
-
123
-
124
-
125
-
126
-
127
-
128
-
129
-
130
-
131
-
132
-
133
-
134
-
135
-
136
-
137
-
138
-
139
 |
 |
