D-Link DIS-200G Quick Install Guide - Page 6
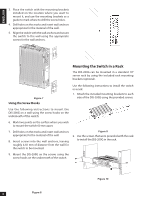
Mounting the Switch in a Rack
 |
View all D-Link DIS-200G manuals
Add to My Manuals
Save this manual to your list of manuals |
Page 6 highlights
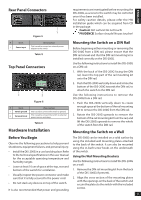
ENGLISH 3. Place the switch with the mounting brackets installed on the location where you want to mount it, and use the mounting brackets as a guide to mark where to drill the screw holes. 4. Drill holes on the marks and insert wall anchors appropriate for the material of the wall. 5. Align the switch with the wall anchors and secure the switch to the wall using the appropriate screws for the wall anchors. Mounting the Switch in a Rack The DIS-200G can be mounted in a standard 19" server rack by using the included rack mounting brackets (optional). Figure 7 Using the Screw Hooks Use the following instructions to install the switch in a rack: 1. Attach the included mounting brackets to each side of the DIS-200G using the provided screws. Use the following instructions to mount the DIS-200G on a wall using the screw hooks on the underneath of the switch: 6. Mark two points on the surface where you wish to mount the switch 60 mm apart. 7. Drill holes on the marks and insert wall anchors appropriate for the material of the wall. 8. Insert screws into the wall anchors, leaving roughly 4.50 mm of distance from the wall for the switch to be mounted. Figure 9 2. Use the screws that were provided with the rack to install the DIS-200G in the rack. 9. Mount the DIS-200G on the screws using the screw hooks on the underneath of the switch. 4 Figure 8 Figure 10
-
 1
1 -
 2
2 -
 3
3 -
 4
4 -
 5
5 -
 6
6 -
 7
7 -
 8
8 -
 9
9 -
 10
10 -
 11
11 -
 12
12 -
13
-
14
-
15
-
16
 |
 |
