D-Link DIS-2650AP Product Manual - Page 8
Basic Installation, Hardware Setup, Mounting the Device on a Wall
 |
View all D-Link DIS-2650AP manuals
Add to My Manuals
Save this manual to your list of manuals |
Page 8 highlights
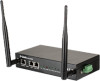
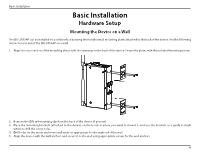
Basic Installation Basic Installation Hardware Setup Mounting the Device on a Wall The DIS-2650AP can be installed on a solid surface by using the included wall mounting plates attached to the back of the device. Use the following instructions to install the DIS-2650AP on a wall: 1. Align the cross-section of the mounting plates with the openings on the back of the device. Secure the plates with the included mounting screws. 2. Remove the DIN rail mounting clip from the back of the device (if present). 3. Place the mounting brackets (attached to the device) on the location where you want to mount it, and use the brackets as a guide to mark where to drill the screw holes. 4. Drill holes on the marks and insert wall anchors appropriate for the material of the wall. 5. Align the device with the wall anchors and secure it to the wall using appropriate screws for the wall anchors. 8
-
 1
1 -
2
-
 3
3 -
 4
4 -
 5
5 -
 6
6 -
 7
7 -
 8
8 -
 9
9 -
 10
10 -
 11
11 -
 12
12 -
 13
13 -
14
-
15
-
16
-
17
-
18
-
19
-
20
-
21
-
22
-
23
-
24
-
25
-
26
-
27
-
28
-
29
-
30
-
31
-
32
-
33
-
34
-
35
-
36
-
37
-
38
-
39
-
40
-
41
-
42
-
43
-
44
-
45
-
46
-
47
-
48
-
49
-
50
-
51
-
52
-
53
-
54
-
55
-
56
-
57
-
58
-
59
-
60
-
61
-
62
-
63
-
64
-
65
-
66
-
67
-
68
-
69
-
70
-
71
-
72
-
73
-
74
-
75
-
76
-
77
-
78
-
79
-
80
-
81
-
82
-
83
-
84
-
85
-
86
-
87
-
88
-
89
-
90
-
91
-
92
-
93
-
94
-
95
-
96
-
97
-
98
-
99
-
100
 |
 |
