D-Link DNS-G120 Manual
D-Link DNS-G120 Manual
 |
UPC - 790069281815
View all D-Link DNS-G120 manuals
Add to My Manuals
Save this manual to your list of manuals |
D-Link DNS-G120 manual content summary:
- D-Link DNS-G120 | Manual - Page 1
- D-Link DNS-G120 | Manual - Page 2
DNS-G120 User's Manual Table of Contents Table of Contents Package Contents 3 Introduction 4 Features and Benefits 5 Hardware Overview 6 Getting Started 8 Hardware Installation 9 Installation Considerations 10 Windows® Connect Now (WCN 11 Connecting to a Wireless Network 14 Mapping a Drive - D-Link DNS-G120 | Manual - Page 3
-G120 User's Manual Package Contents Package Contents D-Link DNS-G120 Wireless Network Storage Adapter CD-ROM with Manual and Software Ethernet (CAT5 UTP/Straight-Through) Cable 5V 2.5A Power Supply Note: Using a power supply with a different voltage than the one included with the DNS-G120 - D-Link DNS-G120 | Manual - Page 4
DNS-G120 User's Manual Introduction Introduction D-Link, an industry leader in networking, introduces the DNS-G120 Wireless Network Storage Adapter. By attaching up to two USB drives to the DNS-G120, create access to storage devices that are available for everyone on the network. The DNS-G120 is - D-Link DNS-G120 | Manual - Page 5
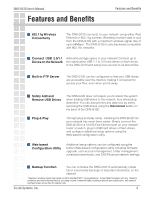
including firmware upgrade, user account management, folder management, scheduled downloads, and DHCP/manual network settings. Backup Function You can schedule the DNS-G120 to automatically create full or incremental backups of important information on the network. * Maximum wireless signal rate - D-Link DNS-G120 | Manual - Page 6
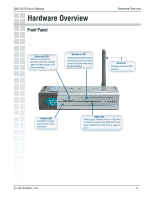
DNS-G120 User's Manual Hardware Overview Front Panel Hardware Overview Ethernet LED Solid green indicates an Ethernet connection. Blinking green indicates activity on the Ethernet network. Wireless LED Indicates that the DNS-G120 is properly connected to a wireless network and blinks when data is - D-Link DNS-G120 | Manual - Page 7
DNS-G120 User's Manual Hardware Overview Rear Panel Hardware Overview Ethernet Port Connects to your router or switch using the included Ethernet cable. Power Receptor Receptor for the provided power adapter. Disconnect Button Press this button to safely disconnect USB drives from the DNS-G120. - D-Link DNS-G120 | Manual - Page 8
DNS-G120 User's Manual Getting Started Getting Started When you have completed the steps in this Quick Installation Guide, your connected network may look similar to this: D-Link Systems, Inc. 8 - D-Link DNS-G120 | Manual - Page 9
DNS-G120 User's Manual Hardware Installation Hardware Installation It is required that an Ethernet cable is used during initial setup. Once your wireless configuration is set, you may disconnect the Ethernet cable and reboot the DNS-G120 to connect to your wireless network. 1 Attach the provided - D-Link DNS-G120 | Manual - Page 10
DNS-G120 User's Manual Wireless Basics Wireless Installation Considerations The DNS-G120 lets you access your stored data and media files using a wireless connection from virtually anywhere within the operating range of your wireless network. Keep in mind, however, that the number, thickness and - D-Link DNS-G120 | Manual - Page 11
-G120 User's Manual Windows Connect Now Windows® Connect Now (WCN) Note: This feature is only available through Windows XP with Service Pack 2 installed. In this section, you will learn how to use the Wireless Network Setup Wizard to easily and securely set up the DNS-G120 on a wireless network - D-Link DNS-G120 | Manual - Page 12
DNS-G120 User's Manual Windows Connect Now Windows® Connect Now (Continued) Enter the network name (SSID). If you want Windows to assign a random network key (encryption key), select Automatically assign a network key. If you want to manually assign a network key select Manually assign a network - D-Link DNS-G120 | Manual - Page 13
DNS-G120 User's Manual Windows Connect Now Windows® Connect Now (Continued) This screen Click Next. When the DNS-G120 wireless setup is successful, a window similar to this one will appear. You have completed the wireless configuration of the DNS-G120. Click Finish. D-Link Systems, Inc. 13 - D-Link DNS-G120 | Manual - Page 14
DNS-G120 User's Manual Connecting to a Wireless Network Connecting to a Wireless Network If you have configured the wireless settings using Windows® Connect Now (WCN), you may skip this section and continue to page 16. Open your Web browser and type http://DNS-G120 into the URL address box and - D-Link DNS-G120 | Manual - Page 15
DNS-G120 User's Manual Connecting to a Wireless Network Connecting to a Wireless Network (continued) Select an available wireless network by clicking on the radio button under Join. Click Connect If the wireless network you've selected has any wireless security enabled, you will be prompted to - D-Link DNS-G120 | Manual - Page 16
-G120 User's Manual Mapping a Drive Mapping a Drive You can use the D-Link Easy Search Utility to map drives to your computer. Insert the DNS-G120 CD into your CD-ROM drive. Click Launch D-Link Easy Search Utility. Highlight an available DNS-G120. Available shares will be displayed under Link - D-Link DNS-G120 | Manual - Page 17
DNS-G120 User's Manual Mapping a Drive Mapping a Drive (continued) As an alternate method, you can access the DNS-G120's USB drive(s) by mapping the shared folders as drives in Windows. Please see the following instructions for mapping a USB drive so that it is accessible from the My Computer - D-Link DNS-G120 | Manual - Page 18
DNS-G120 User's Manual Mapping a Drive Mapping a Drive (continued) Once connected, all shared folders will appear in My Computer. Double-click the My Computer icon on your desktop. Double-click on the mapped drive to access the files and folders. D-Link Systems, Inc. 18 - D-Link DNS-G120 | Manual - Page 19
to access the web-based utility. To assign a static IP, highlight the DNS-G120 and select Disabled from the DHCP Client drop-down menu. Enter the new IP address and network settings. Click Apply to save the settings. Refer to page 16 for Mapping a Drive instructions. D-Link Systems, Inc. 19 - D-Link DNS-G120 | Manual - Page 20
DNS-G120 User's Manual Using the Configuration Utility Using the Configuration Utility To log into the web-based configuration of the DNS-G120, you may run the Easy Search Utility included on your CD or type http://DNS-G120 into a web browser. Open your Web browser and type http://DNS-G120 into the - D-Link DNS-G120 | Manual - Page 21
DNS-G120 User's Manual Home > Wizard Using the Configuration Utility The Home>Wizard screen will appear. Click Run Wizard and the Setup Wizard will guide you through the basic configuration. For a tour of the Wizard, of each screen after you have made a configuration change. D-Link Systems, Inc. 21 - D-Link DNS-G120 | Manual - Page 22
DNS-G120 User's Manual Using the Setup Wizard The Wizard will guide you through five steps: - Password - Time Zone - LAN Connection - Additional settings - Wireless Settings Click Next Create a new password for your DNS-G120. Click Next Select your Time Zone from the drop-down menu. Click Next D-Link - D-Link DNS-G120 | Manual - Page 23
for the DNS-G120. Click Next If you have configured the wireless settings using Windows® Connect Now (WCN), click Next without any configuration changes. Refer to page 11 for WCN setup instructions. By default, the wireless function is disabled. To connect to a wireless network, select Enable - D-Link DNS-G120 | Manual - Page 24
DNS-G120 User's Manual Using the Setup Wizard (continued) Using the Setup Wizard Click Restart You have completed the basic configuration of the DNS-G120 using the setup wizard! Please see the following pages for a complete overview of the Web-based configuration utility. D-Link Systems, Inc. 24 - D-Link DNS-G120 | Manual - Page 25
DNS-G120 User's Manual Home > LAN Using the Configuration Utility DHCP Client/ Select either DHCP Client (default) if you have a DHCP server or Static IP: router on your network, or Static IP if you want to assign the network settings manually. IP Address: Enter the IP address of the DNS-G120 here, - D-Link DNS-G120 | Manual - Page 26
DNS-G120 User's Manual Home > Wireless Using the Configuration Utility Wireless: Select Enabled or Disabled. Connection Mode: Select the network type from the drop-down menu. Infrastructure - Connect to an access point or router. Ad-Hoc - Connect to another wireless client (peer-to-peer). SSID: - D-Link DNS-G120 | Manual - Page 27
DNS-G120 User's Manual Using the Configuration Utility Security The DNS-G120 offers 2 types of wireless security - WEP and WPA-PSK. WEP (Wired Equivalent Privacy) is a method of encrypting data for wireless communication intended to provide the same level of privacy as a wired network the network. - D-Link DNS-G120 | Manual - Page 28
User's Manual Home > Device Using the Configuration Utility Workgroup: Enter the name of the workgroup of your network. Name: Enter a name for the DNS-G120 device. This is useful if you have more than one DNS-G120 devices on the network. Description: Enter a description of the DNS-G120. D-Link - D-Link DNS-G120 | Manual - Page 29
DNS-G120 User's Manual Advanced > User Using the Configuration Utility User Name: Enter a user name. Password: Enter a password for the user. Comfirm Password: Enter the password again for confirmation. Apply: Click Apply to save your settings. Users you create will be listed under User List. To - D-Link DNS-G120 | Manual - Page 30
DNS-G120 User's Manual Advanced > Network Access Using the Configuration Utility User: Select a user from the drop-down menu or check All Accounts. Path: Click Open and select the folder from the USB drive that you would like to - D-Link DNS-G120 | Manual - Page 31
DNS-G120 User's Manual Using the Configuration Utility Advanced > Network Access (continued) To create a network access rule, you must first delete the default rule by clicking on the trash can icon. Once the rule is deleted, users will not be able to access the USB drive(s) until new rules have - D-Link DNS-G120 | Manual - Page 32
DNS-G120 User's Manual Using the Configuration Utility Advanced > FTP Server You can use the built-in FTP server to allow users from the Internet or Intranet FTP access to the drive(s) or folder(s) that you want to share. User: Select a user save your share/permissions. D-Link Systems, Inc. 32 - D-Link DNS-G120 | Manual - Page 33
DNS-G120 User's Manual Advanced > FTP Server (continued) Using the Configuration Utility Max User: Select the maximum number of users allowed to connect via FTP at one time from the drop-down menu. Idle Time: Select the idle time (1-10 minutes). Users will be disconnected when idle for the specified - D-Link DNS-G120 | Manual - Page 34
DNS-G120 User's Manual Advanced > FTP Server (continued) Using the Configuration Utility Example: Log into the web-based configuration by launching the Easy Search Utility or by opening a web browser and entering http://dns-g120. Click Advanced and then click FTP Server. Select a user from the - D-Link DNS-G120 | Manual - Page 35
Anonymous user access to the root folder on the drive with Read-Only permissions. You may edit a rule from the list by clicking on the icon. To delete a rule from the list, click on the icon. To access the FTP server from your local network, open a web browser and enter ftp://dns-g120 and - D-Link DNS-G120 | Manual - Page 36
DNS-G120 User's Manual Tools > Admin Using the Configuration Utility The Admin screen will allow you to change the Admin password. User Name: The user name is set to admin. You cannot change the user name. Password: Enter the old password. New Password: Enter your new password. Confirm Password: - D-Link DNS-G120 | Manual - Page 37
DNS-G120 User's Manual Using the Configuration Utility Tools > Time This section will set the DNS-G120 internal clock. It is important that accurate time is set for scheduled downloading and backup of files and folders. Current Time is displayed in 24-hour format (e.g. 14:00 is 2:00pm). Current - D-Link DNS-G120 | Manual - Page 38
DNS-G120 User's Manual Tools > System Using the Configuration Utility System Restart: Click Restart to reboot your DNS-G120. Restore to Factory Click Restore to reset the DNS-G120 back to the Defaults: factory default settings - erasing all changes you have made. Idle Time: Enter the time (in - D-Link DNS-G120 | Manual - Page 39
DNS-G120 User's Manual Tools > Firmware Using the Configuration Utility Browse: After you have downloaded the firmware upgrade file to your hard drive, click Browse to find the upgrade. When you have found it, click Open in the browser window and click Apply in this screen to begin the firmware upgrade - D-Link DNS-G120 | Manual - Page 40
DNS-G120 User's Manual Status > Device Info Using the Configuration Utility LAN Info: The LAN Info section will display the network settings of the DNS-G120. Device Info: The workgroup, name, and description of the DNS-G120 will be displayed in this section. Wireless Info: The Wireless Info section - D-Link DNS-G120 | Manual - Page 41
DNS-G120 User's Manual Help Using the Configuration Menu This section lists all of the available help topics for reference. Click on a topic to view the online help information. D-Link Systems, Inc. 41 - D-Link DNS-G120 | Manual - Page 42
DNS-G120 User's Manual Using the Configuration Menu Download Scheduling This function will allow the user to set up scheduled folder or file downloads and backup jobs. To log into the web-based configuration of the DNS-G120, you may run the Easy Search Utility included on your CD or type in http:// - D-Link DNS-G120 | Manual - Page 43
DNS-G120 User's Manual Download Scheduling (continued) Using the Configuration Menu Login Method: Select the appropriate login method to access files for download: · Account - If the download site employs restricted access, check this button and enter in the User (same network as DNS-G120) shared fi - D-Link DNS-G120 | Manual - Page 44
DNS-G120 User's Manual Using the Configuration Menu Download Scheduling (continued) Test: This button is provided to test the given URL to make sure it is valid as well as the user name/password authentication set in login method. Local: This button will let you set the source file or folder from - D-Link DNS-G120 | Manual - Page 45
DNS-G120 User's Manual Scheduling > Status Using the Configuration Menu The Status Schedule List will show pending or completed download events. Current download statistics, such as % completed and download speed are displayed for each event. The icons below represent the current status of each - D-Link DNS-G120 | Manual - Page 46
DNS-G120 User's Manual Networking Basics Networking Basics To name your computer n Windows XP, please follow these directions. Properties window. You may enter a Computer Description if you wish; this field is optional. To rename the computer and join a domain, Click Change. D-Link Systems, - D-Link DNS-G120 | Manual - Page 47
DNS-G120 User's Manual Networking Basics In this window, enter the Computer name. Select Workgroup and enter the name of the Workgroup. All computers on your network must have the same Workgroup name. Click OK. D-Link Systems, Inc. 47 - D-Link DNS-G120 | Manual - Page 48
DNS-G120 User's Manual Networking Basics Checking the IP Address in Windows XP The wireless adapter-equipped computers in your network must be in the same IP Address range (see Getting Started in this manual for a definition of IP Address Range). To check the IP Address of the adapter, please do - D-Link DNS-G120 | Manual - Page 49
DNS-G120 User's Manual Networking Basics Assigning a Static IP Address in Windows XP/2000 Note: DHCP-enabled routers will automatically assign IP addresses to the computers on the network, using DHCP (Dynamic Host Configuration Protocol) technology. If you are using a DHCP-capable router you will - D-Link DNS-G120 | Manual - Page 50
DNS-G120 User's Manual Right-click on Local Area Connections. Double-click on Properties. Networking Basics Click on Internet Protocol (TCP/IP). Click Properties. Input your IP address and subnet mask. (The IP addresses on your network must be within the same range. For example, if one - D-Link DNS-G120 | Manual - Page 51
DNS-G120 User's Manual Networking Basics Input your DNS server addresses. (Note: If you are entering a DNS server, you must enter the IP address of the default gateway.) The DNS server information will be supplied by your ISP (Internet Service Provider.) Click OK. Checking the Wireless - D-Link DNS-G120 | Manual - Page 52
DNS-G120 User's Manual Troubleshooting Troubleshooting 1. Why does my wireless connection keep dropping? Antenna Orientation- Try different antenna orientations for the DNS-G120. Try to keep the antenna at least 6 inches away from the wall or other objects. If you are using 2.4GHz cordless - D-Link DNS-G120 | Manual - Page 53
DNS-G120 User's Manual Technical Specifications Technical Specifications Standards • IEEE 802.11 • IEEE 802.11b • IEEE 802.11g • IEEE 802.3 • IEEE 802.3u • USB 1.1 • USB 2.0 • WCN (Windows Connect Now) Device Management • Web-Based - Internet Explorer v6 or later; Netscape Navigator v7 or later; or - D-Link DNS-G120 | Manual - Page 54
DNS-G120 User's Manual Wireless Transmit Power • 802.11b - 16 dBm • 802.11g - 12 dBm Receiver Sensitivity • 54 Mbps OFDM, 10 • FCC Part 15 Class B Dimensions • L = 5.6 inches (142mm) • W = 4.3 inches (109mm) • H = 1.2 inches (30mm) Warranty • 1 Year Technical Specifications D-Link Systems, Inc. 54 - D-Link DNS-G120 | Manual - Page 55
DNS-G120 User's Manual Contacting Technical Support Contacting Technical Support You can find software updates and user documentation on the D-Link website. D-Link provides free technical support for customers within the United States and within Canada for the duration of the warranty period on - D-Link DNS-G120 | Manual - Page 56
DNS-G120 User's Manual Warranty Subject to the terms and conditions set forth herein, D-Link Systems, Inc. ("D-Link") provides this Limited Warranty: · Only to the person or entity that originally purchased the product from D-Link or its authorized reseller or distributor, and · Only for products - D-Link DNS-G120 | Manual - Page 57
DNS-G120 User's Manual software, firmware or other products or services provided by anyone other than D-Link; and Products that have been purchased from inventory clearance or liquidation sales or other sales in which D-Link adaptation without permission from D-Link Corporation/D-Link the instructions, - D-Link DNS-G120 | Manual - Page 58
DNS-G120 User's Manual Warranty FCC Caution: The manufacturer is not responsible for any radio or TV interference caused by unauthorized modifications to this equipment; such modifications could void the user must not be operated in conjunction with any other antenna. D-Link Systems, Inc. 58 - D-Link DNS-G120 | Manual - Page 59
DNS-G120 User's Manual Registration Registration Product registration is entirely voluntary and failure to complete or return this form will not diminish your warranty rights. 05/25/2005 D-Link Systems, Inc. 59
-
 1
1 -
 2
2 -
 3
3 -
 4
4 -
 5
5 -
 6
6 -
 7
7 -
8
-
9
-
10
-
11
-
12
-
13
-
14
-
15
-
16
-
17
-
18
-
19
-
20
-
21
-
22
-
23
-
24
-
25
-
26
-
27
-
28
-
29
-
30
-
31
-
32
-
33
-
34
-
35
-
36
-
37
-
38
-
39
-
40
-
41
-
42
-
43
-
44
-
45
-
46
-
47
-
48
-
49
-
50
-
51
-
52
-
53
-
54
-
55
-
56
-
57
-
58
-
59
 |
 |