D-Link DWS-3026 Product Manual - Page 169
Configuring the Captive Portal, CP Summary, Security > Captive Portal > CP Configuration, Delete
 |
View all D-Link DWS-3026 manuals
Add to My Manuals
Save this manual to your list of manuals |
Page 169 highlights
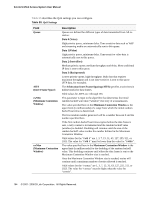
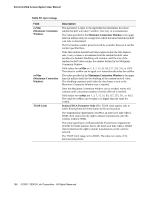
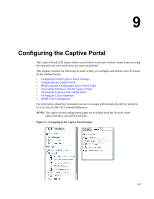
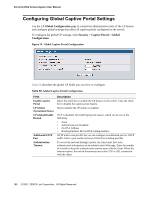
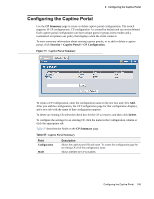
9 Configuring the Captive Portal Configuring the Captive Portal Use the CP Summary page to create or delete captive portal configurations. The switch supports 10 CP configurations. CP configuration 1 is created by default and can not be deleted. Each captive portal configuration can have unique guest or group access modes and a customized acceptance use policy that displays when the client connects. To view summary information about existing captive portals, or to add or delete a captive portal, click Security > Captive Portal > CP Configuration. Figure 77. Captive Portal Summary To create a CP configuration, enter the configuration name in the text box and click Add. After you add the configuration, the CP Configuration page for that configuration displays, and a new tab with the name of that configuration appears. To delete an existing CP, select the check box for the CP to remove, and then click Delete. To configure the settings for an existing CP, click the name in the Configuration column or click the appropriate tab. Table 57 describes the fields on the CP Summary page. Table 57. Captive Portal Summary Field Configuration Mode Description Shows the captive portal ID and name. To access the configuration page for an exiting CP, click the configuration name. Shows whether the CP is enabled. Configuring the Captive Portal 169
-
 1
1 -
2
-
3
-
4
-
5
-
6
-
7
-
8
-
9
-
10
-
11
-
12
-
13
-
14
-
15
-
16
-
17
-
18
-
19
-
20
-
21
-
22
-
23
-
24
-
25
-
26
-
27
-
28
-
29
-
30
-
31
-
32
-
33
-
34
-
35
-
36
-
37
-
38
-
39
-
40
-
41
-
42
-
43
-
44
-
45
-
46
-
47
-
48
-
49
-
50
-
51
-
52
-
53
-
54
-
55
-
56
-
57
-
58
-
59
-
60
-
61
-
62
-
63
-
64
-
65
-
66
-
67
-
68
-
69
-
70
-
71
-
72
-
73
-
74
-
75
-
76
-
77
-
78
-
79
-
80
-
81
-
82
-
83
-
84
-
85
-
86
-
87
-
88
-
89
-
90
-
91
-
92
-
93
-
94
-
95
-
96
-
97
-
98
-
99
-
100
-
101
-
102
-
103
-
104
-
105
-
106
-
107
-
108
-
109
-
110
-
111
-
112
-
113
-
114
-
115
-
116
-
117
-
118
-
119
-
120
-
121
-
122
-
123
-
124
-
125
-
126
-
127
-
128
-
129
-
130
-
131
-
132
-
133
-
134
-
135
-
136
-
137
-
138
-
139
-
140
-
141
-
142
-
143
-
144
-
145
-
146
-
147
-
148
-
149
-
150
-
151
-
152
-
153
-
154
-
155
-
156
-
157
-
158
-
159
-
160
-
161
-
162
-
163
-
 164
164 -
 165
165 -
 166
166 -
 167
167 -
 168
168 -
 169
169 -
 170
170 -
 171
171 -
 172
172 -
 173
173 -
 174
174 -
175
-
176
-
177
-
178
-
179
-
180
-
181
-
182
-
183
-
184
-
185
-
186
-
187
-
188
-
189
-
190
-
191
-
192
-
193
-
194
-
195
-
196
-
197
-
198
-
199
-
200
-
201
-
202
-
203
-
204
-
205
-
206
-
207
-
208
-
209
-
210
-
211
-
212
-
213
-
214
-
215
-
216
-
217
-
218
-
219
-
220
-
221
-
222
-
223
-
224
-
225
-
226
-
227
-
228
-
229
-
230
-
231
-
232
-
233
-
234
-
235
-
236
-
237
-
238
-
239
-
240
-
241
-
242
-
243
-
244
-
245
-
246
-
247
-
248
-
249
-
250
-
251
-
252
-
253
-
254
-
255
-
256
-
257
-
258
-
259
-
260
-
261
-
262
-
263
-
264
-
265
-
266
-
267
-
268
-
269
-
270
 |
 |
