DELPHI TNR800 Installation Guide - Page 12
Remove the Radio.
 |
View all DELPHI TNR800 manuals
Add to My Manuals
Save this manual to your list of manuals |
Page 12 highlights
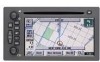
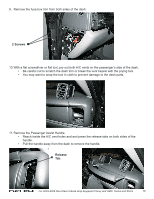
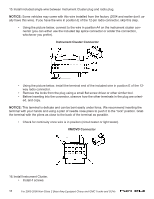
5. Remove the Radio. • Remove the three screws and hold the radio in place. The screws are the only thing holding the radio in place, so hold the radio once the screws are removed. • Turn the key to the "On" position (with the engine off) and put the gear selector in 1st. WARNING - Make sure the parking brake is set. If you don't the vehicle could move and cause personal injury or damage to the vehicle. • Pull out the radio and disconnect the connections in the rear. • Coaxial Antenna Lead (pull perpendicular to the radio to remove). • XM/DVD/AUX plug (12-pin, if equipped). • Main radio connector (24-pin). 6. Remove the instrument cluster. • Remove the four 7 mm screws. • Retate the bottom of the cluster out and disconnect the plug on the back. • Squeeze the tabs and wiggle the connector to remove. 7. Put the gear selector in Park and turn the key to the "Off" position. 8. Remove the driver and passenger side A-Pillar trim. • There is only one clip at the top of the trim piece. • Pull on both sides diagonally away from the pillar. • You may have to remove part of the weather-stripping from around the door frame to get a good grip on the A-Pillar trim. • To remove the weather-stripping, pull straight down to the middle of the door frame. 12 For 2003-2006 Non-Class 2 Bose Amp Equipped Chevy and GMC Trucks and SUVs
-
 1
1 -
2
-
3
-
4
-
5
-
6
-
 7
7 -
 8
8 -
 9
9 -
 10
10 -
 11
11 -
 12
12 -
 13
13 -
 14
14 -
 15
15 -
 16
16 -
 17
17 -
18
-
19
 |
 |
