DIRECTV HR22 Quick Start Guide - Page 6
Verify that You are Connected, QUICK START GUIDE
 |
View all DIRECTV HR22 manuals
Add to My Manuals
Save this manual to your list of manuals |
Page 6 highlights
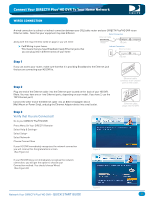
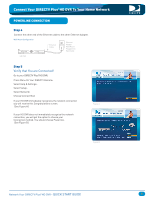
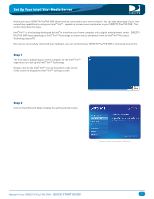
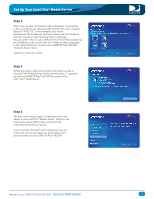
Connect Your DIRECTV Plus®HD DVR To Your Home Network WIRELESS CONNECTION A wireless connection uses your own wireless router and a wireless transceiver to send data from your DSL/cable router to the DIRECTV Plus® HD DVR. Please be advised that DIRECTV does not recommend using a wireless device, because it may not provide the best experience. For the best digital entertainment experience, the better options are Wired and Powerline. However if you prefer to use Wireless, you must follow the manufacturer's directions on configuring your Wireless device. These instructions will help you to make the right connections to your DIRECTV Plus® HD DVR. Along with the requirements listed on page 2, you will need: A Wireless Transceiver that uses an Ethernet Port to connect to a media device. A Wireless Router (in place of a regular router). Ethernet Cable Wireless Transceiver HD DVR Step 1 Connect one end of an Ethernet cable to the LAN port on the back of the wireless transceiver. Step 2 Connect the other end of the Ethernet cable to the DIRECTV Plus® HD DVR jack labeled ETHERNET. (Note: You may have one or two Ethernet ports, depending on your model. If you have 2, use the TOP Ethernet port.) Step 3 Verify that You are Connected! Go to your DIRECTV Plus®HD DVR: Press Menu On Your DIRECTV Remote> Select Help & Settings> Select Setup> Select Network> Choose Connect Now If your HD DVR immediately recognizes the network connection you will receive this Congratulations screen. (See Figure A.) If your HD DVR does not immediately recognize the network connection, you will get the option to choose your Connection method. You should choose Wireless. (See Figure B.) Figure A Ethernet cable connects to the LAN port of the wireless transceiver. Ethernet cable plugs into HD DVR. Figure B Network Your DIRECTV Plus®HD DVR - QUICK START GUIDE 6
-
 1
1 -
 2
2 -
 3
3 -
 4
4 -
 5
5 -
 6
6 -
 7
7 -
 8
8 -
 9
9 -
 10
10 -
 11
11
 |
 |
