Dell 1700 Owner's Manual - Page 40
Run the Installation Software - drivers
 |
UPC - 807027103116
View all Dell 1700 manuals
Add to My Manuals
Save this manual to your list of manuals |
Page 40 highlights
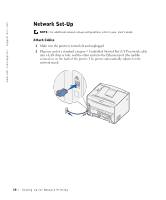
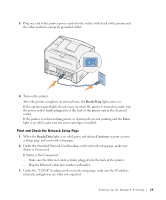
www.dell.com/supplies | support.dell.com If you need to change the IP address, run the Set IP Address Utility from the Drivers and Utilities CD. Run the Installation Software 1 Insert the Drivers and Utilities CD into your computer. 2 The Drivers and Utilities CD should launch the installation software automatically. If the CD does not automatically launch, click Start→Run, type D:\setup.exe (where D is the drive letter of your CD), and then click OK. 3 When the Drivers and Utilities CD screen appears, click Network Installation - Install the printer for use on a network. 4 For local installation, select Install printer on this computer, and then click Next. For remote installation: a Select Install printer on one or more remote computers, and then click Next. b Enter your Administrator user name and password, and then click Add. c Select the clients or servers, and then click Next. 5 Select the network printer you would like to install. If you do not see your printer listed, click Update to refresh the list or click Add Printer to add a printer to the network. If you are setting up a print server, proceed to step 6. A print server is a computer that manages all client print jobs on a network. If you are setting up a client, skip to step 7. A client is one computer that is directly attached to the printer. 6 Select I am setting up this printer on a server, and then click Next. 7 Select your printer from the list. If you would like to change the printer name listed, enter a new name in the Printer Name field. 8 If you want other users on the network to access this printer, select Share this printer with other computers, and then enter a share name that users will easily identify. 9 Click Next. 10 Select the software and documentation you want to install, and then click Install. For more information, see "Software Overview" on page 43. 11 When the Congratulations! screen appears, select whether or not to restart your computer, and then click Finish. 40 Setting Up for Network Printing
-
 1
1 -
2
-
3
-
4
-
5
-
6
-
7
-
8
-
9
-
10
-
11
-
12
-
13
-
14
-
15
-
16
-
17
-
18
-
19
-
20
-
21
-
22
-
23
-
24
-
25
-
26
-
27
-
28
-
29
-
30
-
31
-
32
-
33
-
34
-
 35
35 -
 36
36 -
 37
37 -
 38
38 -
 39
39 -
 40
40 -
 41
41 -
 42
42 -
 43
43 -
 44
44 -
 45
45 -
46
-
47
-
48
-
49
-
50
-
51
-
52
-
53
-
54
-
55
-
56
-
57
-
58
-
59
-
60
-
61
-
62
-
63
-
64
-
65
-
66
-
67
-
68
-
69
-
70
-
71
-
72
-
73
-
74
-
75
-
76
-
77
-
78
-
79
-
80
-
81
-
82
-
83
-
84
-
85
-
86
-
87
-
88
-
89
-
90
-
91
-
92
-
93
-
94
-
95
-
96
-
97
-
98
-
99
-
100
-
101
-
102
 |
 |
