Dell 2355DN User Guide - Page 18
Unpacking Your Printer, Dell 2355dn Laser MFP
 |
View all Dell 2355DN manuals
Add to My Manuals
Save this manual to your list of manuals |
Page 18 highlights
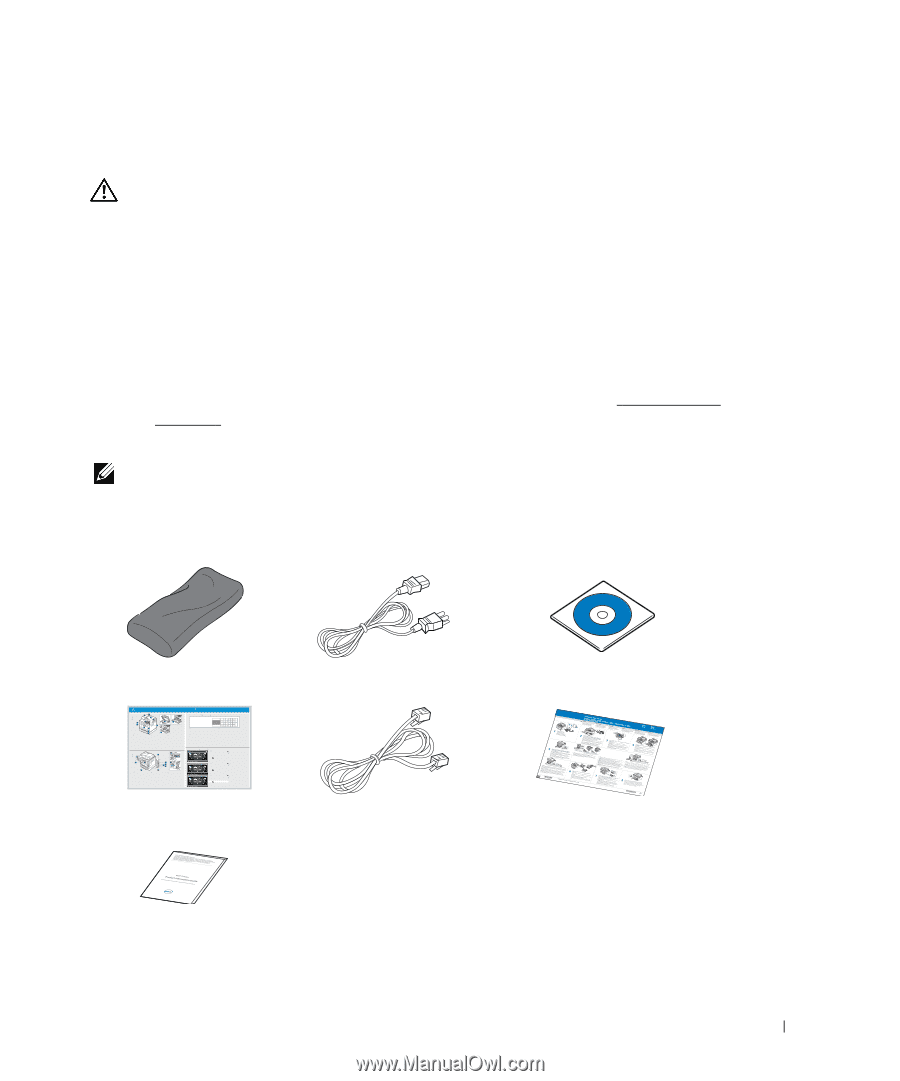
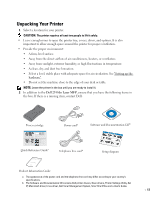
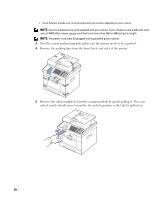
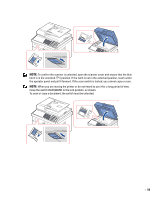
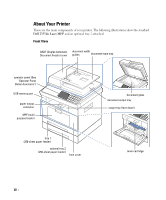
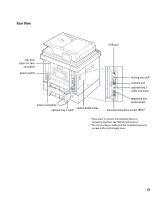
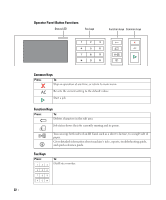
Unpacking Your Printer 1 Select a location for your printer. CAUTION: The printer requires at least two people to lift it safely. • Leave enough room to open the printer tray, covers, doors, and options. It is also important to allow enough space around the printer for proper ventilation. • Provide the proper environment: • A firm, level surface. • Away from the direct airflow of air conditioners, heaters, or ventilators. • Away from sunlight, extreme humidity, or high fluctuations in temperature. • A clean, dry, and dust free lowcation. • Select a level, stable place with adequate space for air circulation. See "Setting up the hardware". • Do not set the machine close to the edge of your desk or table. NOTE: Leave the printer in the box until you are ready to install it. 2 In addition to the Dell 2355dn Laser MFP, ensure that you have the following items in the box. If there is a missing item, contact Dell: Toner cartridge Dell 2355dn MFP Quick Reference Guide Quick Reference Guide Quick Reference Guide Front 2 1 Front 3 Front 4 5 11 12 Front 13 6 7 8 1. DADF 2. Document width guides 3. Document input tray 4. Document output tray 5. Operator panel 6. Output tray (face down) 7. MPF (Multi purpose feeder) 8. Front cover 9. Tray 1 10. Optional tray 2 11. USB memory port 12. Paper output extension 13. Document glass 14. Toner cartridge 15. Express šervice code 19 10 15 1. DADF 2. Document width guides 3. Document input tray 4. Document output tray 5. Operator panel 6. Output tray (face down) 7. MPF (Multi purpose feeder) 8. Front cover 9. Tray 1 10. Optional tray 2 11. USB memory port 12. Paper output extension 13. Document glass 14. Toner cartridge 15. Express šervice code Back Back 1 Back 10 14 1. DADF 2. Document width guides 3. Document input tray 4. Document output tray 5. Operator panel 6. Output tray (face down) 7. MPF (Multi purpose feeder) 8. Front cover 9. Tray 1 10. Optional tray 2 11. USB memory port 12. Paper output extension 13. Document glass 14. Toner cartridge 15. Express šervice code 11 9 7 8 1. USB port 2. Locking slot 3. Network port 4. Optional tray 2 cable connector 5. Telephone line socket (Line) 6. Extension telephone socket (EXT) 7. Rear door 8. Power receptacle 9. Power switch 10. Express šervice code 11. Optional memory 12. Optional wireless card 2 12 3 4 5 6 1. USB port 2. Locking slot 3. Network port 4. Optional tray 2 cable connector 5. Telephone line socket (Line) 6. Extension telephone socket (EXT) 7. Rear door 8. Power receptacle 9. Power switch 10. Express šervice code 11. Optional memory 12. Optional wireless card 1. USB port 2. Locking slot 3. Network port 4. Optional tray 2 cable connector 5. Telephone line socket (Line) 6. Extension telephone socket (EXT) 7. Rear door 8. Power receptacle 9. Power switch 10. Express šervice code 11. Optional memory 12. Optional wireless card Operator Panel Operator Panel Operator Panel 1. LCD: Display. 2. Status LED: Shows the status of your machine. 3. Job Status button: Shows the jobs. 4. M/C Setup button: Leads you to the machine setup and advanced settings. 5 Start button: Initiate operation. 6. Cancel button: Cancel displayed operation. 1. LCD: Display. 2. Status LED: Shows the status of your machine. 3. Job Status button: Shows the jobs. 4. M/C Setup button: Leads you to the machine setup and advanced settings. 5 Start button: Initiate operation. 6. Cancel button: Cancel displayed operation. 1. LCD: Display. 2. Status LED: Shows the status of your machine. 3. Job Status button: Shows the jobs. 4. M/C Setup button: Leads you to the machine setup and advanced settings. 5 Start button: Initiate operation. 6. Cancel button: Cancel displayed operation. Touch Screen Touch Screen Touch Screen 1.Copy: Enters the copy menu. 2. Fax: Enters the fax menu. 3. Scan: Enters the scan menu. 4. Setup: Enters the advanced settings. 8. : Return to the upper menu. 9. : Scroll through available options. 10. : Start a job. 5. None: You can set the option which is frequently uses on main screen. Also you can change shortcut name as well. 6. : Shows the main screen. 7. : Enters the LCD brightness, the USB memory, language, and job status. 1.Copy: Enters the copy menu. 2. Fax: Enters the fax menu. 3. Scan: Enters the scan menu. 4. Setup: Enters the advanced settings. 8. : Return to the upper menu. 9. : Scroll through available options. 10. : Start a job. 5. None: You can set the option which is frequently uses on main screen. Also you can change shortcut name as well. 6. : Shows the main screen. 7. : Enters the LCD brightness, the USB memory, language, and job status. 1.Copy: Enters the copy menu. 2. Fax: Enters the fax menu. 3. Scan: Enters the scan menu. 4. Setup: Enters the advanced settings. 8. : Return to the upper menu. 9. : Scroll through available options. 10. : Start a job. 5. None: You can set the option which is frequently uses on main screen. Also you can change shortcut name as well. 6. : Shows the main screen. 7. : Enters the LCD brightness, the USB memory, language, and job status. Quick Reference Guidec Power corda Software and Documentation CDb Telephone line corda Setup diagram Product Information Guide a The appearance of the power cord and the telephone line cord may differ according to your country's specifications. b The Software and Documentation CD contains Dell printer drivers, Scan drivers, Printer Settings Utility, Set IP, Macintosh driver, Linux driver, Dell Toner Management System, SmarThru Office and a User's Guide. 17
-
 1
1 -
2
-
3
-
4
-
5
-
6
-
7
-
8
-
9
-
10
-
11
-
12
-
 13
13 -
 14
14 -
 15
15 -
 16
16 -
 17
17 -
 18
18 -
 19
19 -
 20
20 -
 21
21 -
 22
22 -
 23
23 -
24
-
25
-
26
-
27
-
28
-
29
-
30
-
31
-
32
-
33
-
34
-
35
-
36
-
37
-
38
-
39
-
40
-
41
-
42
-
43
-
44
-
45
-
46
-
47
-
48
-
49
-
50
-
51
-
52
-
53
-
54
-
55
-
56
-
57
-
58
-
59
-
60
-
61
-
62
-
63
-
64
-
65
-
66
-
67
-
68
-
69
-
70
-
71
-
72
-
73
-
74
-
75
-
76
-
77
-
78
-
79
-
80
-
81
-
82
-
83
-
84
-
85
-
86
-
87
-
88
-
89
-
90
-
91
-
92
-
93
-
94
-
95
-
96
-
97
-
98
-
99
-
100
-
101
-
102
-
103
-
104
-
105
-
106
-
107
-
108
-
109
-
110
-
111
-
112
-
113
-
114
-
115
-
116
-
117
-
118
-
119
-
120
-
121
-
122
-
123
-
124
-
125
-
126
-
127
-
128
-
129
-
130
-
131
-
132
-
133
-
134
-
135
-
136
-
137
-
138
-
139
-
140
-
141
-
142
-
143
-
144
-
145
-
146
-
147
-
148
-
149
-
150
-
151
-
152
-
153
-
154
-
155
-
156
-
157
-
158
-
159
-
160
-
161
-
162
-
163
-
164
-
165
-
166
-
167
-
168
-
169
-
170
-
171
-
172
-
173
-
174
-
175
-
176
-
177
-
178
-
179
-
180
-
181
-
182
-
183
-
184
-
185
-
186
-
187
-
188
-
189
-
190
-
191
-
192
-
193
-
194
-
195
-
196
-
197
-
198
-
199
-
200
-
201
-
202
-
203
-
204
-
205
-
206
-
207
-
208
-
209
-
210
-
211
-
212
-
213
-
214
-
215
-
216
-
217
-
218
-
219
-
220
-
221
-
222
-
223
-
224
-
225
-
226
-
227
-
228
-
229
-
230
-
231
-
232
-
233
-
234
-
235
-
236
-
237
-
238
-
239
-
240
-
241
-
242
-
243
-
244
-
245
-
246
-
247
-
248
-
249
-
250
-
251
-
252
-
253
-
254
-
255
-
256
-
257
-
258
-
259
-
260
-
261
-
262
-
263
-
264
-
265
-
266
-
267
-
268
-
269
-
270
-
271
-
272
-
273
-
274
-
275
-
276
-
277
-
278
-
279
-
280
-
281
-
282
-
283
-
284
-
285
-
286
-
287
-
288
-
289
-
290
-
291
-
292
-
293
-
294
-
295
-
296
-
297
-
298
-
299
-
300
-
301
-
302
-
303
-
304
-
305
-
306
-
307
-
308
-
309
-
310
-
311
-
312
-
313
-
314
-
315
-
316
-
317
-
318
-
319
-
320
 |
 |