Dell 2355DN User Guide - Page 4
Finding Information, What Are You Looking For? - drivers
 |
View all Dell 2355DN manuals
Add to My Manuals
Save this manual to your list of manuals |
Page 4 highlights
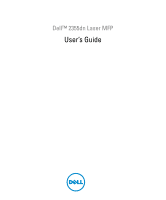
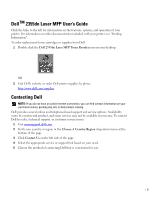
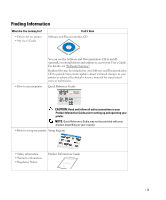
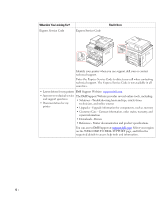
Finding Information What Are You Looking For? • Drivers for my printer • My User's Guide Find It Here Software and Documentation CD You can use the Software and Documentation CD to install, uninstall, or reinstall drivers and utilities or access your User's Guide. For details, see "Software Overview". Readme files may be included on your Software and Documentation CD to provide last-minute updates about technical changes to your printer or advanced technical reference material for experienced users or technicians. • How to use my printer Quick Reference Guide Dell 2355dn MFP Quick Reference Guide Quick Reference Guide Quick Reference Guide Front 2 1 Front 3 Front 4 5 11 12 Front 13 6 7 8 1. DADF 2. Document width guides 3. Document input tray 4. Document output tray 5. Operator panel 6. Output tray (face down) 7. MPF (Multi purpose feeder) 8. Front cover 9. Tray 1 10. Optional tray 2 11. USB memory port 12. Paper output extension 13. Document glass 14. Toner cartridge 15. Express šervice code 19 10 15 1. DADF 2. Document width guides 3. Document input tray 4. Document output tray 5. Operator panel 6. Output tray (face down) 7. MPF (Multi purpose feeder) 8. Front cover 9. Tray 1 10. Optional tray 2 11. USB memory port 12. Paper output extension 13. Document glass 14. Toner cartridge 15. Express šervice code Back Back 1 Back 10 14 1. DADF 2. Document width guides 3. Document input tray 4. Document output tray 5. Operator panel 6. Output tray (face down) 7. MPF (Multi purpose feeder) 8. Front cover 9. Tray 1 10. Optional tray 2 11. USB memory port 12. Paper output extension 13. Document glass 14. Toner cartridge 15. Express šervice code 11 9 7 8 1. USB port 2. Locking slot 3. Network port 4. Optional tray 2 cable connector 5. Telephone line socket (Line) 6. Extension telephone socket (EXT) 7. Rear door 8. Power receptacle 9. Power switch 10. Express šervice code 11. Optional memory 12. Optional wireless card 2 12 3 4 5 6 1. USB port 2. Locking slot 3. Network port 4. Optional tray 2 cable connector 5. Telephone line socket (Line) 6. Extension telephone socket (EXT) 7. Rear door 8. Power receptacle 9. Power switch 10. Express šervice code 11. Optional memory 12. Optional wireless card 1. USB port 2. Locking slot 3. Network port 4. Optional tray 2 cable connector 5. Telephone line socket (Line) 6. Extension telephone socket (EXT) 7. Rear door 8. Power receptacle 9. Power switch 10. Express šervice code 11. Optional memory 12. Optional wireless card Operator Panel Operator Panel Operator Panel 1. LCD: Display. 2. Status LED: Shows the status of your machine. 3. Job Status button: Shows the jobs. 4. M/C Setup button: Leads you to the machine setup and advanced settings. 5 Start button: Initiate operation. 6. Cancel button: Cancel displayed operation. 1. LCD: Display. 2. Status LED: Shows the status of your machine. 3. Job Status button: Shows the jobs. 4. M/C Setup button: Leads you to the machine setup and advanced settings. 5 Start button: Initiate operation. 6. Cancel button: Cancel displayed operation. 1. LCD: Display. 2. Status LED: Shows the status of your machine. 3. Job Status button: Shows the jobs. 4. M/C Setup button: Leads you to the machine setup and advanced settings. 5 Start button: Initiate operation. 6. Cancel button: Cancel displayed operation. Touch Screen Touch Screen Touch Screen 1.Copy: Enters the copy menu. 2. Fax: Enters the fax menu. 3. Scan: Enters the scan menu. 4. Setup: Enters the advanced settings. 8. : Return to the upper menu. 9. : Scroll through available options. 10. : Start a job. 5. None: You can set the option which is frequently uses on main screen. Also you can change shortcut name as well. 6. : Shows the main screen. 7. : Enters the LCD brightness, the USB memory, language, and job status. 1.Copy: Enters the copy menu. 2. Fax: Enters the fax menu. 3. Scan: Enters the scan menu. 4. Setup: Enters the advanced settings. 8. : Return to the upper menu. 9. : Scroll through available options. 10. : Start a job. 5. None: You can set the option which is frequently uses on main screen. Also you can change shortcut name as well. 6. : Shows the main screen. 7. : Enters the LCD brightness, the USB memory, language, and job status. 1.Copy: Enters the copy menu. 2. Fax: Enters the fax menu. 3. Scan: Enters the scan menu. 4. Setup: Enters the advanced settings. 8. : Return to the upper menu. 9. : Scroll through available options. 10. : Start a job. 5. None: You can set the option which is frequently uses on main screen. Also you can change shortcut name as well. 6. : Shows the main screen. 7. : Enters the LCD brightness, the USB memory, language, and job status. CAUTION: Read and follow all safety instructions in your Product Information Guide prior to setting up and operating your printer. NOTE: Quick Reference Gudie may not be provided with your product depending on your country. • How to set up my printer Setup diagram • Safety information • Warranty information • Regulatory Notice Product Information Guide 3
-
 1
1 -
 2
2 -
 3
3 -
 4
4 -
 5
5 -
 6
6 -
 7
7 -
 8
8 -
 9
9 -
 10
10 -
11
-
12
-
13
-
14
-
15
-
16
-
17
-
18
-
19
-
20
-
21
-
22
-
23
-
24
-
25
-
26
-
27
-
28
-
29
-
30
-
31
-
32
-
33
-
34
-
35
-
36
-
37
-
38
-
39
-
40
-
41
-
42
-
43
-
44
-
45
-
46
-
47
-
48
-
49
-
50
-
51
-
52
-
53
-
54
-
55
-
56
-
57
-
58
-
59
-
60
-
61
-
62
-
63
-
64
-
65
-
66
-
67
-
68
-
69
-
70
-
71
-
72
-
73
-
74
-
75
-
76
-
77
-
78
-
79
-
80
-
81
-
82
-
83
-
84
-
85
-
86
-
87
-
88
-
89
-
90
-
91
-
92
-
93
-
94
-
95
-
96
-
97
-
98
-
99
-
100
-
101
-
102
-
103
-
104
-
105
-
106
-
107
-
108
-
109
-
110
-
111
-
112
-
113
-
114
-
115
-
116
-
117
-
118
-
119
-
120
-
121
-
122
-
123
-
124
-
125
-
126
-
127
-
128
-
129
-
130
-
131
-
132
-
133
-
134
-
135
-
136
-
137
-
138
-
139
-
140
-
141
-
142
-
143
-
144
-
145
-
146
-
147
-
148
-
149
-
150
-
151
-
152
-
153
-
154
-
155
-
156
-
157
-
158
-
159
-
160
-
161
-
162
-
163
-
164
-
165
-
166
-
167
-
168
-
169
-
170
-
171
-
172
-
173
-
174
-
175
-
176
-
177
-
178
-
179
-
180
-
181
-
182
-
183
-
184
-
185
-
186
-
187
-
188
-
189
-
190
-
191
-
192
-
193
-
194
-
195
-
196
-
197
-
198
-
199
-
200
-
201
-
202
-
203
-
204
-
205
-
206
-
207
-
208
-
209
-
210
-
211
-
212
-
213
-
214
-
215
-
216
-
217
-
218
-
219
-
220
-
221
-
222
-
223
-
224
-
225
-
226
-
227
-
228
-
229
-
230
-
231
-
232
-
233
-
234
-
235
-
236
-
237
-
238
-
239
-
240
-
241
-
242
-
243
-
244
-
245
-
246
-
247
-
248
-
249
-
250
-
251
-
252
-
253
-
254
-
255
-
256
-
257
-
258
-
259
-
260
-
261
-
262
-
263
-
264
-
265
-
266
-
267
-
268
-
269
-
270
-
271
-
272
-
273
-
274
-
275
-
276
-
277
-
278
-
279
-
280
-
281
-
282
-
283
-
284
-
285
-
286
-
287
-
288
-
289
-
290
-
291
-
292
-
293
-
294
-
295
-
296
-
297
-
298
-
299
-
300
-
301
-
302
-
303
-
304
-
305
-
306
-
307
-
308
-
309
-
310
-
311
-
312
-
313
-
314
-
315
-
316
-
317
-
318
-
319
-
320
 |
 |