Dell Active Fabric Manager Active Fabric Manager Deployment Guide 1.5 - Page 46
Fabric Design – Step 6: Summary, Importing an Existing Fabric Design - 2 5 download
 |
View all Dell Active Fabric Manager manuals
Add to My Manuals
Save this manual to your list of manuals |
Page 46 highlights
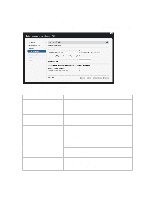
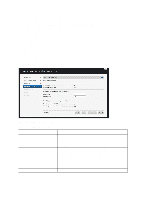
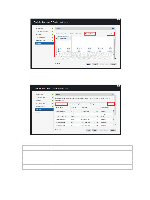
Usage Status • Current - Represents the links based on your current needs. • Future - Represents links based on the fabric's future needs. • Displays usage status: Current / Expansion. To review and export the fabric wiring plan: 1. Navigate to the Network > Design Fabric > New Fabric > Output screen. 2. Click on the type of wiring plan that you want to export: Tabular Wiring Plan, Graphical Wiring Plan, or Network Topology. 3. Click the Export link. The Generate Wiring Plan window displays. 4. Specify the following export options. a) PDF - Table Data, Graphical Wiring Plan, or Both. b) Visio - Network Topology Fabric Design - Step 6: Summary The Summary screen displays a summary of your fabric design. You can export the fabric design by click the Export link in the upper right of the screen, select a format PDF (Table Data, Graphical Wiring Plan, Both) or Visio, then click the Generate button. Carefully review the design before you commit the changes. To commit the changes, click Finish. Next Steps After you have designed the fabric, do the following to prepare it for deployment: 1. Check with your system administrator for the TFTP or FTP IP address. To stage the switch software images, use this address. When you prepare the software images: a) Make sure the software version is the same for each type of switch across the fabric. b) Download the software image for each type of Dell Networking switch. c) Stage the software images on the TFTP or FTP site. 2. Obtain a pool of management IP addresses from the lab or system administrator to use for the switches in the fabric. 3. Prepare the DHCP server so that the switches can be assigned a management IP address. 4. Download the comma separate values (.csv) file that contains the switch system MAC address, if available. If not available, consult Dell customer support. 5. Use the wiring plan to rack and cable the hardware according to the fabric design wiring plan. 6. Document the location of the switches, including the rack and row. 7. Document the system MAC address and name of the switches in the fabric so that you can map the address to the appropriate switch. 8. Select the fabric you are performing pre-deployment on at the Network > Fabric Name > Configure and Deploy > Pre-deployment Configuration screen. Importing an Existing Fabric Design To import an existing fabric design: 1. Navigate to the Home > Getting Started screen. 2. Click the Importing Existing Design option. 46
-
 1
1 -
2
-
3
-
4
-
5
-
6
-
7
-
8
-
9
-
10
-
11
-
12
-
13
-
14
-
15
-
16
-
17
-
18
-
19
-
20
-
21
-
22
-
23
-
24
-
25
-
26
-
27
-
28
-
29
-
30
-
31
-
32
-
33
-
34
-
35
-
36
-
37
-
38
-
39
-
40
-
 41
41 -
 42
42 -
 43
43 -
 44
44 -
 45
45 -
 46
46 -
 47
47 -
 48
48 -
 49
49 -
 50
50 -
 51
51 -
52
-
53
-
54
-
55
-
56
-
57
-
58
-
59
-
60
-
61
-
62
-
63
-
64
-
65
-
66
-
67
-
68
-
69
-
70
-
71
-
72
-
73
-
74
-
75
-
76
-
77
-
78
-
79
-
80
-
81
-
82
-
83
-
84
-
85
-
86
-
87
-
88
-
89
-
90
-
91
-
92
-
93
-
94
-
95
-
96
-
97
-
98
-
99
-
100
-
101
-
102
-
103
-
104
-
105
-
106
-
107
-
108
-
109
-
110
-
111
-
112
-
113
-
114
-
115
-
116
-
117
-
118
-
119
-
120
-
121
-
122
-
123
-
124
-
125
-
126
-
127
 |
 |
