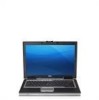
Dell D630 Service Manual - Page 81
Wireless Local Area Network WLAN, Cards
 |
UPC - 019801087219
View all Dell D630 manuals
Add to My Manuals
Save this manual to your list of manuals |
Page 81 highlights
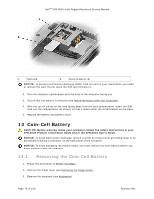
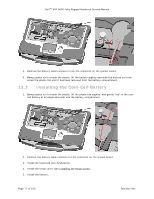
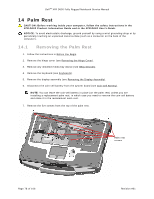
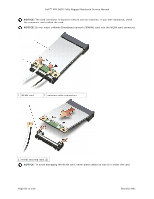
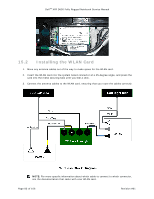
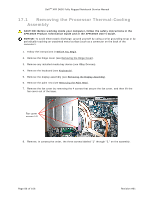
DellTM XFR D630 Fully Rugged Notebook Service Manual 5. Replace the display assembly (see Installing the Display Assembly). 173H 6. Replace the keyboard (see Keyboards). 174H 7. Replace the XBay device (see XBay Devices). 175H 8. Replace the hinge cover (see Installing the Hinge Cover). 176H 9. Install the battery. 15 Wireless Local Area Network (WLAN) Cards If you ordered a WLAN card with your computer, the card is already installed. CAUTION: Before you begin any of the procedures in this section, follow the safety instructions in the XFR D630 Product Information Guide and in the XFR D630 User's Guide. NOTICE: To avoid electrostatic discharge, ground yourself by using a wrist grounding strap or by periodically touching an unpainted metal surface (such as a connector on the back of the computer). 15.1 Removing the WLAN Card 1. Follow the procedures in Before You Begin. 17H 6. Remove the hinge cover (see Removing the Hinge Cover). 178H 3. Remove the keyboard (see Keyboards). 179H 4. Remove the display assembly (see Removing the Display Assembly). 180H 5. Remove the palm rest (see Removing the Palm Rest). 18H NOTICE: To prevent damage to the connector, do not use tools to release the securing tabs. 6. If a WLAN card is not already installed, go to step 5. If you are replacing a WLAN card, remove the existing card: a. Disconnect the antenna cables from the card. NOTE: The WLAN card may have two or three antenna connectors, depending on the type of card you have. b. Release the card by pushing the metal securing tabs away from the card until the card pops up slightly. c. Slide the card at a 45-degree angle out of its connector. Page 81 of 106 Revision A01
-
 1
1 -
2
-
3
-
4
-
5
-
6
-
7
-
8
-
9
-
10
-
11
-
12
-
13
-
14
-
15
-
16
-
17
-
18
-
19
-
20
-
21
-
22
-
23
-
24
-
25
-
26
-
27
-
28
-
29
-
30
-
31
-
32
-
33
-
34
-
35
-
36
-
37
-
38
-
39
-
40
-
41
-
42
-
43
-
44
-
45
-
46
-
47
-
48
-
49
-
50
-
51
-
52
-
53
-
54
-
55
-
56
-
57
-
58
-
59
-
60
-
61
-
62
-
63
-
64
-
65
-
66
-
67
-
68
-
69
-
70
-
71
-
72
-
73
-
74
-
75
-
 76
76 -
 77
77 -
 78
78 -
 79
79 -
 80
80 -
 81
81 -
 82
82 -
 83
83 -
 84
84 -
 85
85 -
 86
86 -
87
-
88
-
89
-
90
-
91
-
92
-
93
-
94
-
95
-
96
-
97
-
98
-
99
-
100
-
101
-
102
-
103
-
104
-
105
-
106
 |
 |
