Dell DX6000 Hardware Owner's Manual - Page 93
See Removing or Installing the Internal SD Module
 |
View all Dell DX6000 manuals
Add to My Manuals
Save this manual to your list of manuals |
Page 93 highlights
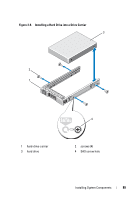
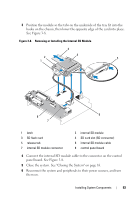
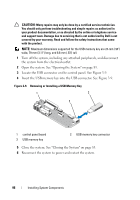
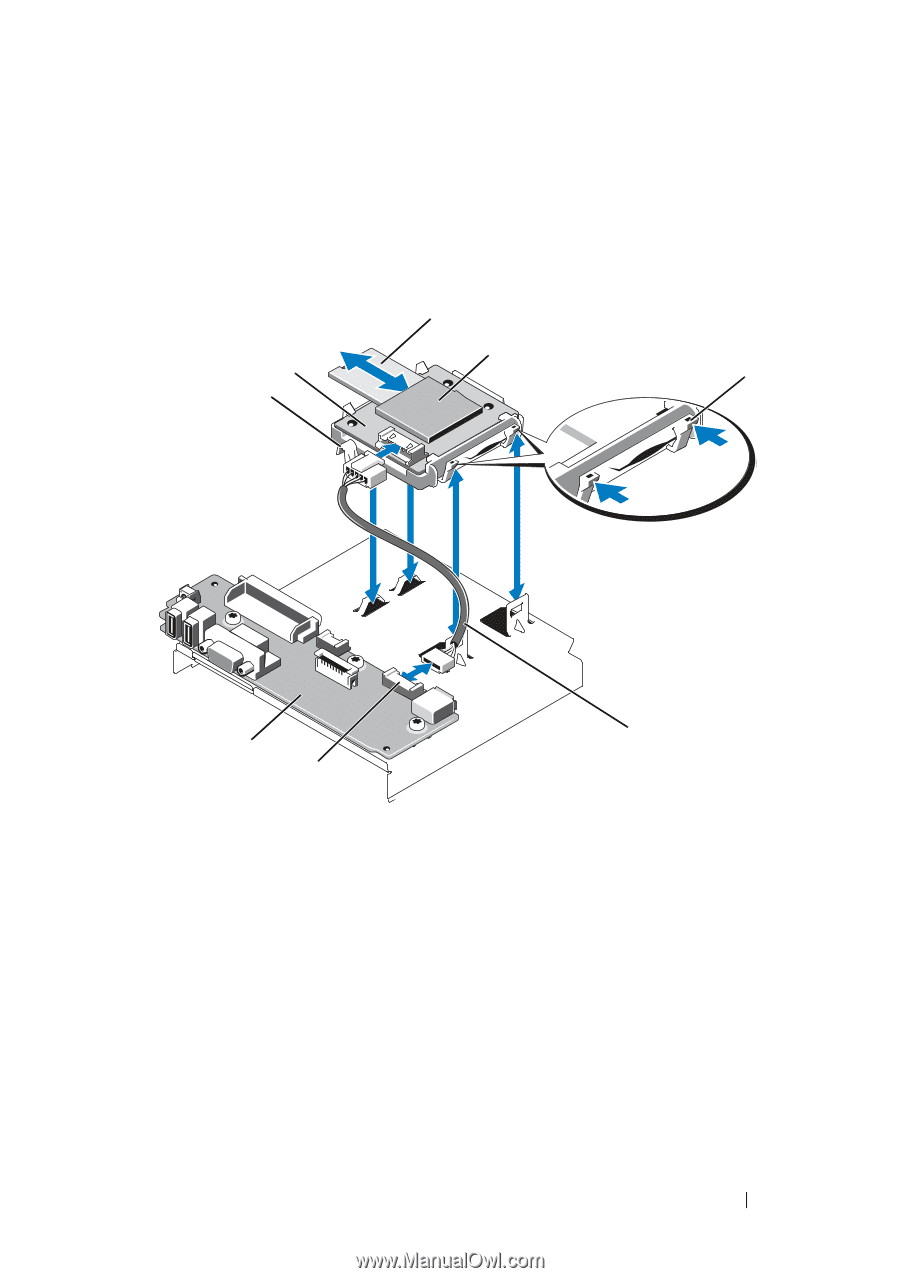
3 Position the module so the tabs on the underside of the tray fit into the hooks on the chassis, then lower the opposite edge of the card into place. See Figure 3-8. Figure 3-8. Removing or Installing the Internal SD Module 3 2 4 5 1 8 6 7 1 latch 3 SD flash card 5 release tab 7 internal SD module connector 2 internal SD module 4 SD card slot (SD connector) 6 internal SD module cable 8 control panel board 4 Connect the internal SD module cable to the connector on the control panel board. See Figure 3-8. 5 Close the system. See "Closing the System" on page 83. 6 Reconnect the system and peripherals to their power sources, and turn them on. Installing System Components 93
-
 1
1 -
2
-
3
-
4
-
5
-
6
-
7
-
8
-
9
-
10
-
11
-
12
-
13
-
14
-
15
-
16
-
17
-
18
-
19
-
20
-
21
-
22
-
23
-
24
-
25
-
26
-
27
-
28
-
29
-
30
-
31
-
32
-
33
-
34
-
35
-
36
-
37
-
38
-
39
-
40
-
41
-
42
-
43
-
44
-
45
-
46
-
47
-
48
-
49
-
50
-
51
-
52
-
53
-
54
-
55
-
56
-
57
-
58
-
59
-
60
-
61
-
62
-
63
-
64
-
65
-
66
-
67
-
68
-
69
-
70
-
71
-
72
-
73
-
74
-
75
-
76
-
77
-
78
-
79
-
80
-
81
-
82
-
83
-
84
-
85
-
86
-
87
-
 88
88 -
 89
89 -
 90
90 -
 91
91 -
 92
92 -
 93
93 -
 94
94 -
 95
95 -
 96
96 -
 97
97 -
 98
98 -
99
-
100
-
101
-
102
-
103
-
104
-
105
-
106
-
107
-
108
-
109
-
110
-
111
-
112
-
113
-
114
-
115
-
116
-
117
-
118
-
119
-
120
-
121
-
122
-
123
-
124
-
125
-
126
-
127
-
128
-
129
-
130
-
131
-
132
-
133
-
134
-
135
-
136
-
137
-
138
-
139
-
140
-
141
-
142
-
143
-
144
-
145
-
146
-
147
-
148
-
149
-
150
-
151
-
152
-
153
-
154
-
155
-
156
-
157
-
158
-
159
-
160
-
161
-
162
-
163
-
164
-
165
-
166
-
167
-
168
-
169
-
170
-
171
-
172
-
173
-
174
-
175
-
176
-
177
-
178
-
179
-
180
-
181
-
182
-
183
-
184
-
185
-
186
-
187
-
188
-
189
-
190
-
191
-
192
-
193
-
194
-
195
-
196
-
197
-
198
 |
 |
Installing System Components
93
3
Position the module so the tabs on the underside of the tray fit into the
hooks on the chassis, then lower the opposite edge of the card into place.
See Figure 3-8.
Figure 3-8.
Removing or Installing the Internal SD Module
4
Connect the internal SD module cable to the connector on the control
panel board. See Figure 3-8.
5
Close the system. See "Closing the System" on page 83.
6
Reconnect the system and peripherals to their power sources, and turn
them on.
1
latch
2
internal SD module
3
SD flash card
4
SD card slot (SD connector)
5
release tab
6
internal SD module cable
7
internal SD module connector
8
control panel board
5
2
4
8
3
6
1
7