Dell Dimension 5100C Owner's Manual - Page 75
Installing a Hard Drive, Unpack the replacement hard drive, and prepare it for installation.
 |
View all Dell Dimension 5100C manuals
Add to My Manuals
Save this manual to your list of manuals |
Page 75 highlights
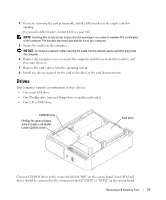
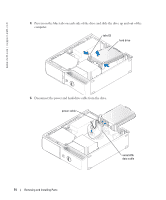
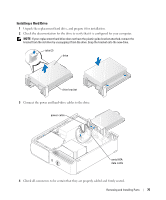
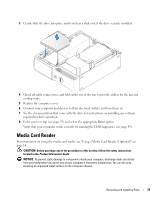
Installing a Hard Drive 1 Unpack the replacement hard drive, and prepare it for installation. 2 Check the documentation for the drive to verify that it is configured for your computer. NOTE: If your replacement hard drive does not have the plastic guide bracket attached, remove the bracket from the old drive by unsnapping it from the drive. Snap the bracket onto the new drive. tabs (2) drive drive bracket 3 Connect the power and hard-drive cables to the drive. power cable serial ATA data cable 4 Check all connectors to be certain that they are properly cabled and firmly seated. Removing and Installing Parts 75
-
 1
1 -
2
-
3
-
4
-
5
-
6
-
7
-
8
-
9
-
10
-
11
-
12
-
13
-
14
-
15
-
16
-
17
-
18
-
19
-
20
-
21
-
22
-
23
-
24
-
25
-
26
-
27
-
28
-
29
-
30
-
31
-
32
-
33
-
34
-
35
-
36
-
37
-
38
-
39
-
40
-
41
-
42
-
43
-
44
-
45
-
46
-
47
-
48
-
49
-
50
-
51
-
52
-
53
-
54
-
55
-
56
-
57
-
58
-
59
-
60
-
61
-
62
-
63
-
64
-
65
-
66
-
67
-
68
-
69
-
 70
70 -
 71
71 -
 72
72 -
 73
73 -
 74
74 -
 75
75 -
 76
76 -
 77
77 -
 78
78 -
 79
79 -
 80
80 -
81
-
82
-
83
-
84
-
85
-
86
-
87
-
88
-
89
-
90
-
91
-
92
-
93
-
94
-
95
-
96
-
97
-
98
-
99
-
100
-
101
-
102
-
103
-
104
-
105
-
106
-
107
-
108
-
109
-
110
-
111
-
112
-
113
-
114
-
115
-
116
-
117
-
118
-
119
-
120
-
121
-
122
-
123
-
124
-
125
-
126
-
127
-
128
 |
 |

Removing and Installing Parts
75
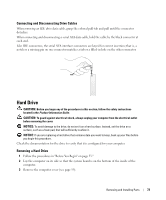
Installing a Hard Drive
1
Unpack the replacement hard drive, and prepare it for installation.
2
Check the documentation for the drive to verify that it is configured for your computer.
NOTE:
If your replacement hard drive does not have the plastic guide bracket attached, remove the
bracket from the old drive by unsnapping it from the drive. Snap the bracket onto the new drive.
3
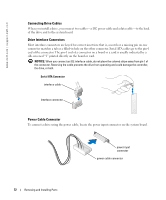
Connect the power and hard-drive cables to the drive.
4
Check all connectors to be certain that they are properly cabled and firmly seated.
drive
tabs (2)
drive bracket
serial ATA
data cable
power cable