Dell Inspiron 600m Owner's Manual - Page 25
Connecting a USB Printer, Printer Problems - usb driver
 |
View all Dell Inspiron 600m manuals
Add to My Manuals
Save this manual to your list of manuals |
Page 25 highlights
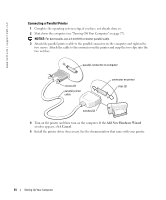
Connecting a USB Printer NOTE: You can connect USB devices while the computer is turned on. 1 Complete the operating system setup if you have not already done so. 2 Install the printer driver if necessary. See the documentation that came with your printer. 3 Attach the USB printer cable to the USB connectors on the computer and the printer. The USB connectors fit only one way. USB connector on computer USB printer cable USB connector on printer Printer Problems C H E C K T H E P R I N T E R C A B L E C O N N E C T I O N S - Ensure that the printer cable is properly connected to the computer. TE S T T H E E L E C T R I C A L O U T L E T - Ensure that the electrical outlet is working by testing it with another device, such as a lamp. E N S U R E T H A T T H E P R I N T E R I S T U R N E D O N - See the documentation supplied with the printer. VERIFY THAT WINDOWS® RECOGNIZES THE PRINTER 1 Click the Start button. 2 Click Control Panel. 3 Click Printers and Other Hardware. 4 Click View installed printers or fax printers. If the printer model is listed, right-click the printer icon. 5 Click Properties, and then click the Ports tab. Ensure that the Print to the following port(s): setting is LPT1 (Printer Port). R E I N S T A L L T H E P R I N T E R D R I V E R - See "Reinstalling Drivers and Utilities" on page 74. Setting Up Your Computer 25
-
 1
1 -
2
-
3
-
4
-
5
-
6
-
7
-
8
-
9
-
10
-
11
-
12
-
13
-
14
-
15
-
16
-
17
-
18
-
19
-
 20
20 -
 21
21 -
 22
22 -
 23
23 -
 24
24 -
 25
25 -
 26
26 -
 27
27 -
 28
28 -
 29
29 -
 30
30 -
31
-
32
-
33
-
34
-
35
-
36
-
37
-
38
-
39
-
40
-
41
-
42
-
43
-
44
-
45
-
46
-
47
-
48
-
49
-
50
-
51
-
52
-
53
-
54
-
55
-
56
-
57
-
58
-
59
-
60
-
61
-
62
-
63
-
64
-
65
-
66
-
67
-
68
-
69
-
70
-
71
-
72
-
73
-
74
-
75
-
76
-
77
-
78
-
79
-
80
-
81
-
82
-
83
-
84
-
85
-
86
-
87
-
88
-
89
-
90
-
91
-
92
-
93
-
94
-
95
-
96
-
97
-
98
-
99
-
100
-
101
-
102
-
103
-
104
-
105
-
106
-
107
-
108
-
109
-
110
-
111
-
112
-
113
-
114
-
115
-
116
-
117
-
118
-
119
-
120
-
121
-
122
 |
 |
