Dell Inspiron 600m Owner's Manual - Page 86
Replacing the Hard Drive - drivers windows 7
 |
View all Dell Inspiron 600m manuals
Add to My Manuals
Save this manual to your list of manuals |
Page 86 highlights
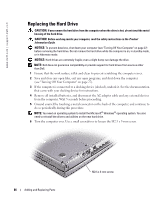
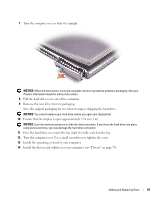
www.dell.com | support.dell.com Replacing the Hard Drive CAUTION: If you remove the hard drive from the computer when the drive is hot, do not touch the metal housing of the hard drive. CAUTION: Before working inside your computer, read the safety instructions in the Product Information Guide. NOTICE: To prevent data loss, shut down your computer (see "Turning Off Your Computer" on page 27) before removing the hard drive. Do not remove the hard drive while the computer is on, in standby mode, or in hibernate mode. NOTICE: Hard drives are extremely fragile; even a slight bump can damage the drive. NOTE: Dell does not guarantee compatibility or provide support for hard drives from sources other than Dell. 1 Ensure that the work surface is flat and clean to prevent scratching the computer cover. 2 Save and close any open files, exit any open programs, and shut down the computer (see "Turning Off Your Computer" on page 27). 3 If the computer is connected to a docking device (docked), undock it. See the documentation that came with your docking device for instructions. 4 Remove all installed batteries, and disconnect the AC adapter cable and any external devices from the computer. Wait 5 seconds before proceeding. 5 Ground yourself by touching a metal connector on the back of the computer, and continue to do so periodically during this procedure. NOTE: You need an operating system to install the Microsoft® Windows® operating system. You also need to reinstall the drivers and utilities on the new hard drive. 6 Turn the computer over. Use a small screwdriver to loosen the M2.5 x 5-mm screw. 86 Adding and Replacing Parts M2.5 x 5-mm screw
-
 1
1 -
2
-
3
-
4
-
5
-
6
-
7
-
8
-
9
-
10
-
11
-
12
-
13
-
14
-
15
-
16
-
17
-
18
-
19
-
20
-
21
-
22
-
23
-
24
-
25
-
26
-
27
-
28
-
29
-
30
-
31
-
32
-
33
-
34
-
35
-
36
-
37
-
38
-
39
-
40
-
41
-
42
-
43
-
44
-
45
-
46
-
47
-
48
-
49
-
50
-
51
-
52
-
53
-
54
-
55
-
56
-
57
-
58
-
59
-
60
-
61
-
62
-
63
-
64
-
65
-
66
-
67
-
68
-
69
-
70
-
71
-
72
-
73
-
74
-
75
-
76
-
77
-
78
-
79
-
80
-
 81
81 -
 82
82 -
 83
83 -
 84
84 -
 85
85 -
 86
86 -
 87
87 -
 88
88 -
 89
89 -
 90
90 -
 91
91 -
92
-
93
-
94
-
95
-
96
-
97
-
98
-
99
-
100
-
101
-
102
-
103
-
104
-
105
-
106
-
107
-
108
-
109
-
110
-
111
-
112
-
113
-
114
-
115
-
116
-
117
-
118
-
119
-
120
-
121
-
122
 |
 |
