Dell OEM Ready Optiplex 760 Service Manual - Page 113
System Configuration
 |
View all Dell OEM Ready Optiplex 760 manuals
Add to My Manuals
Save this manual to your list of manuals |
Page 113 highlights
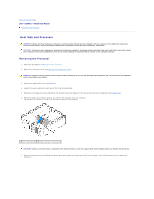
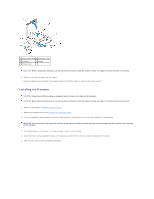
11. Replace the computer cover (see Replacing the Computer Cover). 12. Uninstall the card's driver. See the documentation that came with the card for instructions. 13. If you removed a sound card: a. Enter system setup, select System Configuration ® Miscellaneous Devices, and change the Audio setting to Enabled. (See Entering System Setup). b. Connect external audio devices to the sound card's connectors. Do not connect external audio devices to the microphone, speaker/headphone, or line-in connectors on the back panel of the computer. 14. If you removed a network adapter card and want to turn on the integrated network adapter: a. Enter system setup, select System Configuration ® Integrated NIC, and change the setting to Enabled. (See Entering System Setup). b. Connect the network cable to the integrated the back panel of the computer. PS/2 Serial Port Adapter Installing a PS/2 Serial Port Adapter 1. Follow the procedures in Working on Your Computer. 2. Remove the computer cover (see Removing the Computer Cover). 3. Gently lift the release tab on the card retention latch from the inside and pivot the latch open. 4. Remove the filler bracket (if applicable). NOTE: See the documentation that came with the adapter for information on configuring the adapter, making internal connections, or customizing it for your computer. 5. Align the PS/2 serial-port adapter bracket in the retention slot and press down firmly. Ensure that the adapter is fully seated in the slot. 6. Before you close the card retention mechanism, ensure that: l The tops of all cards and filler brackets are flush with the alignment bar. l The notch in the top of the card or filler bracket fits around the alignment guide. 7. Secure the card(s) by closing the card retention latch and snapping it into place. CAUTION: Do not route card cables over the cards. Cables routed over the cards can prevent the computer cover from closing properly or cause damage to the equipment. 1 release tab 3 serial port adapter bracket 5 serial port adapter system board connector (PS2/SERIAL2) 2 adapter retention latch 4 serial port adapter connector
-
 1
1 -
2
-
3
-
4
-
5
-
6
-
7
-
8
-
9
-
10
-
11
-
12
-
13
-
14
-
15
-
16
-
17
-
18
-
19
-
20
-
21
-
22
-
23
-
24
-
25
-
26
-
27
-
28
-
29
-
30
-
31
-
32
-
33
-
34
-
35
-
36
-
37
-
38
-
39
-
40
-
41
-
42
-
43
-
44
-
45
-
46
-
47
-
48
-
49
-
50
-
51
-
52
-
53
-
54
-
55
-
56
-
57
-
58
-
59
-
60
-
61
-
62
-
63
-
64
-
65
-
66
-
67
-
68
-
69
-
70
-
71
-
72
-
73
-
74
-
75
-
76
-
77
-
78
-
79
-
80
-
81
-
82
-
83
-
84
-
85
-
86
-
87
-
88
-
89
-
90
-
91
-
92
-
93
-
94
-
95
-
96
-
97
-
98
-
99
-
100
-
101
-
102
-
103
-
104
-
105
-
106
-
107
-
 108
108 -
 109
109 -
 110
110 -
 111
111 -
 112
112 -
 113
113 -
 114
114 -
 115
115 -
 116
116 -
 117
117 -
 118
118 -
119
-
120
-
121
-
122
-
123
-
124
-
125
-
126
-
127
-
128
-
129
-
130
-
131
-
132
-
133
-
134
-
135
-
136
-
137
-
138
-
139
-
140
-
141
-
142
-
143
-
144
-
145
-
146
-
147
-
148
-
149
-
150
-
151
-
152
-
153
-
154
-
155
-
156
-
157
-
158
-
159
-
160
-
161
-
162
-
163
-
164
-
165
-
166
-
167
-
168
-
169
-
170
-
171
-
172
-
173
-
174
-
175
-
176
-
177
-
178
-
179
-
180
-
181
-
182
-
183
-
184
-
185
-
186
-
187
-
188
-
189
-
190
-
191
-
192
-
193
-
194
-
195
-
196
-
197
-
198
-
199
-
200
-
201
-
202
-
203
 |
 |
