Dell OEM Ready Optiplex 760 Service Manual - Page 17
Removing a PCI Card
 |
View all Dell OEM Ready Optiplex 760 manuals
Add to My Manuals
Save this manual to your list of manuals |
Page 17 highlights
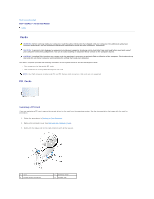
11. Replace the computer cover (see Replacing the Computer Cover), reconnect the computer and devices to electrical outlets, and then turn them on. CAUTION: To connect a network cable, first plug the cable into the network wall jack and then plug it into the computer. 12. If you installed a sound card: a. Enter system setup, select System Configuration® Miscellaneous Devices, and change the Audio setting to Disabled. (See Entering System Setup). b. Connect external audio devices to the sound card's connectors. Do not connect external audio devices to the microphone, speaker/headphone, or line-in connectors on the back panel of the computer. CAUTION: If you disable the integrated network adapter, you will not have AMT functionality. 13. If you installed a network adapter card and want to turn off the integrated network adapter: a. Enter system setup, select System Configuration® Integrated NIC, and change the setting to Disabled (see Entering System Setup). b. Connect the network cable to the network adapter card's connectors. Do not connect the network cable to the integrated network connector on the back panel of the computer. 14. Install any drivers required for the card as described in the card documentation. Removing a PCI Card 1. Follow the procedures in Working on Your Computer. 2. Remove the computer cover (see Removing the Computer Cover). 3. Gently rotate lift the release tab on the card-retention latch. 1 card 3 system board connector 5 release tab 2 card-retention latch 4 card insert 4. If necessary, disconnect any cables connected to the card. 5. If you are replacing a PCI Express x16 card, remove the installed card by gently pulling the release lever away from the card until you release the securing tab from the dent in the card.
-
 1
1 -
2
-
3
-
4
-
5
-
6
-
7
-
8
-
9
-
10
-
11
-
 12
12 -
 13
13 -
 14
14 -
 15
15 -
 16
16 -
 17
17 -
 18
18 -
 19
19 -
 20
20 -
 21
21 -
 22
22 -
23
-
24
-
25
-
26
-
27
-
28
-
29
-
30
-
31
-
32
-
33
-
34
-
35
-
36
-
37
-
38
-
39
-
40
-
41
-
42
-
43
-
44
-
45
-
46
-
47
-
48
-
49
-
50
-
51
-
52
-
53
-
54
-
55
-
56
-
57
-
58
-
59
-
60
-
61
-
62
-
63
-
64
-
65
-
66
-
67
-
68
-
69
-
70
-
71
-
72
-
73
-
74
-
75
-
76
-
77
-
78
-
79
-
80
-
81
-
82
-
83
-
84
-
85
-
86
-
87
-
88
-
89
-
90
-
91
-
92
-
93
-
94
-
95
-
96
-
97
-
98
-
99
-
100
-
101
-
102
-
103
-
104
-
105
-
106
-
107
-
108
-
109
-
110
-
111
-
112
-
113
-
114
-
115
-
116
-
117
-
118
-
119
-
120
-
121
-
122
-
123
-
124
-
125
-
126
-
127
-
128
-
129
-
130
-
131
-
132
-
133
-
134
-
135
-
136
-
137
-
138
-
139
-
140
-
141
-
142
-
143
-
144
-
145
-
146
-
147
-
148
-
149
-
150
-
151
-
152
-
153
-
154
-
155
-
156
-
157
-
158
-
159
-
160
-
161
-
162
-
163
-
164
-
165
-
166
-
167
-
168
-
169
-
170
-
171
-
172
-
173
-
174
-
175
-
176
-
177
-
178
-
179
-
180
-
181
-
182
-
183
-
184
-
185
-
186
-
187
-
188
-
189
-
190
-
191
-
192
-
193
-
194
-
195
-
196
-
197
-
198
-
199
-
200
-
201
-
202
-
203
 |
 |
