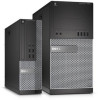
Dell OptiPlex 7020 Tower OptiPlex 7020 Mini Tower Owners Manual - Page 8
Removing and Installing Components, Recommended Tools, Front and Back View - tower
 |
View all Dell OptiPlex 7020 Tower manuals
Add to My Manuals
Save this manual to your list of manuals |
Page 8 highlights
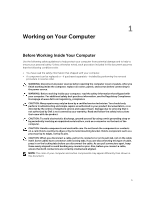
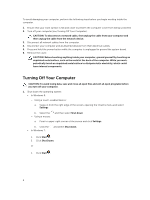
2 Removing and Installing Components This section provides detailed information on how to remove or install the components from your computer. Recommended Tools The procedures in this document may require the following tools: • Small flat-blade screwdriver • Phillips screwdriver • Small plastic scribe Front and Back View Figure 1. Front and Back View Of Mini-Tower 1. power button or power light 3. microphone connector 5. hard-drive activity light 7. power-supply diagnostic button 9. keyboard connector 11. display port connector 13. VGA connector 8 2. flex bay 4. headphone connector 6. power-supply diagnostic light 8. power cable connector 10. USB 2.0 connector 12. USB 3.0 connector 14. line-in or microphone connector
-
 1
1 -
2
-
 3
3 -
 4
4 -
 5
5 -
 6
6 -
 7
7 -
 8
8 -
 9
9 -
 10
10 -
 11
11 -
 12
12 -
 13
13 -
14
-
15
-
16
-
17
-
18
-
19
-
20
-
21
-
22
-
23
-
24
-
25
-
26
-
27
-
28
-
29
-
30
-
31
-
32
-
33
-
34
-
35
-
36
-
37
-
38
-
39
-
40
-
41
-
42
-
43
-
44
-
45
-
46
-
47
-
48
-
49
-
50
-
51
-
52
-
53
-
54
-
55
-
56
 |
 |

2
Removing and Installing Components
This section provides detailed information on how to remove or install the components from your
computer.
Recommended Tools
The procedures in this document may require the following tools:
•
Small flat-blade screwdriver
•
Phillips screwdriver
•
Small plastic scribe
Front and Back View
Figure 1. Front and Back View Of Mini-Tower
1.
power button or power light
2.
flex bay
3.
microphone connector
4.
headphone connector
5.
hard-drive activity light
6.
power-supply diagnostic light
7.
power-supply diagnostic button
8.
power cable connector
9.
keyboard connector
10.
USB 2.0 connector
11.
display port connector
12.
USB 3.0 connector
13.
VGA connector
14.
line-in or microphone connector
8