Dell OptiPlex 740 Quick Reference Guide - Page 15
NOTICE, operating system shutdown. See Turning Off Your - diagnostic lights
 |
View all Dell OptiPlex 740 manuals
Add to My Manuals
Save this manual to your list of manuals |
Page 15 highlights
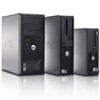
1 optical drive Insert an optical drive (if supported) into this bay. (optional) 2 floppy drive Can contain a floppy drive or a optional media card reader. bay (optional) 3 USB 2.0 Use the front USB connectors for devices that you connect connectors (2) occasionally, such as joysticks or cameras, or for bootable USB devices (see "System Setup" in your online User's Guide for more information on booting to a USB device). It is recommended that you use the back USB connectors for devices that typically remain connected, such as printers and keyboards. 4 LAN indicator This light indicates that a local area network (LAN) light connection is established. 5 diagnostic lights Use the lights to help you troubleshoot a computer problem based on the diagnostic code. For more information, see "Diagnostic Lights" on page 55. 6 power button Press this button to turn on the computer. NOTICE: To avoid losing data, do not turn off the computer by pressing the power button. Instead, perform an operating system shutdown. See "Turning Off Your Computer" in your online User's Guide for more information. NOTICE: If your operating system has ACPI enabled, when you press the power button the computer will perform an operating system shutdown. Quick Reference Guide 15
-
 1
1 -
2
-
3
-
4
-
5
-
6
-
7
-
8
-
9
-
 10
10 -
 11
11 -
 12
12 -
 13
13 -
 14
14 -
 15
15 -
 16
16 -
 17
17 -
 18
18 -
 19
19 -
 20
20 -
21
-
22
-
23
-
24
-
25
-
26
-
27
-
28
-
29
-
30
-
31
-
32
-
33
-
34
-
35
-
36
-
37
-
38
-
39
-
40
-
41
-
42
-
43
-
44
-
45
-
46
-
47
-
48
-
49
-
50
-
51
-
52
-
53
-
54
-
55
-
56
-
57
-
58
-
59
-
60
-
61
-
62
-
63
-
64
-
65
-
66
-
67
-
68
-
69
-
70
-
71
-
72
-
73
-
74
-
75
-
76
-
77
-
78
-
79
-
80
-
81
-
82
-
83
-
84
-
85
-
86
-
87
-
88
-
89
-
90
-
91
-
92
-
93
-
94
-
95
-
96
-
97
-
98
-
99
-
100
-
101
-
102
-
103
-
104
-
105
-
106
-
107
-
108
-
109
-
110
-
111
-
112
-
113
-
114
-
115
-
116
-
117
-
118
-
119
-
120
-
121
-
122
-
123
-
124
-
125
-
126
-
127
-
128
-
129
-
130
-
131
-
132
-
133
-
134
-
135
-
136
-
137
-
138
-
139
-
140
-
141
-
142
-
143
-
144
-
145
-
146
-
147
-
148
-
149
-
150
-
151
-
152
-
153
-
154
-
155
-
156
-
157
-
158
-
159
-
160
-
161
-
162
-
163
-
164
-
165
-
166
-
167
-
168
-
169
-
170
-
171
-
172
-
173
-
174
-
175
-
176
-
177
-
178
-
179
-
180
-
181
-
182
-
183
-
184
-
185
-
186
-
187
-
188
-
189
-
190
-
191
-
192
-
193
-
194
-
195
-
196
-
197
-
198
-
199
-
200
-
201
-
202
-
203
-
204
-
205
-
206
-
207
-
208
-
209
-
210
-
211
-
212
-
213
-
214
-
215
-
216
-
217
-
218
-
219
-
220
-
221
-
222
-
223
-
224
-
225
-
226
-
227
-
228
-
229
-
230
 |
 |