Dell OptiPlex 740 Quick Reference Guide - Page 27
perform an operating system shutdown., instructions for more information. - boot from usb
 |
View all Dell OptiPlex 740 manuals
Add to My Manuals
Save this manual to your list of manuals |
Page 27 highlights
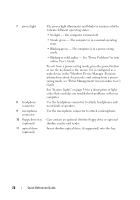
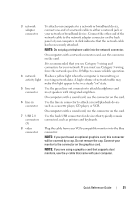
1 USB 2.0 connectors (2) Use the front USB connectors for devices that you connect occasionally, such as joysticks or cameras, or for bootable USB devices (see "System Setup Program" in your online User's Guide for instructions about booting to a USB device). It is recommended that you use the back USB connectors for devices that typically remain connected, such as printers and keyboards. 2 power button Press to turn on the computer. NOTICE: To avoid losing data, do not turn off the computer by pressing the power button. Instead, perform an operating system shutdown. See "Turning Off Your Computer" in your online User's Guide for instructions for more information. NOTICE: If your operating system has ACPI enabled, when you press the power button the computer will perform an operating system shutdown. 3 Dell badge This badge can be rotated to match the orientation of your computer. To rotate, place fingers around the outside of the badge, press firmly, and turn the badge. You can also rotate the badge using the slot provided near the bottom of the badge. 4 hard drive activity light This light flickers when the hard drive is being accessed. 5 diagnostic lights Use the lights to help you troubleshoot a computer problem based on the diagnostic code. For more information, see "Diagnostic Lights" on page 55. 6 LAN indicator light This light indicates that a LAN (local area network) connection is established. Quick Reference Guide 27
-
 1
1 -
2
-
3
-
4
-
5
-
6
-
7
-
8
-
9
-
10
-
11
-
12
-
13
-
14
-
15
-
16
-
17
-
18
-
19
-
20
-
21
-
 22
22 -
 23
23 -
 24
24 -
 25
25 -
 26
26 -
 27
27 -
 28
28 -
 29
29 -
 30
30 -
 31
31 -
 32
32 -
33
-
34
-
35
-
36
-
37
-
38
-
39
-
40
-
41
-
42
-
43
-
44
-
45
-
46
-
47
-
48
-
49
-
50
-
51
-
52
-
53
-
54
-
55
-
56
-
57
-
58
-
59
-
60
-
61
-
62
-
63
-
64
-
65
-
66
-
67
-
68
-
69
-
70
-
71
-
72
-
73
-
74
-
75
-
76
-
77
-
78
-
79
-
80
-
81
-
82
-
83
-
84
-
85
-
86
-
87
-
88
-
89
-
90
-
91
-
92
-
93
-
94
-
95
-
96
-
97
-
98
-
99
-
100
-
101
-
102
-
103
-
104
-
105
-
106
-
107
-
108
-
109
-
110
-
111
-
112
-
113
-
114
-
115
-
116
-
117
-
118
-
119
-
120
-
121
-
122
-
123
-
124
-
125
-
126
-
127
-
128
-
129
-
130
-
131
-
132
-
133
-
134
-
135
-
136
-
137
-
138
-
139
-
140
-
141
-
142
-
143
-
144
-
145
-
146
-
147
-
148
-
149
-
150
-
151
-
152
-
153
-
154
-
155
-
156
-
157
-
158
-
159
-
160
-
161
-
162
-
163
-
164
-
165
-
166
-
167
-
168
-
169
-
170
-
171
-
172
-
173
-
174
-
175
-
176
-
177
-
178
-
179
-
180
-
181
-
182
-
183
-
184
-
185
-
186
-
187
-
188
-
189
-
190
-
191
-
192
-
193
-
194
-
195
-
196
-
197
-
198
-
199
-
200
-
201
-
202
-
203
-
204
-
205
-
206
-
207
-
208
-
209
-
210
-
211
-
212
-
213
-
214
-
215
-
216
-
217
-
218
-
219
-
220
-
221
-
222
-
223
-
224
-
225
-
226
-
227
-
228
-
229
-
230
 |
 |