Dell P2211H User's Guide - Page 22
Menu and Submenus, Description, Energy Gauge, Brightness, Contrast, AUTO ADJUST, INPUT SOURCE
 |
View all Dell P2211H manuals
Add to My Manuals
Save this manual to your list of manuals |
Page 22 highlights
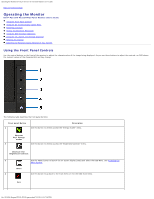
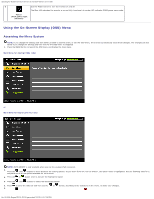
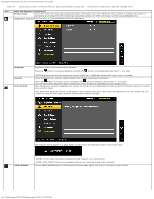
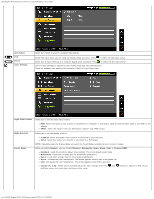
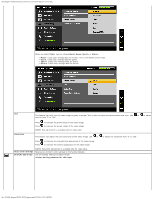
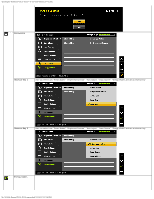
Operating the Monitor:Dell P2211H/P2311H Flat Panel Monitor User's Guide Press the button once to return to the main menu to select another option or press the button two or three times to exit from the OSD menu. Icon Menu and Submenus Description Energy Gauge This meter shows the energy level being consumed by the monitor in real time. When the meter is green, it indicates the monitor is consuming low energy level. When the energy consumed increases, the meter will change to yellow and subsequently red. Brightness/Contrast Use this menu to activate Brightness/Contrast adjustment. Brightness Contrast AUTO ADJUST Brightness adjusts the luminance of the backlight. Press the button to increase brightness and Press the button to decrease brightness (min 0 ~ max 100). NOTE:Brightness control will be greyed out during "Screen dim" in PowerNap option when screen saver is activated. Adjust Brightness first, and then adjust Contrast only if further adjustment is necessary. Press the button to increase contrast and Press the button to decrease contrast (min 0 ~ max 100). The Contrast function adjusts the degree of difference between darkness and lightness on the monitor screen. Even though your computer recognizes your monitor on startup, the Auto Adjustment function optimizes the display settings for use with your particular setup. Auto Adjustment allows the monitor to self-adjust to the incoming video signal. After using Auto Adjustment, you can further tune your monitor by using the Pixel Clock and Phase controls under Displays Settings. The following dialog appears on a black screen as the monitor automatically adjusts to the current input: INPUT SOURCE NOTE: In most cases, Auto Adjust produces the best image for your configuration. NOTE: AUTO ADJUST option is only available when you are using the analog (VGA) connector. Use the INPUT SOURCE menu to select between different video signals that may be connected to your monitor. file:///S|/SSA_Proposal/P2211_P2311/operate.htm[7/13/2011 12:17:56 PM]
-
 1
1 -
2
-
3
-
4
-
5
-
6
-
7
-
8
-
9
-
10
-
11
-
12
-
13
-
14
-
15
-
16
-
 17
17 -
 18
18 -
 19
19 -
 20
20 -
 21
21 -
 22
22 -
 23
23 -
 24
24 -
 25
25 -
 26
26 -
 27
27 -
28
-
29
-
30
-
31
-
32
-
33
-
34
-
35
-
36
-
37
 |
 |
