Dell P2412H User's Guide
Dell P2412H Manual
 |
View all Dell P2412H manuals
Add to My Manuals
Save this manual to your list of manuals |
Dell P2412H manual content summary:
- Dell P2412H | User's Guide - Page 1
Dell™ P2412H/P2412H-HF Monitor User Guide Setting the display resolution to 1920 x 1080 (maximum) Information in this document is subject to change without notice. © 2011 Dell Inc. All rights reserved. Reproduction of these materials in any manner whatsoever without the written permission of Dell - Dell P2412H | User's Guide - Page 2
Dell™ P2412H/P2412H-HF Monitor User's Guide About Your Monitor Setting Up the Monitor Operating the Monitor Troubleshooting problem. WARNING: A WARNING indicates a potential for property damage, personal injury, or death. Information in this document is subject to change without notice. © 2011 Dell - Dell P2412H | User's Guide - Page 3
Back to Contents Page Setting Up Your Monitor Dell™ P2412H/P2412H-HF Monitor Setting the display resolution to 1920 x 1080 (maximum) For maximum display performance with Microsoft® Windows® operating systems, set the display resolution to 1920 x 1080 pixels by performing the following steps: In - Dell P2412H | User's Guide - Page 4
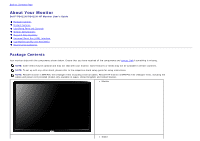
Back to Contents Page About Your Monitor Dell™ P2412H/P2412H-HF Monitor User's Guide Package Contents Product Features Identifying Parts and Controls Monitor Specifications Plug and Play Capability Universal Serial Bus (USB) Interface LCD Monitor Quality and Pixel Policy Maintenance Guidelines - Dell P2412H | User's Guide - Page 5
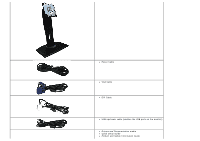
Power Cable VGA Cable DVI Cable USB upstream cable (enables the USB ports on the monitor) Drivers and Documentation media Quick Setup Guide Product and Safety Information Guide - Dell P2412H | User's Guide - Page 6
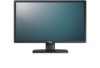
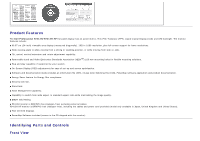
The Dell Professional P2412H/P2412H-HF flat panel display has an active matrix, Thin-Film Transistor (TFT), Liquid Crystal Display (LCD) and LED backlight. The monitor features include: ■ 60.97 cm (24-inch) viewable area display (measured diagonally). 1920 x 1080 resolution, plus full-screen support - Dell P2412H | User's Guide - Page 7
Front view Label Description 1 Preset Modes (default, but configurable) 2 Brightness & Contrast (default, but configurable) 3 Menu 4 Exit 5 Power (with power light indicator) Back View Front panel controls - Dell P2412H | User's Guide - Page 8
mount monitor using VESA-compatible wall mount kit (100 mm x 100 mm) Lists the regulatory approvals Release stand from monitor Refer to this label if you need to contact Dell for technical support Secures monitor with security cable lock Attaches the optional Dell Soundbar Connect your USB devices - Dell P2412H | User's Guide - Page 9
Left view Bottom View Right view - Dell P2412H | User's Guide - Page 10
bottom of the monitor To lock the stand to the monitor using M3 x 6 mm screw (screw is not provided) Monitor Specifications Flat Panel Specifications Model Screen type Panel type Screen dimensions Preset display area P2412H/P2412H-HF Active matrix - TFT LCD TN 60.97 cm (24-inches diagonal viewable - Dell P2412H | User's Guide - Page 11
standards. Resolution Specifications Model Horizontal scan range Vertical scan range Maximum preset resolution P2412H/P2412H-HF 30 kHz to 83 kHz (automatic) 56 Hz to 76 Hz (automatic) 1920 x 1080 at 60 Hz Supported Video Modes Model Video display capabilities (DVI playback) P2412H/P2412H-HF - Dell P2412H | User's Guide - Page 12
Physical Characteristics Model Connector type Signal cable type Dimensions (with stand) P2412H/P2412H-HF 15-pin D-subminiature, blue connector; DVI-D, white connector Digital: detachable, DVI-D, solid pins, shipped detached from the monitor Analog: attachable, D-Sub, 15pins, shipped attached to the - Dell P2412H | User's Guide - Page 13
Depth Stand dimensions Height (extended) Height (compressed) Width Depth Weight Weight with packaging Weight with stand assembly and cables Weight without stand assembly (For wall mount or VESA mount considerations no cables) Weight of stand assembly Front frame gloss 500.0 mm (19.69 inches) 370 - Dell P2412H | User's Guide - Page 14
(maximum) 92.19 BTU/hour (typical) Power Management Modes If you have VESA's DPM™ compliance display card or software installed in your PC, the monitor can automatically reduce its power consumption when not in use. This is referred to as Power Save Mode*. If the computer detects input from the - Dell P2412H | User's Guide - Page 15
STAR -compliant. * Zero power consumption in OFF mode can only be achieved by disconnecting the main cable from the monitor. ** Maximum power consumption with max luminance, Dell Soundbar, and USB active. Pin Assignments VGA Connector Pin 15-pin Side of the Connected Signal Cable Number - Dell P2412H | User's Guide - Page 16
DVI Connector Pin Number 1 2 3 4 5 6 7 8 9 10 11 12 13 14 15 16 17 18 24-pin Side of the Connected Signal Cable TMDS RX2TMDS RX2+ TMDS Ground Floating Floating DDC Clock DDC Data Floating TMDS RX1TMDS RX1+ TMDS Ground Floating Floating +5V/+3.3V power Self test Hot Plug Detect TMDS RX0TMDS RX0+ - Dell P2412H | User's Guide - Page 17
about changing the monitor settings, see Operating the Monitor. Universal Serial Bus (USB) Interface This section gives you information about the USB ports that are available on the left side of your monitor. NOTE: This monitor supports High-Speed Certified USB 2.0 interface. Transfer Speed - Dell P2412H | User's Guide - Page 18
1 upstream - back 2 downstream - 2 on the left side NOTE: USB 2.0 functionality requires a USB 2.0-capable computer. NOTE: The monitor's USB interface works only when the monitor is on or in power save mode. If you turn off the monitor and then turn it on, the attached peripherals may take a few - Dell P2412H | User's Guide - Page 19
WARNING: Before cleaning the monitor, unplug the monitor power cable from the electrical outlet. For best practices, follow the instructions in the list below while unpacking, cleaning, or handling your monitor: To clean your antistatic screen, lightly dampen a soft, clean cloth with water. If - Dell P2412H | User's Guide - Page 20
Back to Contents Page Setting Up the Monitor Dell™ P2412H/P2412H-HF Monitor User's Guide Attaching the Stand Connecting the Monitor Organizing Your Cables Attaching the Soundbar (Optional) Removing the Stand Wall Mounting (Optional) Attaching the Stand NOTE: The stand is detached when the - Dell P2412H | User's Guide - Page 21
view for details.) 2. Connect USB peripherals to the downstream USB ports (side or bottom) on the monitor. (See side or bottom view for details.) 3. Plug the power cables for your computer and monitor into a nearby outlet. 4. Turn on the monitor and the computer. If your monitor displays an image - Dell P2412H | User's Guide - Page 22
Dell Soundbar only. To attach the Soundbar: 1. Working from the back of the monitor, attach the Soundbar by aligning the two slots with the two tabs along the bottom of the monitor. 2. Slide the Soundbar to the left until it snaps into place. 3. Connect the Soundbar with the DC power connector - Dell P2412H | User's Guide - Page 23
(Screw dimension: M4 x 10 mm). Refer to the instructions that come with the VESA-compatible wall mounting kit. 1. Place the monitor panel on a soft cloth or cushion on a stable, flat table. 2. Remove the stand. 3. Use a Philips crosshead screwdriver to remove the four screws securing the plastic - Dell P2412H | User's Guide - Page 24
Back to Contents Page Operating the Monitor Dell™ P2412H/P2412H-HF Monitor User's Guide Using the Front Panel Controls Using the On-Screen Display (OSD) Menu PowerNap Software Setting the Maximum Resolution Using the Dell Soundbar (Optional) Using the Tilt, Swivel, and Vertical Extension - Dell P2412H | User's Guide - Page 25
to turn the monitor on and off. The blue LED indicates the monitor is on and fully functional. An amber LED indicates power save mode. Power (with power light indicator) Using the On-Screen Display (OSD) Menu Accessing the Menu System NOTE: If you change the settings and then either proceed - Dell P2412H | User's Guide - Page 26
or Main Menu for digital (DVI) input - Dell P2412H | User's Guide - Page 27
following table for a complete list of all the options available for the monitor. 3. Push the button once to activate the highlighted option. 4. Push and button to select the desired parameter. 5. Push to enter the slide bar and then use the and buttons, according to the indicators on the - Dell P2412H | User's Guide - Page 28
increase brightness and push the button to decrease brightness (min 0 ~ max 100). NOTE: Manual adjustment of Brightness is disabled when Energy Smart or Dynamic Contrast is switched on. Adjust Brightness adjusts the degree of difference between darkness and lightness on the monitor screen. - Dell P2412H | User's Guide - Page 29
you can further tune your monitor by using the Pixel Clock (Coarse) and Phase (Fine) controls under Display Settings. Input Source NOTE: In video signals that may be connected to your monitor. Auto Select VGA DVI-D Push to select Auto Select, the monitor will auto detect either VGA input - Dell P2412H | User's Guide - Page 30
Color Settings Use Color Settings to adjust the color setting mode and color temperature. There are different color setting sub-menus for VGA/DVI-D and Video input. Input Color Format Choose the RGB option if the monitor is connected to a computer or a DVD using a VGA or DVI cable. Choose the - Dell P2412H | User's Guide - Page 31
the list. Standard: Loads the monitor's default color settings. This is the default preset mode. Multimedia: Loads color settings ideal for multimedia applications. Movie: Loads color settings ideal for movies. Game: Loads color settings ideal for most gaming applications. Text: Loads brightness and - Dell P2412H | User's Guide - Page 32
the monochrome appearance of the video image. Press to increase the colorful appearance of the video image. to adjust the saturation from '0' to '100'. NOTE: Saturation adjustment is available only when you select Movie or Game preset mode. Reset your monitor color settings to the factory - Dell P2412H | User's Guide - Page 33
Display Settings Use the Display Settings to adjust image. Aspect Ratio Horizontal Position Vertical Position Sharpness Pixel Clock Adjust the image '0' to '100'. The Phase and Pixel Clock adjustments allow you to adjust your monitor to your preference. Use or to adjust for best image quality. - Dell P2412H | User's Guide - Page 34
the Dynamic Contrast "On" or "Off" . Note: Dynamic Contrast provides higher contrast if you select Game or Movie preset mode. Select this option to restore default display settings. Select this option to adjust the settings of the OSD, such as, the languages of the OSD, the amount of time the menu - Dell P2412H | User's Guide - Page 35
feature automatically reduces the screen's brightness level when the displayed image contains a high proportion of bright areas. To turn on or off Audio Power during Power Save mode. DDC/CI (Display Data Channel/Command Interface) allows your monitor parameters (brightness, color balance, and etc - Dell P2412H | User's Guide - Page 36
Factory Reset Personalize Reset all OSD settings to the factory preset values. Users can choose a feature from "Preset Modes", "Brightness/Contrast", "Auto Adjust", "Input Source", "Aspect Ratio" or "Menu Rotation" and set it as a shortcut key. - Dell P2412H | User's Guide - Page 37
NOTE: This monitor has a built-in feature to automatically calibrate the brightness to compensate for LED aging. OSD Warning Messages When the Energy Smart or Dynamic Contrast feature is enabled (in these preset modes: Game or Movie), the manual brightness adjustment is disabled. - Dell P2412H | User's Guide - Page 38
support a particular resolution mode, you will see the following message: This means that the monitor cannot synchronize with the signal that it is receiving from the computer. See Monitor Specifications for the Horizontal and Vertical frequency ranges addressable by this monitor. Recommended mode - Dell P2412H | User's Guide - Page 39
When monitor enters Power Save mode, the following message appears: Activate the computer and wake up the monitor to gain access to the OSD. If you press any button other than the power button, one of the following messages will appear depending on the selected input: VGA/DVI-D input If either VGA - Dell P2412H | User's Guide - Page 40
Problems for more information. PowerNap Software The PowerNap software comes in the CD that shipped with the monitor you have just purchased. This software provides Power Saving mode for your monitor. The Power Saving mode lets users set the monitor to "Screen Dim" or "Sleep" when your PC enters - Dell P2412H | User's Guide - Page 41
of the PowerNap Software can be downloaded from Dell's website. Steps to download the software: 1. Go to http://www.support.dell.com 2. Select "Monitor Drivers" under "Drivers and downloads" tab 3. Select your Monitor Model - PowerNap Application 4. Download and install the application Enhanced Menu - Dell P2412H | User's Guide - Page 42
drivers. For instructions about how to download the PowerNap software, see PowerNap Software. Setting the Maximum Resolution To set the maximum resolution for the monitor: Windows XP: 1. Right-click on the desktop and select Properties. 2. Select the Settings tab. 3. Set the screen resolution - Dell P2412H | User's Guide - Page 43
website and download the latest graphic drivers. Using the Dell Soundbar (Optional) The Dell Soundbar is a stereo two channel system adaptable to mount on Dell Flat Panel Displays. The Soundbar has a rotary volume and on/off control to adjust the overall system level, a blue LED for power indication - Dell P2412H | User's Guide - Page 44
mechanism 2. Headphone jacks 3. Power indicator 4. Power/Volume control Using the Tilt, Swivel, and Vertical Extension NOTE: This is applicable for a monitor with a stand. When any other stand is bought, please refer to the respective stand setup guide for set up instructions. Tilt, Swivel With the - Dell P2412H | User's Guide - Page 45
Rotating the Monitor Before you rotate the monitor, your monitor should be fully vertically extended (Vertical Extension) and fully tilted (Tilt) up to avoid hitting the bottom edge of the monitor. - Dell P2412H | User's Guide - Page 46
- Dell P2412H | User's Guide - Page 47
download the graphics driver, go to support.dell.com and see the Download section for Video Drivers for latest driver updates. NOTE: When in Portrait View Mode, you may experience performance degradation in graphic-intensive applications (3D Gaming and etc.) Adjusting the Rotation Display Settings - Dell P2412H | User's Guide - Page 48
Back to Contents Page - Dell P2412H | User's Guide - Page 49
Back to Contents Page Troubleshooting Dell™ P2412H/P2412H-HF Monitor User's Guide Self-Test Built-in Diagnostics Common Problems Product Specific Problems Universal Serial Bus Specific Problems Dell Soundbar Problems WARNING: Before you begin any of the procedures in this section, follow the Safety - Dell P2412H | User's Guide - Page 50
general information about common monitor problems you might encounter and the possible solutions: Common Symptoms No Video/Power LED off What You Experience No picture Possible Solutions Ensure that the video cable connecting the monitor and the computer is properly connected and secure. Verify - Dell P2412H | User's Guide - Page 51
mode. Do not perform any troubleshooting steps. Contact Dell immediately. Ensure that the video cable connecting the monitor to the computer is connected properly and is secure. Reset the monitor to Factory Settings. Perform monitor self-test feature check to determine if the intermittent problem - Dell P2412H | User's Guide - Page 52
. Reset the computer or video player. Due to different video formats (aspect ratio) of DVDs, the monitor may display in full screen. Run the built-in diagnostics. NOTE: When choosing DVI-D mode, the Auto Adjust function will not be available. Universal Serial Bus (USB) Specific Problems Specific - Dell P2412H | User's Guide - Page 53
. Decrease the volume of the audio application. Turn the Power/Volume knob on the Soundbar counter-clockwise to a lower volume setting. Clean and reseat the audio line-in plug. Troubleshoot the computer's sound card. Test the Soundbar using another audio source (i.e. portable CD player). Clear any - Dell P2412H | User's Guide - Page 54
Back to Contents Page Appendix Dell™ P2412H/P2412H-HF Monitor User's Guide Safety Instructions FCC Notice (U.S. Only) and Other Regulatory Information Contacting Dell WARNING: Safety Instructions WARNING: Use of controls, adjustments, or procedures other than those specified in this documentation - Dell P2412H | User's Guide - Page 55
Contents Page Setting Up Your Monitor Dell™ P2412H/P2412H-HF Monitor If you have a Dell™ desktop or a Dell™ portable computer with internet access 1. Go to http://support.dell.com, enter your service tag, and download the latest driver for your graphics card. 2. After installing the drivers for your - Dell P2412H | User's Guide - Page 56
Back to Contents Page Setting Up Your Monitor Dell™ P2412H/P2412H-HF Monitor If you have a non Dell™ desktop, portable computer, or graphics card In Windows XP: 1. Right-click on the desktop and click Properties. 2. Select the Settings tab. 3. Select Advanced. 4. Identify your graphics controller
-
 1
1 -
 2
2 -
 3
3 -
 4
4 -
 5
5 -
 6
6 -
 7
7 -
8
-
9
-
10
-
11
-
12
-
13
-
14
-
15
-
16
-
17
-
18
-
19
-
20
-
21
-
22
-
23
-
24
-
25
-
26
-
27
-
28
-
29
-
30
-
31
-
32
-
33
-
34
-
35
-
36
-
37
-
38
-
39
-
40
-
41
-
42
-
43
-
44
-
45
-
46
-
47
-
48
-
49
-
50
-
51
-
52
-
53
-
54
-
55
-
56
 |
 |

Dell™ P2412H/P2412H-HF Monitor
User Guide
Setting the display resolution to 1920 x 1080
(maximum)
Information in this document is subject to change without notice.
© 2011 Dell Inc. All rights reserved.
Reproduction of these materials in any manner whatsoever without the written permission of Dell Inc. is strictly forbidden.
Trademarks used in this text:
Dell
and the
DELL
logo are trademarks of Dell Inc;
Microsoft
and
Windows
are either
trademarks or registered trademarks of Microsoft Corporation in the United States and/or other countries,
Intel
is a
registered trademark of Intel Corporation in the U.S. and other countries; and ATI is a trademark of Advanced Micro
Devices, Inc. ENERGY STAR is a registered trademark of the U.S. Environmental Protection Agency. As an ENERGY STAR
partner, Dell Inc. has determined that this product meets the ENERGY STAR guidelines for energy efficiency.
Other trademarks and trade names may be used in this document to refer to either the entities claiming the marks and
names or their products. Dell Inc. disclaims any proprietary interest in trademarks and trade names other than its own.
Model P2412Hb
June 2011 Rev. A00