Dell PowerConnect W-650 Installation Guide - Page 16
Tabletop Deployment, Initial Setup and Network Connectivity, Removal
 |
View all Dell PowerConnect W-650 manuals
Add to My Manuals
Save this manual to your list of manuals |
Page 16 highlights
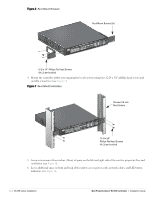
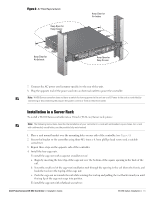
a. Begin by inserting the lower lip of the cage nut over the bottom of the square opening in the back of the rail. b. Compress the top lip of the cage nut with a flathead screwdriver. c. With the lip compressed, push the cage nut's lip fully into the opening in the rail. d. Release the scredriver pressure on the cage nut to lock it into place. 5. Mount the controller within your organization's rack system using four M6 x 20mm phillips head screws and suitable screwdriver. 6. Leave a minimum of four inches (10cm) of space on the left and right side of the unit for proper air flow and ventilation (see Figure 8). 7. Leave additional space in front and back of the unit to access power cords, network cables, and LED status indicators (see Figure 8). 8. Connect the AC power cord (country-specific) to the rear of the unit. 9. Plug the opposite end of the power cord into an electrical outlet to power the controller. Note: W-650 Series controller does not have a switch for turning power to the unit on or off. Power to the unit is controlled by connecting or disconnecting the plug on the power cord to or from an electrical outlet. Tabletop Deployment To deploy a W-650 Series controller on a flat surface, such as a tabletop: 1. Insert the four rubber mounting feet to the bottom of the unit. 2. Attach side bezels by snapping them into place. 3. Place the unit on a hard flat surface. Initial Setup and Network Connectivity Once the physical installation is complete, run the initial setup on the controller to configure the IP address and other basic system information. For complete details and instructions, refer to the ArubaOS Quick Start Guide. Removal To remove a W-650 Series controller from a 19-inch (48.26 cm) rack system: 1. Disconnect the power to the controller by unplugging the power cord from the electrical outlet. 2. Disconnect any other cables or devices attached to the controller. 3. Loosen the four rack mount screws securing the controller to your organizations rack system. 4. Remove the controller from the rack system. 16 | W-650 Series Installation Dell PowerConnect W-650 Controller | Installation Guide
-
 1
1 -
2
-
3
-
4
-
5
-
6
-
7
-
8
-
9
-
10
-
 11
11 -
 12
12 -
 13
13 -
 14
14 -
 15
15 -
 16
16 -
 17
17 -
 18
18 -
 19
19 -
 20
20
 |
 |
