Dell PowerEdge 2450 Activating the Dell PERC 3/Si (.pdf) - Page 6
SCSI/RAID Controller - specifications
 |
View all Dell PowerEdge 2450 manuals
Add to My Manuals
Save this manual to your list of manuals |
Page 6 highlights
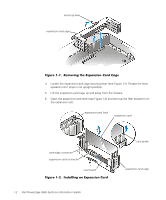
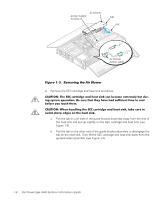
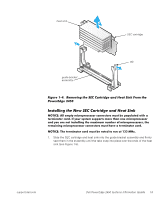
Your system's integrated SCSI host adapter supports the Ultra3 (also known as Ultra160) SCSI standard as defined by the SCSI Trade Association. The Ultra3 SCSI standard supports a combination of new SCSI performance and manageability enhancements to increase data throughput up to 160 megabytes per second (MB/sec). For specific information about the Ultra3 SCSI standard, see the SCSI Trade Association Web site at http://www.scsita.org. Your system employs an implementation of Ultra3 (Ultra160) known as Ultra160/m. The Ultra160/m and Ultra3 (Ultra160) drives supplied by Dell are identical and are interchangeable. The subsections describing SCSI and redundant array of independent disks (RAID) settings in "Using the System Setup Program," of your Dell PowerEdge 2450 Systems User's Guide have been combined to read as follows: SCSI/RAID Controller Selections are RAID Enabled, SCSI Enabled, and Off. When you set the SCSI/RAID Controller to RAID Enabled, Channel A displays RAID and Channel B displays SCSI. When you set it to SCSI Enabled, Channel A and Channel B display SCSI. When you set it to Off, Channel A and Channel B display Off. When installing the SCSI backplane daughter card as addressed in "Installing HardDisk Drives," of the Dell PowerEdge 2450 Systems Installation and Troubleshooting Guide, make sure to slide in the daughter card until it clicks and then lock the card into place by closing the retention lever on the card's front edge. This section provides instructions for: Removing the single edge contact (SEC) cartridge and heat sink Installing the new SEC cartridge and heat sink Before you perform any of the procedures in this section, take a few moments to read the following warning for your personal safety and to prevent damage to the system from electrostatic discharge (ESD). Before you start to work on the system, perform the following steps in the sequence listed: 1. Turn off your system and any devices. 1-4 Dell PowerEdge 2450 Systems Information Update
-
 1
1 -
 2
2 -
 3
3 -
 4
4 -
 5
5 -
 6
6 -
 7
7 -
 8
8 -
 9
9 -
 10
10 -
 11
11 -
 12
12
 |
 |
