Dell PowerEdge 2450 Activating the Dell PERC 3/Si (.pdf) - Page 9
Installation and Troubleshooting Guide - power supply
 |
View all Dell PowerEdge 2450 manuals
Add to My Manuals
Save this manual to your list of manuals |
Page 9 highlights
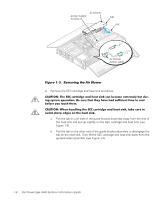
NOTE: The RCU recognizes microprocessors operating at 450 MHz and faster. The latest version of the RCU is available at http://support.dell.com. 1. Turn off the system, including any attached peripherals, and disconnect the power cable from the electrical outlet. 2. Open the system cover. See your system's Installation and Troubleshooting Guide for specific instructions, if needed. 3. Remove the air blower, if present (see Figure 1-3). a. Unplug the Y-shaped air blower power cable from the interposer board. b. Position your right thumb on the outside of the power supply enclosure beside the narrower front part of the air blower. c. Push firmly on the power supply enclosure to move it slightly away from the air blower and allow extra clearance to remove the air blower. d. With your left hand, pull the front of the air blower upward and away from the power supplies to unseat it. You should hear it unsnap. By pulling the air blower slightly away from the power supplies, you avoid the need to use excessive force to clear the power supply enclosure. e. Slide the air blower slightly up and toward the front of the chassis until the metal tab at the back right of the air blower slides out of the small slot at the top back of the chassis. support.dell.com Dell PowerEdge 2450 Systems Information Update 1-7
-
 1
1 -
2
-
3
-
 4
4 -
 5
5 -
 6
6 -
 7
7 -
 8
8 -
 9
9 -
 10
10 -
 11
11 -
 12
12
 |
 |
