Dell PowerEdge 2850 Updating Your NIC Teaming Drivers (.pdf) - Page 6
Service-Only Parts Replacement Procedures, rivets to secure the insulator. - hard drives
 |
View all Dell PowerEdge 2850 manuals
Add to My Manuals
Save this manual to your list of manuals |
Page 6 highlights
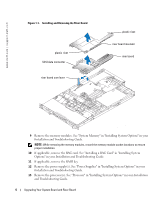
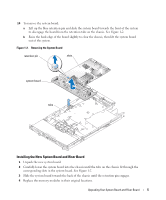
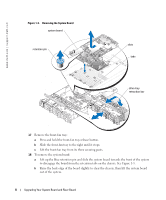
www.dell.com | support.dell.com 5 Replace the processor(s). 6 If applicable, replace the RAC card. 7 If applicable, replace the RAID key. 8 Replace the power supply(s). 9 Install the new riser board provided in your upgrade kit. a Raise the riser board cam lever to a vertical position. See Figure 1-1. b Lower the riser board into position • The cam lever fits through the opening near the outer edge of the riser board. • Align the connector on the underside of the riser board with the corresponding connector on the system board. c When you are certain the riser board is correctly aligned with the system board, carefully close the cam lever to lock the riser board into place. d If you disconnected the SCSI data cable while removing the riser board, reconnect the cable to the riser board. 10 Place the plastic riser board insulator over the riser board and press down on the two plastic rivets to secure the insulator. 11 Reconnect the fan power cables. 12 Replace the SCSI backplane board and reinstall the SCSI hard drives. See "SCSI Backplane Board" in the Service-Only Parts Replacement Procedures guide on support.dell.com. 13 Reinstall the cover. 14 If applicable, reattach the bezel. 6 Upgrading Your System Board and Riser Board
-
 1
1 -
 2
2 -
 3
3 -
 4
4 -
 5
5 -
 6
6 -
 7
7 -
 8
8 -
 9
9 -
 10
10 -
 11
11 -
 12
12 -
13
-
14
-
15
-
16
-
17
-
18
-
19
-
20
 |
 |
