Dell PowerEdge 2850 Updating Your NIC Teaming Drivers (.pdf) - Page 7
Removing and Replacing the System Board and Riser Board In A Dell PowerEdge 2850 System - power supply
 |
View all Dell PowerEdge 2850 manuals
Add to My Manuals
Save this manual to your list of manuals |
Page 7 highlights
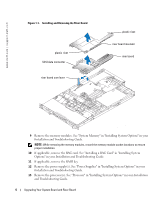
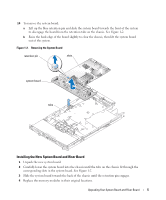
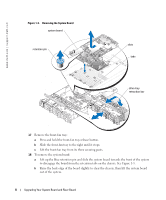
Removing and Replacing the System Board and Riser Board In A Dell PowerEdge 2850 System Removing the System Board 1 If applicable, remove the bezel. 2 Turn off the system and attached peripherals, and disconnect the system from the electrical outlet and peripherals. 3 Remove the system from the rack and place it on a work surface. 4 Remove the system cover. 5 Remove the front fans. 6 Remove the expansion cards. See "Expansion Cards" in "Installing System Options" in your Installation and Troubleshooting Guide. 7 If applicable, disconnect the RAID battery cable from the expansion-card riser board. 8 Remove the expansion-card cage. See "Removing the Expansion-Card Cage" in "Installing System Options" in your Installation and Troubleshooting Guide. 9 Remove the memory module cover. 10 Remove the memory modules. See "System Memory" in "Installing System Options" in your Installation and Troubleshooting Guide. NOTE: While removing the memory modules, record the memory module socket locations to ensure proper installation on the new system board. 11 Remove the back fans and the back-fan tray. 12 If applicable, remove the RAC card. See "Installing a RAC Card" in "Installing System Options" in your Installation and Troubleshooting Guide. 13 If applicable, remove the RAID key. 14 Remove the power supply(s). See "Power Supplies" in "Installing System Options" in your Installation and Troubleshooting Guide. 15 Remove the processor(s). See "Processor" in "Installing System Options" in your Installation and Troubleshooting Guide. 16 Raise the drive-bay retraction bar and swing it toward the front of the chassis to disengage the SCSI backplane from the system board. See Figure 1-3. Upgrading Your System Board and Riser Board 7
-
 1
1 -
 2
2 -
 3
3 -
 4
4 -
 5
5 -
 6
6 -
 7
7 -
 8
8 -
 9
9 -
 10
10 -
 11
11 -
 12
12 -
13
-
14
-
15
-
16
-
17
-
18
-
19
-
20
 |
 |