Dell PowerEdge 6400 Installing VersaRails™
Dell PowerEdge 6400 Manual
 |
View all Dell PowerEdge 6400 manuals
Add to My Manuals
Save this manual to your list of manuals |
Dell PowerEdge 6400 manual content summary:
- Dell PowerEdge 6400 | Installing
VersaRails™ - Page 1
Dell™ Systems Installing VersaRails™ Installation de VersaRails™ Installation von VersaRails™ Instalación de VersaRails™ VersaRails™ www.dell.com | suppor t.dell.com - Dell PowerEdge 6400 | Installing VersaRails™ - Page 2
- Dell PowerEdge 6400 | Installing VersaRails™ - Page 3
- Dell PowerEdge 6400 | Installing
VersaRails™ - Page 4
Throughout this guide, blocks of text may be accompanied by an icon and printed in bold you make better use of your computer system. Information in this document is subject to change without notice. © 2001 Dell Computer Corporation. All rights reserved. Reproduction in any manner whatsoever without - Dell PowerEdge 6400 | Installing
VersaRails™ - Page 5
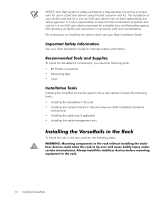
read through this entire document carefully. For procedures on installing your system in the rack, see your Rack Installation Guide. The kit includes the safety instructions provided in your system's System Information document for additional information. support.dell.com Installing VersaRails 1-1 - Dell PowerEdge 6400 | Installing
VersaRails™ - Page 6
for suitability by a certified safety agency. Dell disclaims all liability and warranties in connection with such combinations. For instructions on installing the system itself, see your Rack Installation Guide. See your Rack Installation Guide for important safety information. To install the - Dell PowerEdge 6400 | Installing
VersaRails™ - Page 7
(see Figure 1-1 for 2U systems and Figure 1-2 for 4U and 7U systems). right-front rail 0.125-inch rail spacing second mounting hole bottom of VersaRail support.dell.com Installing VersaRails 1-3 - Dell PowerEdge 6400 | Installing
VersaRails™ - Page 8
right-front rail 0.125-inch rail spacing first mounting hole bottom of VersaRail NOTE: Ensure that you use the mounting holes, as shown in Figure 1-1 and Figure 1-2, to secure the front of the VersaRails to the rack. The second and fourth mounting holes from the bottom of the VersaRail are used - Dell PowerEdge 6400 | Installing
VersaRails™ - Page 9
in a rack. If your VersaRails kit came with a cable tray, see your Rack Installation Guide for instructions on attaching the cable tray to your system. To install the cable-management arm in the on the cabinet's back vertical rail as shown in Figure 1-4. support.dell.com Installing VersaRails 1-5 - Dell PowerEdge 6400 | Installing
VersaRails™ - Page 10
: For 4U and 7U systems, the cable management arm can be attached to either the right or the left vertical rail. See your Rack Installation Guide for instructions on reversing the cable management arm. 3. After you have secured the cable management arm to the rack, see your Rack Installation - Dell PowerEdge 6400 | Installing VersaRails™ - Page 11
- Dell PowerEdge 6400 | Installing
VersaRails™ - Page 12
strictement interdite. Marques déposées utilisées dans ce guide : Dell, le logo DELL et VersaRails sont des marques commerciales de Dell Computer Corporation. Toutes les autres marques déposées et noms de marques utilisés dans ce document se rapportent aux sociétés propriétaires des marques et des - Dell PowerEdge 6400 | Installing
VersaRails™ - Page 13
adaptateurs de rack et Quatre vis à épaulement 10-32 pour systèmes 7U uniquement Un détendeur de câble pour systèmes 2U uniquement Lisez les instructions de sécurité figurant dans le document Information sur le système pour plus d'informations. support.dell.com Installation de VersaRails 2-1 - Dell PowerEdge 6400 | Installing
VersaRails™ - Page 14
combinaison finale du système et du kit de rack Dell dans un rack d'une autre marque. Dell décline toute responsabilité et toutes garanties liées à dans le rack (voir le Guide d'installation du rack ) Installation du chemin de câble, si nécessaire Installation du support de câbles Pour installer les - Dell PowerEdge 6400 | Installing
VersaRails™ - Page 15
la figure Figure 2-2 pour les systèmes 4U et 7U). rail frontal droit espace de 0,125 pouce deuxième orifice de fixation bas du VersaRail support.dell.com Installation de VersaRails 2-3 - Dell PowerEdge 6400 | Installing
VersaRails™ - Page 16
rail frontal droit espace de 0,125 pouce premier orifice de montage bas du VersaRail REMARQUE : Veillez à utiliser les orifices de fixation, comme indiqué dans les figures Figure 2-1 et Figure 2-2, pour fixer l'avant du VersaRail au rack. Les deuxième et quatrième orifices de montage au bas du - Dell PowerEdge 6400 | Installing
VersaRails™ - Page 17
dans un rack. Si le kit VersaRails est livré avec un chemin de câbles, consultez le Guide d'installation du rack pour plus d'informations sur la fixation du chemin de câbles au système. Pour installer le support de câble dans le rack, procédez comme suit : 1. Placez-vous devant la face arri - Dell PowerEdge 6400 | Installing
VersaRails™ - Page 18
le rail vertical de droite ou sur le rail vertical de gauche. Pour plus d'informations sur l'inversion du support de câble, consultez le Guide d'installation du rack. 3. Une fois le support de câble fixé au rack, consultez le Guide d'installation du rack pour plus d'informations sur la fixation du - Dell PowerEdge 6400 | Installing VersaRails™ - Page 19
- Dell PowerEdge 6400 | Installing
VersaRails™ - Page 20
Ihr Computersystem besser nutzen können. Die in diesem Dokument enthaltenen Informationen können ohne Vorankündigung geändert werden. © 2001 Dell Computer Corporation. Alle Rechte vorbehalten. Eine Reproduktion dieses Dokuments in jeglicher Form ist nur mit vorheriger schriftlicher Genehmigung der - Dell PowerEdge 6400 | Installing
VersaRails™ - Page 21
und vier 10-32 Ansatzschrauben, nur für 7U-Systeme Eine Zugentlastungsklammer, nur für 2U-Systeme Weitere Hinweise finden Sie in den Sicherheitshinweisen im Dokument Systeminformationen für Ihr System. support.dell.com Installation von VersaRails 3-1 - Dell PowerEdge 6400 | Installing
VersaRails™ - Page 22
und Rack-Kits für den Einsatz in Gestellschränken anderer Hersteller durch eine zertifizierte Prüfbehörde untersuchen zu lassen. Dell lehnt jede Haftung und Gewährleistung für solche Kombinationen ab. Anweisungen zur Installation des Systems selbst finden Sie in Ihrer RackInstallationsanleitung - Dell PowerEdge 6400 | Installing
VersaRails™ - Page 23
die Vorderseite des VersaRails mit zwei Kreuzschlitzschrauben am Rack fest (siehe Abbildung 3-1 für 2U-Systeme und Abbildung 3-2 für 4U- und 7USysteme). rechte vordere Schiene 0,125-Zoll Schienenabstand support.dell.com zweites Montageloch Unterseite des VersaRails Installation von VersaRails 3-3 - Dell PowerEdge 6400 | Installing
VersaRails™ - Page 24
rechte vordere Schiene 0,125-Zoll Schienenabstand erstes Montageloch Unterseite des VersaRails ANMERKUNG: Vergewissern Sie sich, dass Sie die Montagelöcher wie in Abbildung 3-1 und Abbildung 3-2 gezeigt verwenden, um die Vorderseite der VersaRails am Rack zu befestigen. Das zweite und vierte - Dell PowerEdge 6400 | Installing
VersaRails™ - Page 25
hinter den Gestellschrank, richten Sie die rechtwinklige Klemme des Kabelarms über den Befestigungsschrauben an der hinteren vertikalen Schiene des Gestellschranks wie in Abbildung 3-4 gezeigt aus. support.dell.com Installation von VersaRails 3-5 - Dell PowerEdge 6400 | Installing
VersaRails™ - Page 26
rechte hintere Schiene Kabelarmklemme rechte hintere Schiene Kabelarmklemme 2. Befestigen Sie den Kabelarm mit zwei Kreutzschlitzschrauben am Rack (siehe Abbildung 3-4). ANMERKUNG: Bei 4U- und 7U-Systemen kann der Kabelarm entweder an der rechten oder an der linken vertikalen Schiene befestigt - Dell PowerEdge 6400 | Installing VersaRails™ - Page 27
- Dell PowerEdge 6400 | Installing
VersaRails™ - Page 28
importante que ayuda a hacer un mejor uso de su sistema informático. La información de este documento está sujeta a modificaciones sin previo aviso. © 2001 Dell Computer Corporation. Reservados todos los derechos. Queda prohibida su reproducción en cualquier medio sin la autorización por escrito de - Dell PowerEdge 6400 | Installing
VersaRails™ - Page 29
soporte para evitar la tensión, sólo para sistemas 2U Lea las instrucciones de seguridad del documento Información del sistema de su sistema para obtener más información. support.dell.com Instalación de VersaRails 4-1 - Dell PowerEdge 6400 | Installing
VersaRails™ - Page 30
. El montaje del sistema y kit de rack en armarios rack de otra marca que no sea Dell no ha sido aprobado por ninguna agencia de seguridad. Es responsabilidad del cliente la evaluación, por parte de una agencia de seguridad certificada, de la combinación de sistema y kit de rack montados en armarios - Dell PowerEdge 6400 | Installing
VersaRails™ - Page 31
Phillips (consulte la Figura 4-1 para los sistemas 2U y la figura Figura 4-2 si se trata de sistemas 4U o 7U). guía delantera derecha espacio de 0,125 pulgadas support.dell.com segundo agujero de montaje parte inferior de VersaRail Instalación de VersaRails 4-3 - Dell PowerEdge 6400 | Installing
VersaRails™ - Page 32
VersaRail hacia atrás hasta que se ajuste perfectamente en el lado interior de la guía vertical trasera. 5. Con VersaRail nivelado, ajuste la parte trasera de VersaRail al rack usando dos tornillos Phillips (consulte la Figura 4-3). 6. Repita los pasos del 2 al 5 para instalar un segundo VersaRail - Dell PowerEdge 6400 | Installing
VersaRails™ - Page 33
espacio de 0,125 pulgadas segundo agujero de montaje parte inferior de VersaRail Consulte la Guía de montaje en la extensión para tendido de cables en el rack, siga estos pasos: 1. Mirando hacia la parte trasera del armario rack, alinee el soporte en ángulo recto de la extensión para tendido de - Dell PowerEdge 6400 | Installing
VersaRails™ - Page 34
guía trasera derecha soporte de la extensión para tendido de cables guía trasera derecha soporte de la extensión para tendido de cables 2. Sujete la extensión para tendido de cables al rack mediante dos tornillos Phillips (consulte la Figura 4-4). NOTA: En el caso de los sistemas 4U y 7U, la extensi - Dell PowerEdge 6400 | Installing
VersaRails™ - Page 35
Dell™ VersaRails™ - Dell PowerEdge 6400 | Installing
VersaRails™ - Page 36
: : : : © 2001 Dell Computer Corporation Dell Computer Corporation Dell DELL VersaRails Dell Computer Corporation 2001 9 Dell Computer Corporation P/N 0H113 Rev. A02 - Dell PowerEdge 6400 | Installing
VersaRails™ - Page 37
VersaRails™ 4 VersaRails 1 VersaRails 1 VersaRails • VersaRails 1 • 1 • 10-32 x 0.500 10 • ) 1 6-32 x 0.25 5 (4U 7U • 1 10-32 4 (7U ) • 1 (2U ) : support.dell.com VersaRails 5-1 - Dell PowerEdge 6400 | Installing
VersaRails™ - Page 38
: Dell Dell Dell Dell Dell Dell Dell Dell VersaRails • #2 • • VersaRails • VersaRails • • • ( ) ( ) VersaRails VersaRails : 5-2 VersaRails - Dell PowerEdge 6400 | Installing
VersaRails™ - Page 39
1. 2. VersaRails VersaRail 5-2 : (2U ) 0.125 2 0.125 - 2U - 4U - 7U 3. 2 5-1 4U VersaRail 2 VersaRail 3 VersaRail 4 VersaRail 7U 0.125 5-1 4U 7U 1 0.250 0.125 0.125 0.125 (2U 5-2 ) 0.125 5-1. VersaRail (2U ) support.dell.com 2 VersaRail VersaRails 5-3 - Dell PowerEdge 6400 | Installing
VersaRails™ - Page 40
0.125 1 VersaRail 5-2. VersaRail (4U ) : 5-1 5-2 Rail 2 4 2U VersaRail 1 2 4U 7U 4. VersaRail 5. VersaRail ( 5-3 6. 2 VersaRail 2 ) VersaRail 2 5 VersaVersaRail 5-4 VersaRails - Dell PowerEdge 6400 | Installing
VersaRails™ - Page 41
0.125 5-3. VersaRail 2 VersaRail VersaRails 1. 5-4 support.dell.com VersaRails 5-5 - Dell PowerEdge 6400 | Installing
VersaRails™ - Page 42
2U 5-4. 2. 2 ) : 4U 7U 3. 4U/ 7U 5-6 VersaRails ( 5-4
-
 1
1 -
 2
2 -
 3
3 -
 4
4 -
 5
5 -
 6
6 -
 7
7 -
8
-
9
-
10
-
11
-
12
-
13
-
14
-
15
-
16
-
17
-
18
-
19
-
20
-
21
-
22
-
23
-
24
-
25
-
26
-
27
-
28
-
29
-
30
-
31
-
32
-
33
-
34
-
35
-
36
-
37
-
38
-
39
-
40
-
41
-
42
 |
 |

www.dell.com | support.dell.com
Dell
™
Systems
Installing VersaRails
™
Installation de VersaRails™
Installation von VersaRails™
Instalación de VersaRails™
VersaRails™
±²³´µ