Dell PowerEdge 6450 Rack Installation Guide - Page 26
Installing the Cable Tray, hex-head Phillips screws see
 |
View all Dell PowerEdge 6450 manuals
Add to My Manuals
Save this manual to your list of manuals |
Page 26 highlights
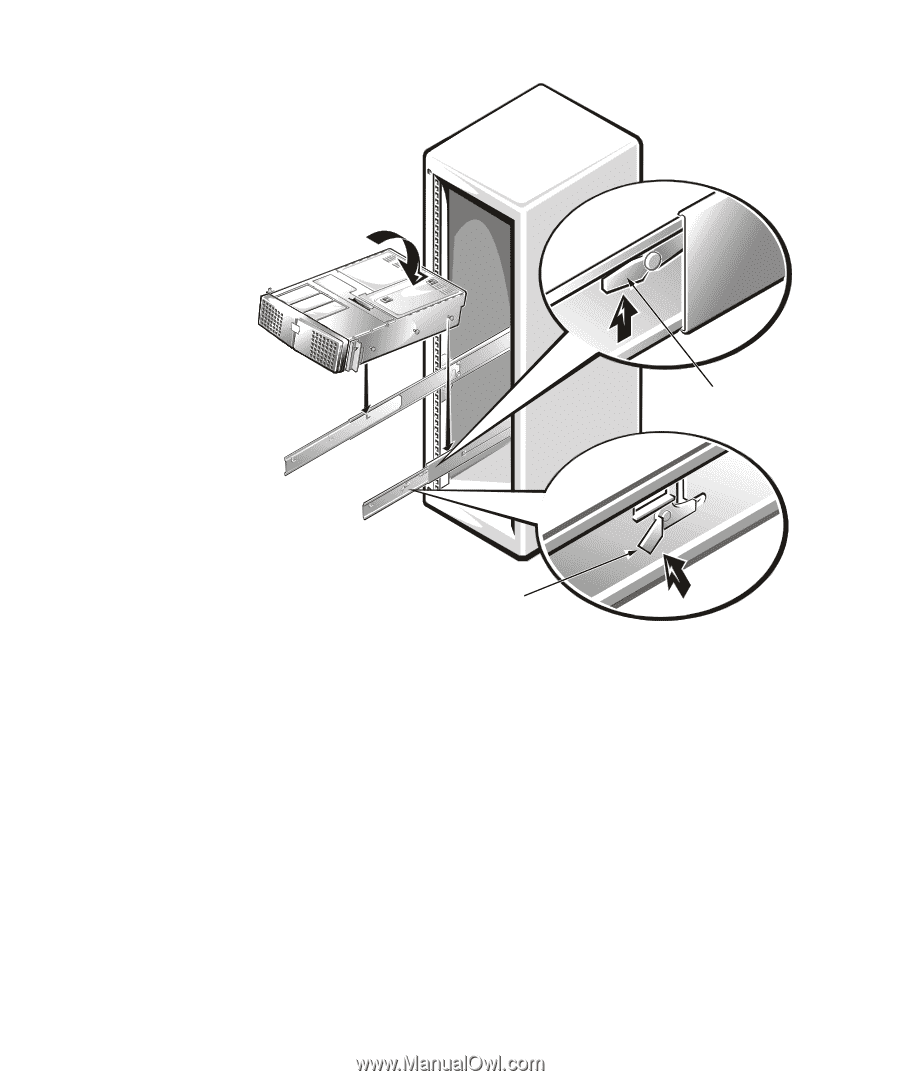
back latch (green) middle latch (yellow) 6. Press up on the green latches and push the chassis into the rack. 7. Tighten the captive thumbscrews on each rack adapter bracket. 8. Install the front bezel, if it was removed. Attach the cable tray to the PowerEdge computer chassis using the five 6-32 x 0.25-inchhex-head Phillips screws (see Figure 1-10). 1-12 Dell PowerEdge 6x50 Systems Rack Installation Guide
-
 1
1 -
2
-
3
-
4
-
5
-
6
-
7
-
8
-
9
-
10
-
11
-
12
-
13
-
14
-
15
-
16
-
17
-
18
-
19
-
20
-
 21
21 -
 22
22 -
 23
23 -
 24
24 -
 25
25 -
 26
26 -
 27
27 -
 28
28 -
 29
29 -
 30
30 -
 31
31 -
32
-
33
-
34
 |
 |
1-12
Dell PowerEdge 6x50 Systems Rack Installation Guide
±²³´µ¶·¸¹,º··'ÃÄÀ¼Ïϲó·Àȶ·ÁÂÍÇ´À¶µ·²Ã·Àȶ·»¼½¾
6.
Press up on the green latches and push the chassis into the rack.
7.
Tighten the captive thumbscrews on each rack adapter bracket.
8.
Install the front bezel, if it was removed.
'³¾»µ¶¶¼³Ä·»Í²·*µË¶²·Ï´µÅ
Attach the cable tray to the PowerEdge computer chassis using the five 6-32 x 0.25-inch-
hex-head Phillips screws (see Figure 1-10).
±²³´µ¶·¸³ÂÀ¸½¾ÎÆÀ¸¿Ã¾Ë¸¾»¼¸º¿Á¸ÇÅÌ»¿º»È¸¾ÃÀ¸»Å¿¸Á¿Ìü˸À»ÅÌȸ¿Å¸ÁÌÄÄÅÿ¸
¿ÂÀ¸ÉÀºÈ¿¸Åʸ¿ÂÀ¸,ÅÉÀö¼ÈÀ¸½Â¾ÁÁºÁ"¸ÁŸ¼Å¸»Å¿¸ÈþÁĸ¿ÂÀ¸½¾ÎÆÀ¸¿Ã¾Ë¸ÉÂÀ»¸
ƺʿº»È¸¿ÂÀ¸ÁËÁ¿ÀÇϸ?Å̸ÁÂÅÌƼ¸ÆºÊ¿¸¿ÂÀ¸ÁËÁ¿ÀǸŻÆ˸Î˸¿ÂÀ¸À¼ÈÀÁ¸Åʸ¿ÂÀ¸
½Â¾ÁÁºÁϸ
back latch
(green)
middle latch (yellow)