Dell PowerEdge 6600 Memory Installation Guidelines (.pdf)
Dell PowerEdge 6600 Manual
 |
View all Dell PowerEdge 6600 manuals
Add to My Manuals
Save this manual to your list of manuals |
Dell PowerEdge 6600 manual content summary:
- Dell PowerEdge 6600 | Memory
Installation Guidelines (.pdf) - Page 1
Dell™ Systems Microprocessor Upgrade Installation Guide www.dell.com | support.dell.com - Dell PowerEdge 6600 | Memory
Installation Guidelines (.pdf) - Page 2
to hardware or loss of data and tells you how to avoid the problem. CAUTION: A CAUTION indicates a potential for property damage, personal injury, the entities claiming the marks and names or their products. Dell Computer Corporation disclaims any proprietary interest in trademarks and trade names - Dell PowerEdge 6600 | Memory
Installation Guidelines (.pdf) - Page 3
and functionality, you can add additional microprocessors or replace installed microprocessors. NOTICE: Before you add or replace a microprocessor, check the latest system BIOS information on the Dell Support website at support.dell.com, and upgrade the BIOS if necessary. NOTICE: The additional - Dell PowerEdge 6600 | Memory
Installation Guidelines (.pdf) - Page 4
disconnect it from its power source. NOTICE: See "Protecting Against Electrostatic Discharge" in the safety instructions in your System Information document. NOTE: For steps 1 through 5, see your Installation and Troubleshooting Guide for details. 1 Open the bezel. 2 Turn off the system, including - Dell PowerEdge 6600 | Memory
Installation Guidelines (.pdf) - Page 5
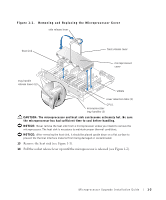
Figure 1-1. Removing and Replacing the Microprocessor Cover side release become extremely hot. Be sure the microprocessor has had sufficient time to cool before handling. NOTICE: Never remove the heat sink from a microprocessor released (see Figure 1-2). Microprocessor Upgrade Installation Guide 1-3 - Dell PowerEdge 6600 | Memory
Installation Guidelines (.pdf) - Page 6
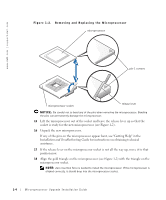
www.dell.com | support.dell.com Figure 1-2. Removing and Replacing the bent, see "Getting Help" in the Installation and Troubleshooting Guide for instructions on obtaining technical assistance. 17 If the release lever on the microprocessor socket. 1-4 Mircroprocessor Upgrade Installation Guide - Dell PowerEdge 6600 | Memory
Installation Guidelines (.pdf) - Page 7
can permanently damage the microprocessor and the system when you turn on the system. When placing the microprocessor in the and Troubleshooting Guide for details. 30 Reseat the following components: • Peripheral riser card • Memory riser cards • Fans Microprocessor Upgrade Installation Guide 1-5 - Dell PowerEdge 6600 | Memory
Installation Guidelines (.pdf) - Page 8
.dell.com | support.dell.com Figure 1-3. Installing the VRM VRM VRM connector ejectors (2) alignment key 31 Replace the front cover. 32 Replace the back cover. 33 Close the bezel. 34 Reconnect your system and peripherals to their electrical outlets, and turn on the system. As the system boots - Dell PowerEdge 6600 | Memory
Installation Guidelines (.pdf) - Page 9
Dell™ 系统 www.dell.com | support.dell.com - Dell PowerEdge 6600 | Memory
Installation Guidelines (.pdf) - Page 10
2002 Dell Computer Corporation 未经 Dell Computer Corporation Dell 和 DELL 徽标是 Dell Computer Corporation 的商标 Corporation Dell Computer 2002 年 11 月 P/N 4N560 Rev. A01 - Dell PowerEdge 6600 | Memory
Installation Guidelines (.pdf) - Page 11
Dell 支持 Web 站点 support.dell.com BIOS BIOS PGA ZIF 插槽中 CPU1 VRM CPU1 和 VRM1 CPU1 和 VRM1 2-1 VRM VRM VRM VRM 则会在 POST 2-1 表 2-1 Mismatch VRMn VID mismatch n 原因 纠正措施 VRM 的 VRM 的 VRM VRM 2-1 - Dell PowerEdge 6600 | Memory
Installation Guidelines (.pdf) - Page 12
www.dell.com | support.dell.com 1 至 5 1 2 3 4 5 6 2-1 7 8 9 10 参见图 2-1 11 图 2-1 12 2-2 - Dell PowerEdge 6600 | Memory
Installation Guidelines (.pdf) - Page 13
图 2-1 散热器 2 个 VRM1 2 个 CPU1 2 个 13 2-1 14 2-2 2-3 - Dell PowerEdge 6600 | Memory
Installation Guidelines (.pdf) - Page 14
www.dell.com | support.dell.com 图 2-2 微处理器 插针 1 边角 释放拉杆 15 2-2 16 17 18 2-2 2-4 - Dell PowerEdge 6600 | Memory
Installation Guidelines (.pdf) - Page 15
19 20 2-1 21 如图 2-1 22 2-1 23 24 2-1 25 2-1 26 VRM VRM 2-3 27 28 29 30 至 33 30 2-5 - Dell PowerEdge 6600 | Memory
Installation Guidelines (.pdf) - Page 16
www.dell.com | support.dell.com 图 2-3 安装 VRM VRM VRM 连接器 弹出器 2 个 对齐栓锁 31 32 33 34 35 按 - Dell PowerEdge 6600 | Memory
Installation Guidelines (.pdf) - Page 17
Systèmes Dell™ Guide d'installation pour la mise à niveau du microprocesseur www.dell.com | support.dell.com - Dell PowerEdge 6600 | Memory
Installation Guidelines (.pdf) - Page 18
noms de marques et marques commerciales utilisés dans ce document se rapportent aux sociétés propriétaires des marques et des noms de ces produits. Dell Computer Corporation décline tout intérêt dans l'utilisation des marques déposées et des noms de marques ne lui appartenant pas. Novembre 2002 - Dell PowerEdge 6600 | Memory
Installation Guidelines (.pdf) - Page 19
Lisez ces instructions avant d' replacer les microprocesseurs existants. MISE EN GARDE : Avant d'ajouter ou de remplacer un microprocesseur, consultez les dernières informations sur le BIOS système sur le site Web de support de Dell, support.dell Guide d'installation pour la mise à niveau du - Dell PowerEdge 6600 | Memory
Installation Guidelines (.pdf) - Page 20
www.dell.com | support.dell.com Association du microprocesseur et d'un module VRM les décharges électrostatiques » dans les instructions de sécurité du document Informations sur le système. REMARQUE : Pour exécuter les étapes 1 à 5, reportez-vous au Guide d'installation et de dépannage. 1 Ouvrez - Dell PowerEdge 6600 | Memory
Installation Guidelines (.pdf) - Page 21
à l'extérieur du châssis tout en appuyant sur les dispositifs de blocage. 9 Placez le support sur une surface plane. 10 Maintenez la patte du levier de libération latéral et relevez le (2) poignées du plateau du microprocesseur (2) Guide d'installation pour la mise à niveau du microprocesseur 3-3 - Dell PowerEdge 6600 | Memory
Installation Guidelines (.pdf) - Page 22
www.dell.com | support.dell.com ATTENTION : Le microprocesseur et le dissipateur thermique peuvent être brûlants. broches lors du retrait du microprocesseur. Vous risqueriez sinon d'endommager définitivement le microprocesseur. 3-4 Guide d'installation pour la mise à niveau du microprocesseur - Dell PowerEdge 6600 | Memory
Installation Guidelines (.pdf) - Page 23
nouveau microprocesseur de son emballage. Si des broches du microprocesseur sont tordues, reportez-vous à la section « Obtention d'aide » dans le Guide d'installation et de dépannage pour savoir comment demander une assistance technique. 17 Si ce n'est déjà fait, redressez la manette de dégagement - Dell PowerEdge 6600 | Memory
Installation Guidelines (.pdf) - Page 24
www.dell.com | support.dell.com 27 Glissez le plateau des microprocesseurs dans le châ verrouiller sur le panneau avant. REMARQUE : Pour exécuter les étapes 30 à 33, reportez-vous au Guide d'installation et de dépannage. 30 Remettez en place les composants suivants : • Carte de montage (carte riser - Dell PowerEdge 6600 | Memory
Installation Guidelines (.pdf) - Page 25
l'utilisateur). 36 Exécutez les diagnostics du système pour vérifier que le nouveau microprocesseur fonctionne correctement. Reportez-vous à « Exécution de Dell Diagnostics » dans le Guide d'installation et de dépannage pour savoir comment exécuter les diagnostics et résoudre les incidents éventuels - Dell PowerEdge 6600 | Memory
Installation Guidelines (.pdf) - Page 26
www.dell.com | support.dell.com 3-8 Guide d'installation pour la mise à niveau du microprocesseur - Dell PowerEdge 6600 | Memory
Installation Guidelines (.pdf) - Page 27
Dell™-Systeme Installationshandbuch für Mikroprozessor-Upgrades www.dell.com | support.dell.com - Dell PowerEdge 6600 | Memory
Installation Guidelines (.pdf) - Page 28
Beschädigung von Hardware oder den Verlust von Daten hin und wie dieses Problem vermieden werden kann. VORSICHT: VORSICHT weist darauf hin, dass Gefahr für einen können ohne Vorankündigung geändert werden. © 2002 Dell Computer Corporation. Alle Rechte vorbehalten. Eine Reproduktion dieses Dokuments - Dell PowerEdge 6600 | Memory
Installation Guidelines (.pdf) - Page 29
BIOS-Systeminfomationen auf der Dell SupportWebsite unter support.dell.com, und führen Sie, falls erforderlich, ein Upgrade durch, bevor Sie einen , muss dort stattdessen ein Wärmeableitblech eingebaut sein. Das Mikroprozessor-Upgrade-Kit enthält die folgenden Teile: •Einen Mikroprozessor •Ein - Dell PowerEdge 6600 | Memory
Installation Guidelines (.pdf) - Page 30
www.dell.com | support.dell.com Verknüpfung von Mikroprozessor und VRM Ihr System unterstü . 4 Entfernen Sie die Frontabdeckung. 5 Bringen Sie folgende Komponenten in Service-Position: • Speichersteckkarte • Peripheriesteckkarte • Lüfter 4-2 Installationshandbuch für Mikroprozessor - Dell PowerEdge 6600 | Memory
Installation Guidelines (.pdf) - Page 31
Sie den Hebel nach oben drehen, bis die Abdeckung von der Gehäusevorderseite gelöst ist (siehe Abbildung 4-1). 12 Entfernen Sie die Abdeckung. Installationshandbuch für Mikroprozessor-Upgrades 4-3 - Dell PowerEdge 6600 | Memory
Installation Guidelines (.pdf) - Page 32
www.dell.com | support.dell.com Abbildung 4-1. Entfernen und Einbauen der MikroprozessorAbdeckung Seitlicher Freigabehebel Wärmeableitblech Vorderer oder verschmutzt wird. 13 Entfernen Sie das Wärmeableitblech (siehe Abbildung 4-1). 4-4 Installationshandbuch für Mikroprozessor-Upgrades - Dell PowerEdge 6600 | Memory
Installation Guidelines (.pdf) - Page 33
bekommen" im Installations- und Fehlerbehebungshandbuch. 17 Sollte der Freigabehebel am Mikroprozessor-Sockel nicht in der senkrechten Position sein, richten Sie ihn senkrecht aus. Installationshandbuch für Mikroprozessor-Upgrades 4-5 - Dell PowerEdge 6600 | Memory
Installation Guidelines (.pdf) - Page 34
www.dell.com | support.dell.com 18 Richten Sie das goldene Dreieck am Mikroprozessor (siehe Abbildung 4-2) nach dem Dreieck am : Nähere Informationen zu den Schritten 30 bis 33 finden Sie Installations- und Fehlerbehebungshandbuch. 4-6 Installationshandbuch für Mikroprozessor-Upgrades - Dell PowerEdge 6600 | Memory
Installation Guidelines (.pdf) - Page 35
-Programm auf, und stellen Sie sicher, dass die Mikroprozessor-Kategorien mit der neuen Systemkonfiguration übereinstimmen (siehe „System-Setup-Programm verwenden" in Ihrem Benutzerhandbuch). Installationshandbuch für Mikroprozessor-Upgrades 4-7 - Dell PowerEdge 6600 | Memory
Installation Guidelines (.pdf) - Page 36
www.dell.com | support.dell.com 36 Führen Sie die Systemdiagnose aus, um sicherzustellen, dass der neue Mikroprozessor korrekt arbeitet. Fehlern finden Sie unter „Durchführen der System-Diagnose" im Installations- und Fehlerbehebungshandbuch. 4-8 Installationshandbuch für Mikroprozessor-Upgrades - Dell PowerEdge 6600 | Memory
Installation Guidelines (.pdf) - Page 37
Dell www.dell.com | support.dell.com - Dell PowerEdge 6600 | Memory
Installation Guidelines (.pdf) - Page 38
2002 Dell Computer Corporation Dell Computer Corporation Dell および DELL Dell Computer Corporation Dell Computer Corporation 2002 年 11 月 P/N 4N560 Rev. A01 - Dell PowerEdge 6600 | Memory
Installation Guidelines (.pdf) - Page 39
BIOS 情報を Dell Web サイト support.jp.dell.com BIOS L2 および L3 ZIF PGA CPU1 VRM CPU1 VRM1 CPU1 VRM1 5-1 VRM 5-1 - Dell PowerEdge 6600 | Memory
Installation Guidelines (.pdf) - Page 40
www.dell.com | support.dell.com VRM の混在 VRM VRM POST 時に表 5-1 表 5-1 Mismatch VRMn 原因 VRM VRM VID mismatch n 対応処置 VRM VRM 1 から 5 Installation and Troubleshooting Guide 1 2 3 4 5 6 5-1 5-2 - Dell PowerEdge 6600 | Memory
Installation Guidelines (.pdf) - Page 41
7 8 9 10 5-1 11 5-1 12 図 5-1 2) VRM1 2) CPU1 2) 5-3 - Dell PowerEdge 6600 | Memory
Installation Guidelines (.pdf) - Page 42
www.dell.com | support.dell.com 13 5-1 14 5-2 図 5-2 ピン -1 側の角 15 5-2 5-4 - Dell PowerEdge 6600 | Memory
Installation Guidelines (.pdf) - Page 43
16 1 Installation and Troubleshooting Guide 17 18 5-2 ZIF(zero insertion force 19 20 5-1 21 図 5-1 22 5-1 23 24 5-1 25 5-1 26 VRM VRM 5-3 5-5 - Dell PowerEdge 6600 | Memory
Installation Guidelines (.pdf) - Page 44
www.dell.com | support.dell.com 27 28 29 30 から 33 Installation and Troubleshooting Guide 30 図 5-3. VRM VRM VRM 31 32 33 2) 5-6 - Dell PowerEdge 6600 | Memory
Installation Guidelines (.pdf) - Page 45
34 ID 35 - Dell PowerEdge 6600 | Memory
Installation Guidelines (.pdf) - Page 46
www.dell.com | support.dell.com 5-8 - Dell PowerEdge 6600 | Memory
Installation Guidelines (.pdf) - Page 47
Dell www.dell.com | support.dell.com - Dell PowerEdge 6600 | Memory
Installation Guidelines (.pdf) - Page 48
2002 Dell Computer Corporation Dell Computer Corporation Dell 및 DELL 로고는 Dell Computer Corporation Dell Computer Corporation 2002년 11월 P/N 4N560 Rev. A01 - Dell PowerEdge 6600 | Memory
Installation Guidelines (.pdf) - Page 49
Dell support.dell.com BIOS BIOS L2 및 L3 ZIF PGA CPU1 VRM CPU1과 VRM1 CPU1과 VRM1 6-1 1개 1개 • VRM 1 6-1 - Dell PowerEdge 6600 | Memory
Installation Guidelines (.pdf) - Page 50
www.dell.com | support.dell.com VRM 혼합 VRM VRM POST 동안 표 6-1 표 6-1 메시지 Mismatch VRMn VID mismatch n 원인 조치 VRM VRM VRM 모든 VRM 1단계~5 1 2 3 4 5 6 6-1 참조). 7 6-2 - Dell PowerEdge 6600 | Memory
Installation Guidelines (.pdf) - Page 51
8 9 10 6-1 참조). 11 6-1 참조). 12 그림 6-1 방열판 2) VRM1 2) CPU1 2) 6-3 - Dell PowerEdge 6600 | Memory
Installation Guidelines (.pdf) - Page 52
www.dell.com | support.dell.com 13 6-1 참조). 14 6-2 참조). 그림 6-2 1 15 6-2 참조). 6-4 - Dell PowerEdge 6600 | Memory
Installation Guidelines (.pdf) - Page 53
16 17 18 6-2 19 20 6-1 참조). 21 그림 6-1 22 6-1 참조). 23 24 6-1 참조). 25 6-1 참조). 26 VRM 소켓에 VRM 6-3 참조). 27 6-5 - Dell PowerEdge 6600 | Memory
Installation Guidelines (.pdf) - Page 54
www.dell.com | support.dell.com 28 29 30 단계 ~33 30 그림 6-3. VRM 설치 VRM VRM 커넥터 맞춤 키 31 32 33 배출기 (2) 6-6 - Dell PowerEdge 6600 | Memory
Installation Guidelines (.pdf) - Page 55
34 System Setup ID 35 System Setup F2 36 6-7 - Dell PowerEdge 6600 | Memory
Installation Guidelines (.pdf) - Page 56
www.dell.com | support.dell.com 6-8 - Dell PowerEdge 6600 | Memory
Installation Guidelines (.pdf) - Page 57
Sistemas Dell™ Guía de instalación para actualización de microprocesadores www.dell.com | support.dell.com - Dell PowerEdge 6600 | Memory
Installation Guidelines (.pdf) - Page 58
y nombres comerciales que puedan utilizarse en este documento se refieren a las empresas que figuran en las marcas y los nombres de sus productos. Dell Computer Corporation renuncia a cualquier interés de propiedad en las marcas y nombres comerciales que no sean los suyos propios. Noviembre de 2002 - Dell PowerEdge 6600 | Memory
Installation Guidelines (.pdf) - Page 59
. AVISO: Antes de añadir o sustituir un microprocesador, compruebe la información más reciente acerca del BIOS del sistema en la página Web Dell Support, support.dell.com y, en caso de ser necesario, actualice el BIOS. AVISO: Los microprocesadores adicionales deben ser del mismo tipo que el - Dell PowerEdge 6600 | Memory
Installation Guidelines (.pdf) - Page 60
www.dell.com | support.dell.com Mezcla de microprocesador y VRM El sistema no admite la mezcla de procesadores o VRM. Si mezcla microprocesadores o VRM, durante POST aparecen los mensajes de la - Dell PowerEdge 6600 | Memory
Installation Guidelines (.pdf) - Page 61
7-1). 11 Mientras sujeta la palanca de liberación frontal, gire la palanca hacia arriba hasta que se suelte la cubierta de la parte frontal del alojamiento (consulte la Figura 7-1). 12 Desmonte la cubierta. Figura 7-1. Extracción y colocación de la cubierta del microprocesador palanca de liberaci - Dell PowerEdge 6600 | Memory
Installation Guidelines (.pdf) - Page 62
www.dell.com | support.dell.com AVISO: Nunca quite el disipador de calor de un microprocesador a menos que quiera quitar el microprocesador. El disipador de calor es necesario para mantener - Dell PowerEdge 6600 | Memory
Installation Guidelines (.pdf) - Page 63
de que todas las patillas encajan en sus correspondientes agujeros. Tenga cuidado de no doblar las patillas. 19 Aplique una ligera presión en la parte superior del microprocesador al girar hacia abajo la palanca de liberación del zócalo, fijando el microprocesador. 20 Coloque el disipador de calor - Dell PowerEdge 6600 | Memory
Installation Guidelines (.pdf) - Page 64
www.dell.com | support.dell.com 28 Levante las asas de la bandeja del microprocesador y presione ligeramente la bandeja hacia adelante para acoplar las trabas de las asas. 29 Gire - Dell PowerEdge 6600 | Memory
Installation Guidelines (.pdf) - Page 65
34 Vuelva a conectar el sistema y los periféricos a las tomas de red y encienda el sistema. Mientras el sistema arranca, detecta la presencia de los nuevos microprocesadores y automáticamente cambia la información de configuración del sistema en el programa de configuración del sistema y muestra el - Dell PowerEdge 6600 | Memory
Installation Guidelines (.pdf) - Page 66
www.dell.com | support.dell.com 7-8 Guía de instalación para actualización de microprocesadores
-
 1
1 -
 2
2 -
 3
3 -
 4
4 -
 5
5 -
 6
6 -
 7
7 -
8
-
9
-
10
-
11
-
12
-
13
-
14
-
15
-
16
-
17
-
18
-
19
-
20
-
21
-
22
-
23
-
24
-
25
-
26
-
27
-
28
-
29
-
30
-
31
-
32
-
33
-
34
-
35
-
36
-
37
-
38
-
39
-
40
-
41
-
42
-
43
-
44
-
45
-
46
-
47
-
48
-
49
-
50
-
51
-
52
-
53
-
54
-
55
-
56
-
57
-
58
-
59
-
60
-
61
-
62
-
63
-
64
-
65
-
66
 |
 |

www.dell.com | support.dell.com
Dell™ Systems
Microprocessor Upgrade
Installation Guide