Dell PowerEdge 6600 Memory Installation Guidelines (.pdf) - Page 4
Adding or Replacing a Microprocessor - bezel
 |
View all Dell PowerEdge 6600 manuals
Add to My Manuals
Save this manual to your list of manuals |
Page 4 highlights
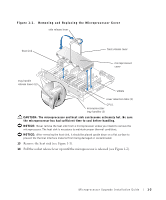
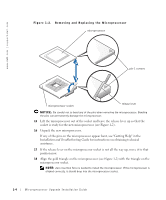
www.dell.com | support.dell.com Adding or Replacing a Microprocessor CAUTION: Before you perform this procedure, you must turn off the system and disconnect it from its power source. NOTICE: See "Protecting Against Electrostatic Discharge" in the safety instructions in your System Information document. NOTE: For steps 1 through 5, see your Installation and Troubleshooting Guide for details. 1 Open the bezel. 2 Turn off the system, including any attached peripherals, and disconnect the system from the electrical outlet. 3 Remove the back cover. 4 Remove the front cover. 5 Raise the following components to the service position: • Memory riser cards • Peripheral riser card • Fans 6 While grasping the microprocessor tray handles, press the release levers with your thumbs and rotate the tray handles up until the tray is released from the front panel (see Figure 1-1). 7 Slide the microprocessor tray out until the safety latches lock into place. 8 While pressing on the safety latches, pull the microprocessor tray straight out until the tray clears the chassis. 9 Place the microprocessor tray on a flat surface. 10 While holding the tab on the side release lever, rotate the lever up until the cover is released from the side of the enclosure (see Figure 1-1). 11 While holding the front release lever, rotate the lever up until the cover is released from the front of the enclosure (see Figure 1-1). 12 Remove the cover. 1-2 Mircroprocessor Upgrade Installation Guide
-
 1
1 -
 2
2 -
 3
3 -
 4
4 -
 5
5 -
 6
6 -
 7
7 -
 8
8 -
 9
9 -
 10
10 -
11
-
12
-
13
-
14
-
15
-
16
-
17
-
18
-
19
-
20
-
21
-
22
-
23
-
24
-
25
-
26
-
27
-
28
-
29
-
30
-
31
-
32
-
33
-
34
-
35
-
36
-
37
-
38
-
39
-
40
-
41
-
42
-
43
-
44
-
45
-
46
-
47
-
48
-
49
-
50
-
51
-
52
-
53
-
54
-
55
-
56
-
57
-
58
-
59
-
60
-
61
-
62
-
63
-
64
-
65
-
66
 |
 |