Dell PowerEdge External Media System 1434 Dell PowerEdge R720 and R720xd Owner - Page 124
iDRAC7 User's Guide, power supplys
 |
View all Dell PowerEdge External Media System 1434 manuals
Add to My Manuals
Save this manual to your list of manuals |
Page 124 highlights
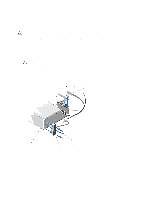
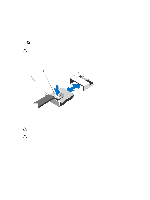
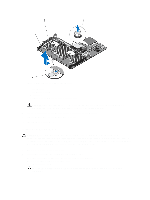
CAUTION: Take care not to damage the system identification button while placing the system board into the chassis. 3. Hold the touch points and lower the system board into the chassis. 4. Push the system board toward the back of the chassis until the board clicks into place. 5. Replace the following: a) cable retention bracket b) PCIe card holder c) integrated storage controller card d) internal USB key (if installed) e) internal dual SD module f) all expansion-card risers g) cooling-fan assembly h) cooling shroud i) power supply(s) 6. Reconnect all cables to the system board. NOTE: Ensure that the cables inside the system are routed along the chassis wall and secured using the cable securing bracket. 7. Close the system. 8. Reconnect the system to its electrical outlet and turn the system on, including any attached peripherals. 9. Import your new or existing iDRAC Enterprise license. For more information, see iDRAC7 User's Guide, at dell.com/ support/manuals. 124
-
 1
1 -
2
-
3
-
4
-
5
-
6
-
7
-
8
-
9
-
10
-
11
-
12
-
13
-
14
-
15
-
16
-
17
-
18
-
19
-
20
-
21
-
22
-
23
-
24
-
25
-
26
-
27
-
28
-
29
-
30
-
31
-
32
-
33
-
34
-
35
-
36
-
37
-
38
-
39
-
40
-
41
-
42
-
43
-
44
-
45
-
46
-
47
-
48
-
49
-
50
-
51
-
52
-
53
-
54
-
55
-
56
-
57
-
58
-
59
-
60
-
61
-
62
-
63
-
64
-
65
-
66
-
67
-
68
-
69
-
70
-
71
-
72
-
73
-
74
-
75
-
76
-
77
-
78
-
79
-
80
-
81
-
82
-
83
-
84
-
85
-
86
-
87
-
88
-
89
-
90
-
91
-
92
-
93
-
94
-
95
-
96
-
97
-
98
-
99
-
100
-
101
-
102
-
103
-
104
-
105
-
106
-
107
-
108
-
109
-
110
-
111
-
112
-
113
-
114
-
115
-
116
-
117
-
118
-
 119
119 -
 120
120 -
 121
121 -
 122
122 -
 123
123 -
 124
124 -
 125
125 -
 126
126 -
 127
127 -
 128
128 -
 129
129 -
130
-
131
-
132
-
133
-
134
-
135
-
136
-
137
-
138
-
139
-
140
-
141
-
142
-
143
-
144
-
145
-
146
-
147
-
148
-
149
-
150
-
151
-
152
-
153
-
154
-
155
-
156
-
157
-
158
-
159
-
160
-
161
-
162
-
163
-
164
-
165
 |
 |
