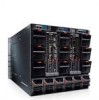
Dell PowerEdge M1000e Dell M8428-k Getting Started Guide - Page 10
Connecting the converged network switch to the Ethernet management network - chassis management controller
 |
View all Dell PowerEdge M1000e manuals
Add to My Manuals
Save this manual to your list of manuals |
Page 10 highlights
5. Enter one of the following commands: a. interface intengigabitethernet 0/x where x is the internal port you wish to change b. interface extengigabitethernet 0/x where x is the external port you wish to change 6. Once in the interface for the port, enter the following commands in the order shown: fcoeport no shut exit 7. Repeat steps 5-6 for any other blade port you wish to configure. 8. Once finished with all of the blade ports, type exit and press Enter (you should still be in the CMSH at this point). 9. Enter the following command: write mem Answer yes to overwrite the startup file. 10. Enter the following command: copy running-config startup-config Answer yes to overwrite. See the Converged Enhanced Ethernet Administrator's Guide for information about CEE CLI interface and configuring switches for FCoE operation and the Converged Enhanced Ethernet Command Reference for more details on the commands. Connecting the converged network switch to the Ethernet management network Once you have successfully set the appropriate IP address of the switch module, you can establish an Ethernet connection through the Chassis Management Controller (CMC) to a remote management workstation for any additional configuration. The management workstation must be on the same Ethernet subnet as the CMC. NOTE Ensure that the switch module is not being modified from any other connection until configuration is complete. Connecting the converged network switch to the fabric Before beginning the following steps, determine whether the switch module is in NPIV or full fabric mode. This affects the configuration process. Using the converged network switch CLI, you can enter the ag --modeShow command to determine the current operating mode. These steps assume the switch is in NPIV mode. 1. Log onto the switch module through a Telnet connection, using the admin account. 2. If you need to install SFP transceivers, install them in the external ports as required. Be sure you have all the necessary SFP transceivers as well as either optical or active twin-ax copper cables. a. Remove the dust plugs from the ports to be used. b. If necessary, remove the end caps from the SFP. c. Orient the transceiver correctly and insert it into a port until it is firmly seated and the latching mechanism clicks. For instructions specific to the type of transceiver, refer to the transceiver manufacturer's documentation. 8 of 160 Dell M8428-k Getting Started Guide MHWKY
-
 1
1 -
2
-
3
-
4
-
 5
5 -
 6
6 -
 7
7 -
 8
8 -
 9
9 -
 10
10 -
 11
11 -
 12
12 -
 13
13 -
 14
14 -
 15
15 -
16
-
17
-
18
-
19
-
20
-
21
-
22
-
23
-
24
-
25
-
26
-
27
-
28
-
29
-
30
-
31
-
32
-
33
-
34
-
35
-
36
-
37
-
38
-
39
-
40
-
41
-
42
-
43
-
44
-
45
-
46
-
47
-
48
-
49
-
50
-
51
-
52
-
53
-
54
-
55
-
56
-
57
-
58
-
59
-
60
-
61
-
62
-
63
-
64
-
65
-
66
-
67
-
68
-
69
-
70
-
71
-
72
-
73
-
74
-
75
-
76
-
77
-
78
-
79
-
80
-
81
-
82
-
83
-
84
-
85
-
86
-
87
-
88
-
89
-
90
-
91
-
92
-
93
-
94
-
95
-
96
-
97
-
98
-
99
-
100
-
101
-
102
-
103
-
104
-
105
-
106
-
107
-
108
-
109
-
110
-
111
-
112
-
113
-
114
-
115
-
116
-
117
-
118
-
119
-
120
-
121
-
122
-
123
-
124
-
125
-
126
-
127
-
128
-
129
-
130
-
131
-
132
-
133
-
134
-
135
-
136
-
137
-
138
-
139
-
140
-
141
-
142
-
143
-
144
-
145
-
146
-
147
-
148
-
149
-
150
-
151
-
152
-
153
-
154
-
155
-
156
-
157
-
158
-
159
-
160
-
161
-
162
-
163
-
164
-
165
-
166
-
167
-
168
-
169
-
170
-
171
-
172
 |
 |
