Dell PowerVault LTO4-120HH Dell PowerVault LTO5-140HH Tape Drive (IBM) v2 User - Page 43
General Guidelines, Methods of Receiving Errors and Messages
 |
View all Dell PowerVault LTO4-120HH manuals
Add to My Manuals
Save this manual to your list of manuals |
Page 43 highlights
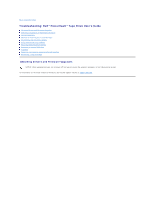
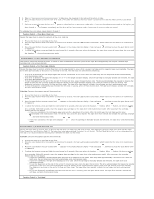
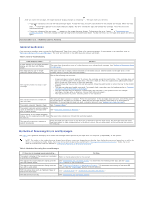
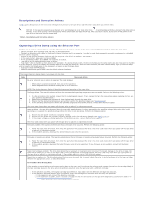
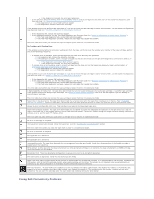
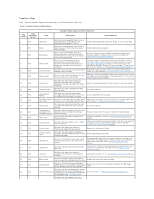
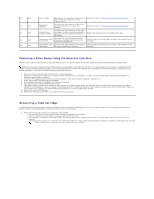
After you insert the cartridge, the single-character display changes to a flashing . The tape drive runs the tests. ¡ If no error is detected, the test will loop and begin again. To stop the loop, press the eject button for one second and release. When the loop ends, temporarily appears in the single-character display. The drive rewinds the tape and unloads the cartridge. The drive then exits maintenance mode. ¡ If an error is detected the test stops, appears in the single-character display. To determine the error, locate in "Descriptions and Corrective Actions". The drive unloads the tape cartridge and exits maintenance mode. To clear the error, turn the tape drive power off, then on again. Function Code P or U - RESERVED (Service Function) General Guidelines If you encounter problems when running the Dell PowerVault Tape Drive, refer to Table 4 for common problems. If the problem is not identified, refer to "Methods of Receiving Errors and Messages." The color and condition of the LEDs may also indicate a problem. Table 4. General Troubleshooting If the problem is this... Do this... A code displays on the single-character The tape drive detected an error or is directing you to an informational message. See "Methods of Receiving Errors display and the fault LED flashes and Messages ." amber. The ready/activity LED or singlecharacter display never turns on. The tape drive has no power. Check the power at the power source. Connect power to the tape drive. If the problem persists, contact Dell technical support. One of the following has occurred: The tape drive does not load a tape cartridge. l A tape cartridge is already loaded. To remove the cartridge, press the eject button. If the cartridge does not eject, turn off the power to the tape drive, then turn it back on. After the ready/activity LED becomes solid green, press the eject button to eject the cartridge. l The cartridge tray may not be in the correct position. Press the eject button to return the tray to the correct position. l The tape cartridge was loaded incorrectly. To properly load a cartridge, see the Loading section in "Loading, Unloading, and Write-Protecting Cartridges." l The tape cartridge may be defective. Load another tape cartridge. If the problem exists for multiple cartridges, the tape drive is defective. Contact Dell technical support. l The tape drive has no power. Connect power to the tape drive. The tape drive does not unload the tape cartridge. The tape cartridge is stuck or is broken. Press the eject button. If the cartridge does not eject, turn off the power to the tape drive, and then turn it back on. (Note that the mid-tape recovery could take up to 10 minutes to complete.) If the cartridge still does not eject, manually remove it (see "Recovering a Tape Cartridge"). The system received TapeAlert flags. See "TapeAlert Flags." The system reported system problems (such as selection or command timeouts, or parity errors). See "Fixing SAS Connectivity Problems." Codes display on the single-character display, but the ready/activity LED does The tape drive is defective. Contact Dell technical support. not turn on. The tape drive does not respond to system commands. Press and hold the eject button on the drive for 10 seconds to force a drive dump. The drive will save the dump and then reboot to allow communication to the drive to occur. Do not cycle power, as this will erase the contents of the dump. Methods of Receiving Errors and Messages Use Table 5 as a guide for identifying error codes and message codes reported by the tape drive, its computer (if applicable), or the system. NOTE: The codes on the single-character display have different meanings, depending on whether they display during normal operations or while the drive is in maintenance mode. Codes that occur during normal operations are defined in "Descriptions and Corrective Actions." Codes that occur while in maintenance mode are defined in "Selecting a Diagnostic or Maintenance Function." Table 5. Methods of Receiving Errors and Messages If the error or message was presented by... The system's display (if the tape drive is enclosed in a library or autoloader) The tape drive's single-character display and the fault LED flashes amber The tape drive's single-character display and the fault LED is solid amber SCSI log sense data (such as TapeAlert flags) or SCSI drive sense data The tape drive's error log Do this... Refer to the documentation for the system. See "Descriptions and Corrective Actions." To determine the meaning of the LED, see the " Front Panel" section in the Introduction. See "Selecting a Diagnostic or Maintenance Function ." To determine the meaning of the fault LED activity, see the " Front Panel" section in the Introduction. See "TapeAlert Flags" or " Descriptions and Corrective Actions." See "Descriptions and Corrective Actions."
-
 1
1 -
2
-
3
-
4
-
5
-
6
-
7
-
8
-
9
-
10
-
11
-
12
-
13
-
14
-
15
-
16
-
17
-
18
-
19
-
20
-
21
-
22
-
23
-
24
-
25
-
26
-
27
-
28
-
29
-
30
-
31
-
32
-
33
-
34
-
35
-
36
-
37
-
 38
38 -
 39
39 -
 40
40 -
 41
41 -
 42
42 -
 43
43 -
 44
44 -
 45
45 -
 46
46 -
 47
47 -
 48
48 -
49
-
50
-
51
-
52
-
53
-
54
-
55
-
56
 |
 |