Dell W-7030 AOS 6.4.x Quick Start Guide - Page 4
Initial Setup on a Serial Port Connection, Baud Rate, Data Bits, Parity, Stop Bits, Flow Control
 |
View all Dell W-7030 manuals
Add to My Manuals
Save this manual to your list of manuals |
Page 4 highlights
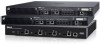
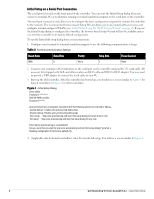
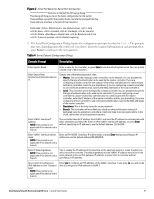
Initial Setup on a Serial Port Connection The serial port is located on the front panel of the controller. You can start the Initial Setup dialog when you connect a terminal, PC or workstation running a terminal emulation program to the serial port on the controller. The serial port connection only allows you to configure the basic configuration required to connect the controller to the network. The recommended browser-based Setup Wizard allows you to also install software licenses and configure internal and guest WLANs (see "Initial Setup Using the WebUI Setup Wizard" on page 2). If you use the Initial Setup dialog to configure the controller, the browser-based Setup Wizard will not be available unless you reset the controller to its factory default configuration. To run the Initial full setup dialog from a serial connection: 1. Configure your terminal or terminal emulation program to use the following communication settings: Table 3 Terminal Communication Settings Baud Rate Data Bits Parity Stop Bits Flow Control 9600 8 None 1 None 2. Connect your terminal or PC/workstation to the serial port on the controller using an RS-232 serial cable. All accessory kits shipped with Dell controllers contain an RJ-45 cable and DB-9 to RJ-45 adapter. You may need to provide a USB adapter to connect the serial cable to your PC. 3. Boot up the Dell controller. After the controller has booted up, you should see a screen similar to Figure 1 for branch controllers or Figure 2 for other controllers: Figure 1 Initial Setup Dialog User: admin Password: ******** (Dell W-7024) >enable Password:****** Auto-provisioning is in progress. Choose one of the following options to override or debug... 'enable-debug' : Enable auto-provisioning debug logs 'disable-debug': Disable auto-provisioning debug logs 'mini-setup' : Stop auto-provisioning and start mini setup dialog for smart-branch role 'full-setup' : Stop auto-provisioning and start full setup dialog for any role Enter Option (partial string is acceptable):f Are you sure that you want to stop auto-provisioning and start full setup dialog? (yes/no): y Reading configuration from factory-default.cfg 4. (Applicable only for branch controllers) enter f to invoke full-setup. You will see a screen similar to Figure 2. 4 Dell Networking W-Series ArubaOS 6.4.x | Quick Start Guide
-
 1
1 -
 2
2 -
 3
3 -
 4
4 -
 5
5 -
 6
6 -
 7
7 -
 8
8 -
 9
9 -
 10
10 -
11
-
12
 |
 |
