Denon AVR-591 Owners Manual - English - Page 33
Set up speakers - setup microphone
 |
UPC - 883795001335
View all Denon AVR-591 manuals
Add to My Manuals
Save this manual to your list of manuals |
Page 33 highlights
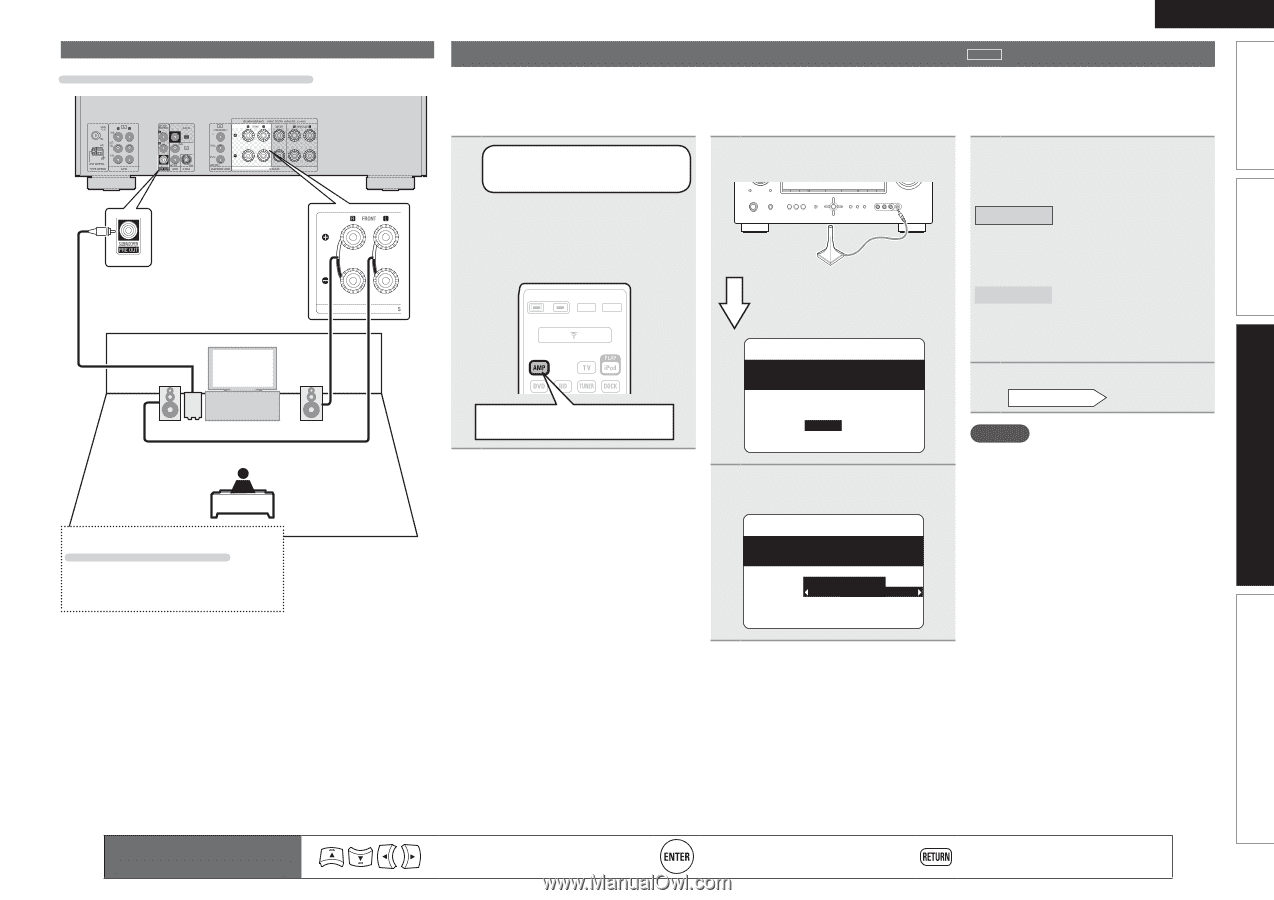
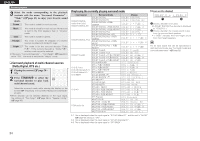
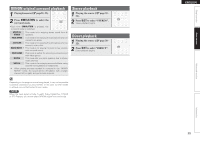
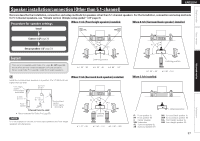
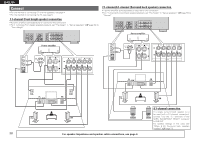
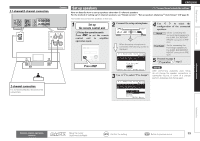
Simple version Basic version 2.1-channel/2-channel connection FL FR SW 2-channel connection For 2-channel playback, disconnect the subwoofers. Connect ENGLISH Set up speakers around items indicate the settings. Here we describe how to set up speakers other than 5.1-channel speakers. For the method of setting up 5.1-channel speakers, see "Simple version", "Set up speakers (Audyssey® Auto Setup)" (vpage 6). First install and connect the speakers to this unit. 1 Set up the remote control unit nn Set up the operation mode Press AMP to set the remote control unit to amplifier operation mode. Press AMP 2 Connect the setup microphone. When the setup microphone is connected, the following screen is displayed. 3-1.Audyssey Auto Setup MultEQ Please place microphone at ear height at main listening position. Pre Assign: Normal Start Cancel [ENT]:Select [RTN]:Back 3 Use ui to select "Pre Assign". 4 Use o p to select the configuration of the connected speakers. Normal Set for connecting the surround Back speakers to the SURR. BACK/FRONT HEIGHT connector in PRE OUT. Front Height Set for connecting the front height speakers to the SURR. BACK/FRONT HEIGHT connector in PRE OUT. 5 Proceed to page 8 " Preparation " step 5. NOTE After performing Audyssey Auto Setup, do not change the speaker connections or subwoofer volume. In event of a change, perform Audyssey Auto Setup again. 3-1.Audyssey Auto Setup MultEQ Please place microphone at ear height at main listening position. Pre Assign: Normal Start Cancel [RTN]:Back Advanced version Information Remote control operation buttons Move the cursor (Up/Down/Left/Right) Confirm the setting Return to previous menu 29
-
 1
1 -
2
-
3
-
4
-
5
-
6
-
7
-
8
-
9
-
10
-
11
-
12
-
13
-
14
-
15
-
16
-
17
-
18
-
19
-
20
-
21
-
22
-
23
-
24
-
25
-
26
-
27
-
 28
28 -
 29
29 -
 30
30 -
 31
31 -
 32
32 -
 33
33 -
 34
34 -
 35
35 -
 36
36 -
 37
37 -
 38
38 -
39
-
40
-
41
-
42
-
43
-
44
-
45
-
46
-
47
-
48
-
49
-
50
-
51
-
52
-
53
-
54
-
55
-
56
-
57
-
58
-
59
-
60
-
61
-
62
-
63
-
64
-
65
-
66
-
67
-
68
-
69
-
70
-
71
-
72
-
73
-
74
-
75
-
76
-
77
 |
 |