Dewalt DCV5801H Instruction Manual - Page 13
Blower Fig. 2, MAINTENANCE, Hose and Accessory Storage Fig. 2, Lubrication, Cleaning
 |
View all Dewalt DCV5801H manuals
Add to My Manuals
Save this manual to your list of manuals |
Page 13 highlights
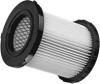
English 3. Clean the filter by shaking off excess dust, tapping into a waste receptacle, then rinsing under running water. Depending on the condition of the filter, a water wash is not always required. Do not use a brush to clean filter. 4. Reinstall and secure the filter onto the power head by twisting the filter to the left. 5. Replace power head onto the tank and secure latches. Blower (Fig. 2) The blower function can be used to remove debris from behind small spaces, to dry a damp floor, to blow grass clippings or leaves from an outside walk, patio, etc. TO USE AS A BLOWER 1. Empty the tank following the instructions under the Vacuum Cleaning section of this manual. 2. Twist the vacuum hose (B) to remove. 3. Insert the hose into the side exhaust port (F) and twist to secure. MAINTENANCE WARNING: To reduce the risk of injury, turn unit off and disconnect it from power source before installing and removing accessories, before adjusting or when making repairs. An accidental start-up can cause injury. • Empty the vacuum often, especially when wet debris is in the canister. • MAINTAIN TOOL WITH CARE. Keep fan area clean for best and safest performance. • Do not attempt to repair the vacuum. To assure product safety and reliability, repairs, maintenance, and adjustments should be performed by authorized DEWALT service centers. Hose and Accessory Storage (Fig. 2) When the vacuum is not in use, the hose can be wrapped around the appliance, underneath the battery interface, and secured with the hose clip (G) also located at the back of the vacuum. The two accessories (crevice tool and wide nozzle) can be stored on board the vacuum as well. Lubrication Never lubricate the vacuum motor. The motor bearings are permanently sealed. This vacuum is intended for indoor use and for wet or dry pick up, but it is not intended to be exposed to rain. Cleaning WARNING: Blow dirt and dust out of all air vents with clean, dry air at least once a week. To minimize the risk of eye injury, always wear ANSI Z87.1 approved eye protection when performing this. WARNING: Never use solvents or other harsh chemicals for cleaning the non-metallic parts of the tool. These chemicals may weaken the plastic materials used in these parts. Use a cloth dampened only with water and mild soap. Never let any liquid get inside the tool; never immerse any part of the tool into a liquid. CHARGER CLEANING INSTRUCTIONS WARNING: Shock hazard. Disconnect the charger from the AC outlet before cleaning. Dirt and grease may be removed from the exterior of the charger using a cloth or soft non-metallic brush. Do not use water or any cleaning solutions. 11
-
 1
1 -
2
-
3
-
4
-
5
-
6
-
7
-
 8
8 -
 9
9 -
 10
10 -
 11
11 -
 12
12 -
 13
13 -
 14
14 -
 15
15 -
 16
16 -
 17
17 -
 18
18 -
19
-
20
-
21
-
22
-
23
-
24
-
25
-
26
-
27
-
28
-
29
-
30
-
31
-
32
-
33
-
34
-
35
-
36
-
37
-
38
-
39
-
40
-
41
-
42
-
43
-
44
-
45
-
46
-
47
-
48
 |
 |