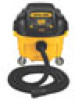
Dewalt DWV010 Instruction Manual - Page 7
English - accessories
 |
View all Dewalt DWV010 manuals
Add to My Manuals
Save this manual to your list of manuals |
Page 7 highlights
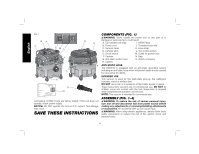
English WARNING: The filters (I) must always be in place and tightened FIG. 2 properly while vacuuming. Otherwise hazardous dust could come through the unit, except as described under I Wet Pick Up Applications under Operation. When vacuuming fine dust, you may also use an additional paper bag or fleece bag to make emptying the canister easier. 1. If optional paper or fleece bag (N) is to be used, install as shown in Figure 3. NOTE: Be careful not to tear the bag. Place bag securely onto the backside of the inlet (J) to provide a tight seal for maximum dust collection performance. FIG. 3 FIG. 4 N J J G 2. Place the vacuum head (C) onto the canister and secure it by closing the canister latches (D). 3. Insert end of hose (G) into hose inlet (J) and rotate clockwise to lock in place. OPERATION WARNING: To reduce the risk of serious personal injury, turn tool off and disconnect tool from power source before making any adjustments or removing/installing attachments or accessories. An accidental start-up can cause injury. 1. Plug the power cord into an appropriate outlet. 2. If tool actuation of vacuum is desired, FIG. 5 see Connecting the Power tools. 3. Turn on the main on/off power switch (E). NOTE: If the tool control switch (L) is turned on, E L and no power cord is plugged into the outlet (M), the vacuum will turn on briefly and then off again to indicate the tool control switch (L) is in the on position. CONNECTING TO POWER TOOLS (FIG. 1, 6) 1. Plug the vacuum power cord into an appropriate outlet. 2. Plug the power tool into the outlet (M) and make sure the power tool is properly grounded. 3. Turn on the tool control switch (L) to the ON position ( ) prior to turning on the main power switch (E). This allows the vacuum to be turned on and off automatically with the power tool. NOTE: The vacuum cleaner starts automatically within 0.5 seconds and continues to run for 15 seconds after the power tool has been turned off. 4. To switch back to manual mode, turn off the tool control switch. In manual mode the tool and the vacuum are turned on and off independent of each other. 5
-
 1
1 -
 2
2 -
 3
3 -
 4
4 -
 5
5 -
 6
6 -
 7
7 -
 8
8 -
 9
9 -
 10
10 -
 11
11 -
 12
12 -
13
-
14
-
15
-
16
-
17
-
18
-
19
-
20
-
21
-
22
-
23
-
24
-
25
-
26
-
27
-
28
-
29
-
30
-
31
-
32
-
33
-
34
-
35
-
36
-
37
-
38
-
39
-
40
-
41
-
42
-
43
-
44
 |
 |
