Dynex DX-NNBC User Manual (English)
Dynex DX-NNBC - N NOTEBOOK CARD WiFi Manual
 |
UPC - 600603119064
View all Dynex DX-NNBC manuals
Add to My Manuals
Save this manual to your list of manuals |
Dynex DX-NNBC manual content summary:
- Dynex DX-NNBC | User Manual (English) - Page 1
Wireless N Notebook Card DX-NNBC USER GUIDE - Dynex DX-NNBC | User Manual (English) - Page 2
2 Contents Dynex DX-NNBC Wireless N Notebook Card Contents Wireless card features 2 Setting up your wireless card 3 Setting up your wireless card 3 Troubleshooting 23 Specifications 28 Legal notices 28 One-Year Limited Warranty 31 Wireless card features The card complies with the IEEE - Dynex DX-NNBC | User Manual (English) - Page 3
into your computer's CardBus slot Setting up your wireless card Windows Vista® Important note: Install the software before inserting the card. To install the software and the card with Windows Vista: 1 Insert the Installation Software CD into your CD/DVD drive. The AutoPlay box opens. DX-NNBC - Dynex DX-NNBC | User Manual (English) - Page 4
4 Setting up your wireless card 2 Double-click Run Installer.exe. If you see a window titled, " window titled, "Windows can't verify the publisher of this driver software." This is normal and does not indicate a problem. Our software has been fully tested and is compatible with this operating - Dynex DX-NNBC | User Manual (English) - Page 5
Setting up your wireless card 5 4 Click Install this driver software anyway, then, when prompted, plug in your card. When the installation completes, the InstallShield Wizard Complete screen opens. 5 Click Finish. Your installation is now complete. 6 To connect to the Internet, open the Network - Dynex DX-NNBC | User Manual (English) - Page 6
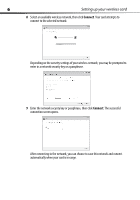
6 Setting up your wireless card 8 Select an available wireless network, then click Connect. Your card attempts to connect to the selected network. Depending on the security settings of your wireless network, you may be prompted to enter in a network security key or a passphrase. 9 Enter the - Dynex DX-NNBC | User Manual (English) - Page 7
window let you configure your network connections. All other Windows versions Important note: Install the software before inserting the card. To install the software: 1 Insert the Installation Software CD into your notebook's CD/DVD drive. The InstallShield Wizard Welcome screen opens. Note: If the - Dynex DX-NNBC | User Manual (English) - Page 8
8 Setting up your wireless card 2 Click Next. The Choose Destination Location screen opens. 3 Click Next. The Please plug in your Notebook Card now screen opens. Note: If at any time during the install a warning appears that the software has not passed Windows® logo testing, click the Continue - Dynex DX-NNBC | User Manual (English) - Page 9
Setting up your wireless card 9 4 Firmly insert the card, label side UP, into your computer's CardBus slot until it stops. The Found New Hardware Wizard Welcome screen opens. Note: If your system did not prompt you to insert your Card, do so now. - Dynex DX-NNBC | User Manual (English) - Page 10
10 Setting up your wireless card 5 Click No, not this time, then click Next. The Welcome to the Found New Hardware Wizard Install screen opens. 6 Click Install the software automatically (Recommended), then click Next. The Completing the Found New Hardware Wizard opens. - Dynex DX-NNBC | User Manual (English) - Page 11
Setting up your wireless card 11 7 Click Finish. The Setup has finished installing screen opens. 8 Click Yes, I want to restart my computer now, then click Finish. Your computer will restart and the Dynex Wireless Networking Utility opens. Note: In order to see your available networks, you must - Dynex DX-NNBC | User Manual (English) - Page 12
12 Setting up your wireless card 9 Select a network to connect to from the Available Networks list, then click Connect. Note: If the Dynex Wireless Networking Utility did not open automatically, double-click the Wireless Utility icon in the system tray near the clock. Connecting to your network - Dynex DX-NNBC | User Manual (English) - Page 13
wireless card 13 Accessing the wireless networking utility (WNU) To access the WNU from the Windows system tray: • Right-click the WNU icon on the Windows system tray in the lower right corner of the desktop. If the icon is not present, click on Start, Programs, Dynex, Wireless of a problem, use - Dynex DX-NNBC | User Manual (English) - Page 14
14 Setting up your wireless card Connection Failure Other options will appear during attempts to reconnect. To stop trying to connect, click Stop. To re-try connecting, click Retry. Network Status and Solution Tips To further understand the current network status, click Open Wireless Utility. The - Dynex DX-NNBC | User Manual (English) - Page 15
Setting up your wireless card 15 Setting Wireless Network Profiles The My Connections tab on the WNU lets you add, edit, and delete connection profiles. It also your router, then click Connect. The next few pages are advanced options of setting the security through the card instead of the router. - Dynex DX-NNBC | User Manual (English) - Page 16
16 Setting up your wireless card Note: When you select a network using encryption, you will first see the simple security screen. Click the Advanced button to see other security options (below). - Dynex DX-NNBC | User Manual (English) - Page 17
router and enter it manually into the hex WEP key table in your card's configuration screen. WPA WPA is a new Wi-Fi standard that improves upon the security features of WEP. To use WPA security, the drivers and software of your wireless equipment must be upgraded to support it. These updates will - Dynex DX-NNBC | User Manual (English) - Page 18
your Wireless N Notebook card to use the same security settings. Changing the Wireless Security Settings The Wireless N Cardbus network adapter supports the latest WPA security feature as well as the legacy WEP security standard. By default, wireless security is disabled. Your Dynex wireless card is - Dynex DX-NNBC | User Manual (English) - Page 19
up your wireless card 19 To access the security settings on your card: 1 Open Wireless Network Properties tab on the Edit information for a network page. 2 Select WEP from the Data Encryption menu. 3 After selecting your WEP encryption mode, you can enter your key by typing in the hex key manually - Dynex DX-NNBC | User Manual (English) - Page 20
. Caution: If you are using a wireless client (such as your notebook equipped with a wireless notebook card) to turn on the security settings in your wireless router, you will temporarily lose your wireless connection until you activate security on your wireless client. Record the key prior to - Dynex DX-NNBC | User Manual (English) - Page 21
. Caution: If you are using a wireless client (such as your notebook equipped with a wireless notebook card) to turn on the security settings in your wireless router, you will temporarily lose your wireless connection until you activate security on your wireless client. Record the key prior to - Dynex DX-NNBC | User Manual (English) - Page 22
be used on all of the clients (network cards) that you want to include in your network. 4 Click Save to finish. You must now set all clients (network cards) to match these settings. Wireless networking utility options The Options tab on the Wireless Networking Utility (WNU) lets you customize WNU - Dynex DX-NNBC | User Manual (English) - Page 23
settings of the hardware and software components of the wireless network. It provides an array of tests and connectivity services to ensure optimal network performance. Troubleshooting Placement of your wireless networking hardware for optimal performance Your wireless connection will be stronger - Dynex DX-NNBC | User Manual (English) - Page 24
, and not blinking. • The WAN light should be either on or blinking. If you are not using a Dynex Wireless Router, consult that router manufacturer's user guide. • Open your Wireless Networking Utility (WNU) software by clicking on the icon in the system tray at the bottom right corner of the screen - Dynex DX-NNBC | User Manual (English) - Page 25
ON, the problem may be that the card is not connected or is not installed correctly. Make sure that the card is plugged firmly into the PCI slot of your computer. Check to see that the drivers for the card have been installed. Right-click on the My Computer icon on your notebook. Choose Properties - Dynex DX-NNBC | User Manual (English) - Page 26
26 Troubleshooting The Link LED is blinking slowly and you cannot connect to a wireless network or the Internet If your card appears to be functioning correctly, but you cannot connect to a network or you have a red wireless icon at the bottom of your screen, the problem may be that there is a - Dynex DX-NNBC | User Manual (English) - Page 27
Troubleshooting 27 Limiting the wireless transmit rate - Limiting the wireless transmit rate can help improve the maximum wireless range, and connection stability. Most wireless cards have the ability to limit the transmission rate. To change this property, click Start, Control Panel, Network - Dynex DX-NNBC | User Manual (English) - Page 28
has a built-in wired Ethernet card This condition occurs if your computer has an active Ethernet card while your wireless card is also active. This happens the Dynex Corporation, of 7601 Penn Ave. South, Richfield, MN 55423 U.S.A., declare under our sole responsibility that the product, DX-NNBC, - Dynex DX-NNBC | User Manual (English) - Page 29
compliance with safety performance of the U.S. Department of Health and Human Services, and also with FDA Radiation Performance Standards 21 CFR Subchapter J. and, if not installed and used in accordance with the instructions, may cause harmful interference to radio communications. However, there is - Dynex DX-NNBC | User Manual (English) - Page 30
30 Legal notices - Dynex DX-NNBC | User Manual (English) - Page 31
Dynex Products ("Dynex") warrants to you, the original purchaser of this new DX-NNBC the original packaging. To obtain in-home warranty service for a television with a screen 25 inches cover? This warranty does not cover: • Customer instruction • Installation • Set up adjustments • Cosmetic damage - Dynex DX-NNBC | User Manual (English) - Page 32
due to incorrect operation or maintenance • Connection to an incorrect voltage supply • Attempted repair by anyone other than a facility authorized by Dynex to service the Product • Products sold as is or with all faults • Consumables, such as fuses or batteries • Products where the factory applied - Dynex DX-NNBC | User Manual (English) - Page 33
ENGLISH 08-1499 PM01448 www.dynexproducts.com (800) 305-2204 © 2008 Best Buy Enterprise Services, Inc. All rights reserved. DYNEX is a trademark of Best Buy Enterprise Services, Inc. Registered in some countries. All other products and brand names are trademarks of their respective owners.
-
 1
1 -
 2
2 -
 3
3 -
 4
4 -
 5
5 -
 6
6 -
 7
7 -
8
-
9
-
10
-
11
-
12
-
13
-
14
-
15
-
16
-
17
-
18
-
19
-
20
-
21
-
22
-
23
-
24
-
25
-
26
-
27
-
28
-
29
-
30
-
31
-
32
-
33
 |
 |

USER GUIDE
Wireless N Notebook Card
DX-NNBC