Dynex DX-UPDVD2 User Manual (English) - Page 8
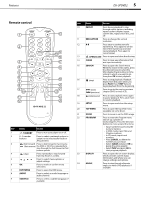
Setting up your DVD player - remote control
 |
UPC - 600603125119
View all Dynex DX-UPDVD2 manuals
Add to My Manuals
Save this manual to your list of manuals |
Page 8 highlights
6 DX-UPDVD2 Setting up your DVD player Installing remote control batteries To install the remote control batteries: 1 Remove the battery cover. 2 Insert two AAA batteries into the battery compartment. Make sure that you match the + and - symbols on the batteries with the + and - symbols in the battery compartment. 3 Replace the cover. Notes: • Do not mix batteries of different types. • Do not mix old and new batteries. • Remove batteries when the charge is depleted. • Battery chemicals can cause a rash. If the batteries leak, clean the battery compartment with a cloth. If chemicals touch your skin, wash immediately. • If the remote control is not going to be used for an extended period of time, remove the batteries. Making connections For the best possible picture, follow these guidelines and use the best cables your TV accepts: • Best-HDMI video • Better-Component video • Good-Composite video Connecting power Warnings: • The player uses a polarized AC plug with one wide blade and one narrow blade. The plug will only fit into matching polarized power outlets. This is a safety feature to reduce the possibility of electric shock. If the plug will not fit in your power outlets, you probably have outdated, non-polarized outlets which should be changed by a qualified, licensed electrician. Do not file the wide blade on the plug or use an adapter to make the plug fit into your outlet. • Never connect the AC cord plug to other than the specified voltage (120 V 60 Hz). Use the attached power cord only. To connect power: • Plug the AC power cord into a power outlet. Setting up your DVD player Unpacking and setting up Package contents: • DVD player • Remote control • Batteries AAA (2) • Composite cable • Quick Start Guide If you need to replace any of these items, call our help line mentioned in the Warranty section of this guide. Carefully remove all of the components from the carton and make sure that you have all of the necessary components before you dispose of the carton. To unpack your player: 1 Remove all packing materials from the individual components. Do not remove any labels or stickers on the back panel of your player. 2 Place your player in the location you want. Your player is designed to be used on a level, stable, flat surface, such as a table, desk, shelf, or stand convenient to a power outlet, out of direct sunlight, and away from sources of excess heat, dust, moisture, or vibration. 3 Unwind the AC power cord and extend the cord to its full length, then plug it into the back of your player.
-
 1
1 -
2
-
 3
3 -
 4
4 -
 5
5 -
 6
6 -
 7
7 -
 8
8 -
 9
9 -
 10
10 -
 11
11 -
 12
12 -
 13
13 -
14
-
15
-
16
-
17
 |
 |
