E-Z-GO TXT - Gas Owner Manual - Page 26
Changing the Oil
 |
View all E-Z-GO TXT - Gas manuals
Add to My Manuals
Save this manual to your list of manuals |
Page 26 highlights
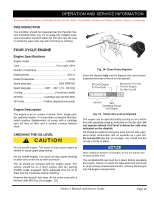
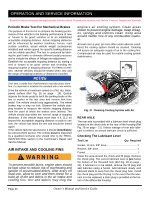
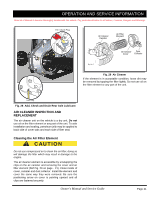
OPERATION AND SERVICE INFORMATION Read all of Manual to become thoroughly familiar with this vehicle. Pay particular attention to all Notices, Cautions, Dangers and Warnings Changing the Oil Tool List Qty. Required Socket, 3/8" drive 1 Ratchet, 3/8" drive 1 Extension, 3/8" drive, 8 1 Oil drain pan 1 Wrench, 3/4 1 drain pan under engine. Wipe top of the engine clean with a cloth (Ref Fig. 17 on page - 16). Remove the oil fill cap. Oil Fill Cap For maximum performance and longevity, the engine oil should be replaced after the first 8 hours of operation. After the initial oil change, it should be changed every 125 hours of operation or semi-annually, whichever comes first. The selection of oil is dependent upon the service that the vehicle will perform. Most vehicles require 10W-30 oil, whereas vehicles used at capacity or near capacity load applications will utilize 10W-40 oil after a break-in period of 100 hours (Ref Fig. 16 on page - 16). HEAVY DUTY WORK 10W-30 10W-40 LIGHT DUTY WORK 10W-30 Fig. 17 Cleaning Top of Engine Clean the area around filter. Using a filter wrench, strap wrench or other suitable wrench, remove the filter (B) from the engine and allow the oil to drain. The 'O' rings may remain on engine (A) or filter (B) (Ref Fig. 18 on page - 16) F 0 -20 0 20 40 60 80 100 C 0 -30 -20 -10 0 10 20 Ref Ovc 1 (AIR TEMPERATURE) 30 40 Fig. 16 Oil Viscosity Chart NOTICE If vehicle is to be stored over winter months, it can be stored with old oil left in engine. The oil should be changed as part of spring maintenance. This will remove any moisture that has accumulated during storage. Fig. 18 Remove Oil Filter Inspect the filter. Make sure the 'O' ring is not left on the engine surface. Be aware that engine fluids may be hot and contact to the skin may cause severe burns. Wear rubber gloves to protect skin from exposure to the old oil and degreaser. The oil should be changed with engine warm. Park vehicle on a level surface, engage parking brake and remove key. Place a Page 16 Owner's Manual and Service Guide
-
 1
1 -
2
-
3
-
4
-
5
-
6
-
7
-
8
-
9
-
10
-
11
-
12
-
13
-
14
-
15
-
16
-
17
-
18
-
19
-
20
-
 21
21 -
 22
22 -
 23
23 -
 24
24 -
 25
25 -
 26
26 -
 27
27 -
 28
28 -
 29
29 -
 30
30 -
 31
31 -
32
-
33
-
34
-
35
-
36
-
37
-
38
-
39
-
40
-
41
-
42
-
43
-
44
-
45
-
46
-
47
-
48
-
49
-
50
-
51
-
52
-
53
-
54
-
55
-
56
-
57
-
58
 |
 |
