E-Z-GO TXT - Gas Owner Manual - Page 27
Starter/generator Belt Tension
 |
View all E-Z-GO TXT - Gas manuals
Add to My Manuals
Save this manual to your list of manuals |
Page 27 highlights
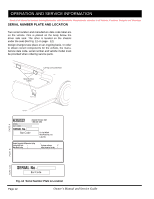
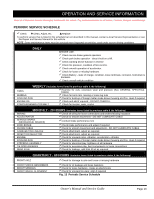
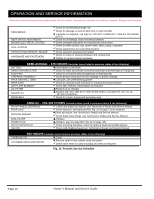
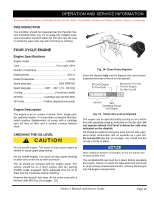
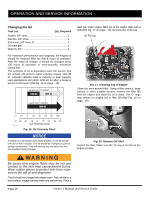
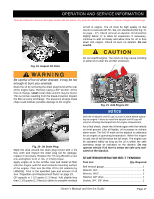
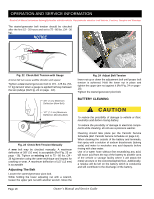
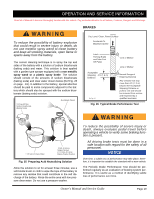
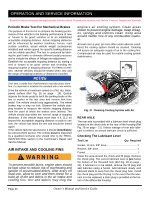
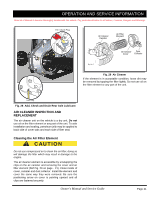
OPERATION AND SERVICE INFORMATION Read all of Manual to become thoroughly familiar with this vehicle. Pay particular attention to all Notices, Cautions, Dangers and Warnings oil left in engine. The oil must be high quality oil that meets or exceeds API SF, SG, CC standards (Ref Fig. 21 on page - 17). Check oil level on dipstick. Oil should be slightly below 'H' to allow for expansion. If necessary, continue to add oil slowly and allow time for oil to flow down into engine. Check oil level on dipstick. Do not overfill. Fig. 19 Inspect Oil Filter Do not overfill engine. Too much oil may cause smoking or allow oil to enter the air filter enclosure. Be careful of hot oil when drained. It may be hot enough to burn you severely Drain the oil by removing the drain plug found at the rear of the engine base. Remove using a 3/4" wrench. At the first oil change, small metal chips and lint may be found. This is normal, resulting from the break-in period. Inspect the filter at every oil change. The presence of large metal chips could indicate possible damage to the engine. Fig. 20 Oil Drain Plug Wipe the area around the drain plug mount with a lint free cloth and inspect the drain plug (A) for damage; replace if necessary. Replace the "O"-ring (B) with a new one and tighten to 61 in. lbs. (7.0 Nm) torque. Apply engine oil to the oil filter seal and install oil filter onto the engine until the seal contacts mounting surface of the engine. Then turn the filter 2/3 to 3/4 rotations by HAND(S). Pour in the specified type and amount of oil See "Capacities and Replacement Parts" on page 23. Oil capacity is 1 1/3 quarts (1.3 liters). Add slightly less than 1 1/3 quarts (1.3 liters) to allow for possible residual Fig. 21 Add Engine Oil NOTICE Both the oil dipstick and fill cap must be in place before operating the engine. Failure to install the dipstick and fill cap will result in oil being discharged into the engine compartment. As a final check, check the oil level again with the vehicle on level ground. Like all liquids, oil increases in volume when warm. The full 'H' mark on the dipstick is calibrated for an engine at operating temperature. When the engine is cold, the oil will be below the full mark. The engine can be operated safely as long as the oil is within the safe operating range as indicated on the dipstick. Do not operate vehicle if oil level is below the safe area indicated on the dipstick. STARTER/GENERATOR BELT TENSION Tool List Qty. Required Belt tension gauge 1 Wrench, 3/4 1 Wrench, 9/16 2 Ratchet, 3/8" drive 1 Socket, 3/4", 3/8" drive 1 Owner's Manual and Service Guide Page 17
-
 1
1 -
2
-
3
-
4
-
5
-
6
-
7
-
8
-
9
-
10
-
11
-
12
-
13
-
14
-
15
-
16
-
17
-
18
-
19
-
20
-
21
-
 22
22 -
 23
23 -
 24
24 -
 25
25 -
 26
26 -
 27
27 -
 28
28 -
 29
29 -
 30
30 -
 31
31 -
 32
32 -
33
-
34
-
35
-
36
-
37
-
38
-
39
-
40
-
41
-
42
-
43
-
44
-
45
-
46
-
47
-
48
-
49
-
50
-
51
-
52
-
53
-
54
-
55
-
56
-
57
-
58
 |
 |
