Edimax EW-7428HCn Manual - Page 11
Getting Started - firmware
 |
View all Edimax EW-7428HCn manuals
Add to My Manuals
Save this manual to your list of manuals |
Page 11 highlights
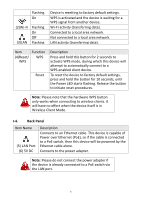
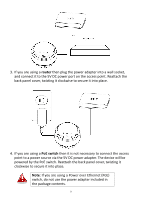
II. GETTING STARTED 1. Carefully remove the back panel cover by twisting it counter-clockwise. This enables easier access to the LAN port and the power adapter. 2. Plug one end of an Ethernet cable into the device's Ethernet port, plug the other end into your computer's Ethernet port. 3. Plug the power adapter into a wall socket, then connect it to the 5V DC power port. Reattach the back panel cover, twisting it clockwise to secure it into place. 4. The device will begin to initialize. After 30 seconds, the power LED will turn on, which indicates the device has completed its initialization. Note: Make sure that your computer is set as a DHCP client. If you are unsure, please see APPENDIX IV-1. Configuring your IP address to set your PC IP to "Obtain an IP address automatically". 5. Enclosed in the product box is an Access Key card to indicate device factory default information, containing a URL to access the device's browser-based configuration interface, similar to the example below. "Web browser access" is necessary information for you to login web-based firmware. "Wi-Fi Client access" is necessary information for your wireless client device(for example your computer, tablet, smart phone) to connect to this device. 11
-
 1
1 -
2
-
3
-
4
-
5
-
 6
6 -
 7
7 -
 8
8 -
 9
9 -
 10
10 -
 11
11 -
 12
12 -
 13
13 -
 14
14 -
 15
15 -
 16
16 -
17
-
18
-
19
-
20
-
21
-
22
-
23
-
24
-
25
-
26
-
27
-
28
-
29
-
30
-
31
-
32
-
33
-
34
-
35
-
36
-
37
-
38
-
39
-
40
-
41
-
42
-
43
-
44
-
45
-
46
-
47
-
48
-
49
-
50
-
51
-
52
-
53
-
54
-
55
-
56
-
57
-
58
-
59
-
60
-
61
-
62
-
63
-
64
-
65
-
66
-
67
-
68
-
69
-
70
-
71
-
72
-
73
-
74
-
75
-
76
-
77
-
78
-
79
-
80
-
81
-
82
-
83
-
84
-
85
-
86
-
87
-
88
-
89
-
90
-
91
-
92
 |
 |
