Edimax IC-3030PoE Manual - Page 32
Video Type
 |
View all Edimax IC-3030PoE manuals
Add to My Manuals
Save this manual to your list of manuals |
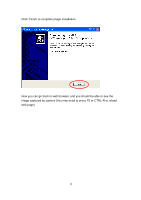
Page 32 highlights
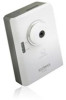
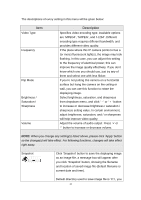
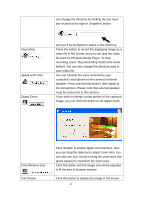
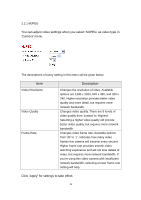
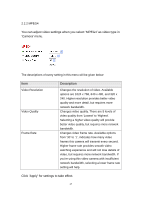
The descriptions of every setting in this menu will be given below: Item Video Type Frequency Flip Mode Brightness / Saturation / Sharpness Volume Description Specifies video encoding type. Available options are „MPEG4‟, „MJPEG‟, and „H.264‟. Different encoding type requires different bandwidth, and provides different video quality. If the place where this IP camera points to has a (or more) fluorescent light(s), the image may look flashing. In this case, you can adjust this setting to the frequency of electrical power; this can improve the image quality effectively. If you don‟t know which one you should use, just try any of them and select one with less flicker. If you‟re not putting this camera on a horizontal surface but hang the camera on the ceiling or wall, you can use this function to rotate the displaying image. Select brightness, saturation, and sharpness from dropdown menu, and click „ - ' or „ + „ button to increase or decrease brightness / saturation / sharpness setting value. In certain environment, adjust brightness, saturation, and / or sharpness will help improve video quality. Adjust the volume of audio output. Press „+‟ or „-„ button to increase or decrease volume. NOTE: When you change any setting(s) listed above, please click 'Apply' button so the change(s) will take effect. For following functions, changes will take effect right away. Snapshot Click „Snapshot‟ button to save the displaying image as an image file, a message box will appear after you click „Snapshot‟ button, showing the filename and location of saved image file (default filename is current date and time). Default directory used to save image file is „C:\‟, you 32
-
 1
1 -
2
-
3
-
4
-
5
-
6
-
7
-
8
-
9
-
10
-
11
-
12
-
13
-
14
-
15
-
16
-
17
-
18
-
19
-
20
-
21
-
22
-
23
-
24
-
25
-
26
-
 27
27 -
 28
28 -
 29
29 -
 30
30 -
 31
31 -
 32
32 -
 33
33 -
 34
34 -
 35
35 -
 36
36 -
 37
37 -
38
-
39
-
40
-
41
-
42
-
43
-
44
-
45
-
46
-
47
-
48
-
49
-
50
-
51
-
52
-
53
-
54
-
55
-
56
-
57
-
58
-
59
-
60
-
61
-
62
-
63
-
64
-
65
-
66
-
67
-
68
-
69
-
70
-
71
-
72
-
73
-
74
-
75
-
76
-
77
-
78
-
79
-
80
-
81
-
82
-
83
-
84
-
85
-
86
-
87
-
88
-
89
-
90
-
91
-
92
-
93
-
94
-
95
-
96
-
97
-
98
-
99
-
100
-
101
-
102
-
103
-
104
-
105
-
106
-
107
-
108
-
109
-
110
-
111
-
112
-
113
-
114
-
115
-
116
-
117
-
118
-
119
-
120
-
121
-
122
-
123
-
124
-
125
-
126
-
127
-
128
-
129
 |
 |