Electrolux CEI30EF5GS Use and Care Manual - Page 19
Display Abbreviations
 |
View all Electrolux CEI30EF5GS manuals
Add to My Manuals
Save this manual to your list of manuals |
Page 19 highlights
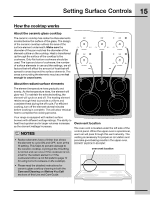
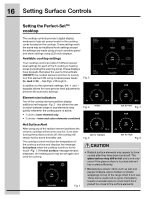
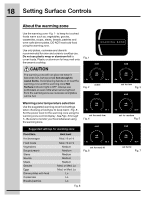
Display Abbreviations 19 About the warming zone List of displayed abbreviations Setting the warming zone • Touch the ON OFF key to activate the warming zone. • Press the desired power level key once (hi+, med or lo-) for the quick automatic settings or for more precise level settings use the hi+ or lokeys. Each press of the hi+ will increase or lokeypad will decrease the power one level. Any of these power level changes may be made any time during the warming process. For best results See the chart below for common abbreviations that you may see while using your appliance. Message Abbreviantions Chart Message explanation CLn Self clean CLO Setting the clock dEF Defrost d-O Door open • Always start with hot cooked food. • When warming pastries or breads the cover should have an opening to allow moisture to escape. • All food placed on the warming zone should be covered with a lid to maintain moisture. End F10* Hi Hot End of cycle Fault code error Hi setting Hot oven NOTES • Pressing a cooktop ON OFF key only activates or deactivates the warming zone but will not start the heating process. Activating and powering any surface cooktop zone requires pressing two keys - the ON OFF key first and then a power level selection (+, - or med) must be added before the cooktop zone will begin heating. • Any of the cooking zones will begin to heat ONLY when activated -See Fig 2 pg 18. If a power level is not added to the active cooking zone within 10 seconds of being active the control will automatically deactivate the cooking zone. • If activating a surface cooking zone when no surface cooking zones are active, you must press and hold the ON OFF key for a few seconds longer than normal before the first cooking zone will activate. Once any cooking zone is active, any zones added will respond immediately. Lo Lo setting Loc Control lock SAb Sabbath mode Sd Demo mode SF Sabbath mode failure CF Check food *This is an example of a fault code that you may see. These codes will help your servicer repair your appliance.
-
 1
1 -
2
-
3
-
4
-
5
-
6
-
7
-
8
-
9
-
10
-
11
-
12
-
13
-
 14
14 -
 15
15 -
 16
16 -
 17
17 -
 18
18 -
 19
19 -
 20
20 -
 21
21 -
 22
22 -
 23
23 -
 24
24 -
25
-
26
-
27
-
28
-
29
-
30
-
31
-
32
-
33
-
34
-
35
-
36
-
37
-
38
-
39
-
40
-
41
-
42
-
43
-
44
-
45
-
46
-
47
-
48
-
49
-
50
-
51
-
52
-
53
-
54
-
55
-
56
-
57
-
58
-
59
-
60
 |
 |