Electrolux EFDE210TIW Installation Instructions English Spanish French
Electrolux EFDE210TIW Manual
 |
View all Electrolux EFDE210TIW manuals
Add to My Manuals
Save this manual to your list of manuals |
Electrolux EFDE210TIW manual content summary:
- Electrolux EFDE210TIW | Installation Instructions English Spanish French - Page 1
EN FRONT LOAD DRYER FR SÉCHEUSE Á CHARGEMENT FRONTAL ES SECADORA DE CARGA FRONTAL INSTALLATION INSTRUCTIONS INSTRUCTIONS D'INSTALLATION INSTRUCCIONES DE INSTALACIÓN 136936002 April 2017 - Electrolux EFDE210TIW | Installation Instructions English Spanish French - Page 2
dryer installation and service must be performed by a qualified installer or service agency. • Install the clothes dryer according to the manufacturer's instructions and local codes. • The electrical service to the dryer instructions in this manual and all other literature included with this dryer - Electrolux EFDE210TIW | Installation Instructions English Spanish French - Page 3
30R or 14-30R service cord with all screws tight on terminal block q Terminal access cover/strain relief installed before initial operation Door Reversal q Follow detailed instructions in this guide q Test hinge and latch for function Electrical Power q House power turned on q Dryer plugged in Final - Electrolux EFDE210TIW | Installation Instructions English Spanish French - Page 4
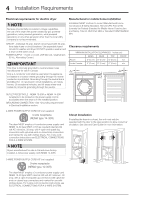
with clothes dryers. For 4-wire cord connection instructions see ELECTRICAL CONNECTIONS FOR A 4-WIRE SYSTEM. NOTE Dryers manufactured for sale See Use and Care Guide for more information. 3-WIRE POWER SUPPLY CORD KIT (not supplied) 3-wire receptacle (NEMA type 10-30R) The dryer MUST employ a 3- - Electrolux EFDE210TIW | Installation Instructions English Spanish French - Page 5
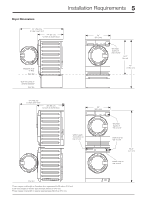
of unit1 drain hose on rear of unit2 68.5" (174 cm) power cord on rear of unit3 floor line 1Power supply cord length on Canadian dryer approximately 59 inches (150 cm). 2Drain hose length on washer approximately 55 inches (140 cm). 3Power supply cord length on washer approximately 59 inches (150 - Electrolux EFDE210TIW | Installation Instructions English Spanish French - Page 6
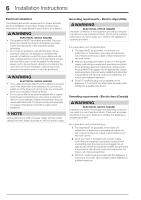
• This appliance MUST be properly grounded. Electrical shock can result if the dryer is not properly grounded. Follow the instructions in this manual for proper grounding. • Do not use an extension cord with this dryer. Some extension cords are not designed to withstand the amounts of electrical - Electrolux EFDE210TIW | Installation Instructions English Spanish French - Page 7
Instructions 7 Electrical connection (non-Canada) - 3 wire cord 3-wire receptacle (NEMA type 10-30R) 30 AMP NEMA 10-30 Neutral (center wire) WARNING ELECTRICAL SHOCK HAZARD Failure to disconnect power source before servicing neutral terminal IMPORTANT If moving dryer from a 4-wire system and - Electrolux EFDE210TIW | Installation Instructions English Spanish French - Page 8
Instructions Electrical connection (non-Canada) - 4 wire cord 4-wire receptacle (NEMA type 14-30R) 30 AMP NEMA 14-30 Neutral Ground (WHITE wire) (GREEN wire) WARNING ELECTRICAL SHOCK HAZARD Failure to disconnect power source before servicing . 5 Move the internal dryer harness ground (WHITE) wire - Electrolux EFDE210TIW | Installation Instructions English Spanish French - Page 9
) If your model included a direct drain kit, you may follow the instructions below to install it on your dryer for convenient drainage of your dryer's condensed water. 1 Locate the red tubing and plastic fitting on the back of the dryer. 4 Retrieve the clear tubing that came in the kit and install - Electrolux EFDE210TIW | Installation Instructions English Spanish French - Page 10
10 Installation Instructions Direct Drain Kit, continued 6 To route the drain tube to the left of the dryer, secure the tube with the "P" clamp from the kit to the back of the dryer with the cabinet screw shown below. 8 Install the hose hanger from the kit onto the end of the hose and insert - Electrolux EFDE210TIW | Installation Instructions English Spanish French - Page 11
you time and money. 7 If you have any questions during initial operation, please review the "Avoid Service Checklist" in your Use & Care Guide before calling for service. 8 Place these instructions in a location near the dryer for future reference. NOTE A wiring diagram is located next to the water - Electrolux EFDE210TIW | Installation Instructions English Spanish French - Page 12
and move it to the opposite location and reinstall. Set the inner door ring aside. 2 1 3 7 Lift the inner lens and set it aside. 3 Gently place dryer door face down on flat, covered work surface. 4 Locate the 12 screws (no. 1-12) on the inner door ring. Remove and save these 12 screws - Electrolux EFDE210TIW | Installation Instructions English Spanish French - Page 13
it in place around the door latch. 1 2 180 11 Reinstall inner door ring with 12 screws removed earlier. 6 5 4 3 2 7 8 9 10 11 111 12 15 While supporting the door, install the 2 hinge mounting screws removed in first step. Attach the upper screw first and then the lower one. 12 Gently pry the - Electrolux EFDE210TIW | Installation Instructions English Spanish French - Page 14
parts: If replacements parts are needed for your dryer, contact the source where you purchased your dryer or refer to your Use and Care Guide for more information. WARNING ELECTRICAL SHOCK HAZARD Label all wires prior to disconnection when servicing controls. Wiring errors can cause improper and - Electrolux EFDE210TIW | Installation Instructions English Spanish French - Page 15
EN FRONT LOAD DRYER FR SÉCHEUSE Á CHARGEMENT FRONTAL ES SECADORA DE CARGA FRONTAL INSTALLATION INSTRUCTIONS INSTRUCTIONS D'INSTALLATION INSTRUCCIONES DE INSTALACIÓN - Electrolux EFDE210TIW | Installation Instructions English Spanish French - Page 16
par un installateur qualifié ou un technicien de service. • Installez l'appareil conformément aux instructions du fabricant et aux codes locaux. • L' superposition correspondant à votre modèle. • Les instructions comprises dans ce guide et toute autre documentation fournie avec cet appareil ne - Electrolux EFDE210TIW | Installation Instructions English Spanish French - Page 17
me électrique de la maison est sous tension q La sécheuse est branchée Vérifications finales q Vous avez lu entièrement les Instructions d'Installation et le Guide d'Utilisation et d'Entretien q La porte se verrouille et le tambour tourne lorsqu'un cycle démarre q La carte d'enregistrement est envoy - Electrolux EFDE210TIW | Installation Instructions English Spanish French - Page 18
alimentation différente de celle fournie par les services publics n'est pas recommandée. CIRCUIT - Circuit une utilisation avec une sécheuse. Pour les instructions de raccordement du cordon à 3 fils, consultez circulation de l'air. Reportez-vous au Guide d'Utilisation et d'Entretien pour plus d' - Electrolux EFDE210TIW | Installation Instructions English Spanish French - Page 19
Dimensions de Sécheuse 43" (109 cm) avec la porte grande ouverte 24" (61 cm) à partir de l'avant de la porte lorsqu'elle est fermée Exigences d'Installation 19 24" (60.5 cm) laveuse montée sur le socle optionnel plancher laveuse montée sur le socle optionnel plancher alimentation électrique à l' - Electrolux EFDE210TIW | Installation Instructions English Spanish French - Page 20
équatement mis à la terre. La mise à la terre inadéquate de la sécheuse pourrait entraîner des risques de choc électrique. Suivez les instructions de ce guide pour une mise à la terre adéquate. • N'utilisez pas de rallonge avec cet appareil. Certains cordons prolongateurs ne sont pas conçus pour la - Electrolux EFDE210TIW | Installation Instructions English Spanish French - Page 21
Instructions d'Installation 21 Connexion électrique (sauf au Canada) - cordon à 3 fils Prise à 3 alvéoles (NEMA type 10-30R) 30 AMP NEMA 10-30 Neutral (center wire) AVERTISSEMENT - Electrolux EFDE210TIW | Installation Instructions English Spanish French - Page 22
22 Instructions d'Installation Connexion électrique (sauf au Canada) - cordon à 4 fils Prise à 4 alvéoles (NEMA type 14-30R) 30 AMP NEMA 14-30 Fils neutres Mises à la terre ( - Electrolux EFDE210TIW | Installation Instructions English Spanish French - Page 23
d'Installation 23 Trousse de Vidange Direct (certains modèles) Si votre modèle de sécheuse inclut une trousse de vidange direct, suivez les instructions d'installation ci-dessous pour faciliter l'évacuation des eaux condensées. 1 Localisez le tuyau rouge et le raccord en plastique à l'arrière de la - Electrolux EFDE210TIW | Installation Instructions English Spanish French - Page 24
24 Instructions d'Installation Trousse de Vidange Direct (suite) 6 Pour acheminer le tuyau de vidange sur la gauche, le fixer à l'arrière de la sécheuse avec le collier en « P » de la trousse et à l'aide de la vis illustrée ci-dessous. 8 Installer le support de la trousse sur l'extrémité du tuyau - Electrolux EFDE210TIW | Installation Instructions English Spanish French - Page 25
relative à l'utilisation initiale, veuillez vous reporter à la section « Liste de vérification » de votre Guide d'utilisation et d'entretien avant d'effectuer une demande de service. 8 Laissez ces instructions à proximité de la sécheuse pour vous y reporter ultérieurement. REMARQUE Un schéma de - Electrolux EFDE210TIW | Installation Instructions English Spanish French - Page 26
26 Inversion de la Porte 1 Protégez la surface de travail, comme le dessus de la sécheuse ou le plancher près de la sécheuse, avec un chiffon doux ou une serviette. 2 Ouvrez la porte de la sécheuse et retirez les deux vis de la charnière. Enlevez d'abord la vis du bas, puis la vis du haut. 6 Relâ - Electrolux EFDE210TIW | Installation Instructions English Spanish French - Page 27
10 Raites tourner la lentille intérieure à 180 degrés et replacez-la dans la porte. 180 Inversion de la Porte 27 14 Faites tourner le protecteur de verrou en plastique de 180 degrés et enclenchez-le autour du verrou de porte. 1 2 180 11 Réinstallez l'anneau de porte intérieur à l'aide des 12 - Electrolux EFDE210TIW | Installation Instructions English Spanish French - Page 28
des pièces de rechange pour votre sécheuse, communiquez avec le marchand qui vous a vendu votre appareil, ou reportez-vous au guide d'utilisation et d'entretien pour obtenir plus de détails. AVERTISSEMENT RISQUE ÉLECTRIQUE Étiquetez tous les fils avant de les débrancher pendant l'entretien - Electrolux EFDE210TIW | Installation Instructions English Spanish French - Page 29
EN FRONT LOAD DRYER FR SÉCHEUSE Á CHARGEMENT FRONTAL ES SECADORA DE CARGA FRONTAL INSTALLATION INSTRUCTIONS INSTRUCTIONS D'INSTALLATION INSTRUCCIONES DE INSTALACIÓN - Electrolux EFDE210TIW | Installation Instructions English Spanish French - Page 30
30 Instrucciones Importantes De Seguridad ADVERTENCIA Para su seguridad, debe seguir la información de esta guía para minimizar el riesgo de incendio o explosión o para evitar daños a la propiedad, lesiones personales o incluso la muerte. No almacene ni utilice gasolina ni otros líquidos o vapores - Electrolux EFDE210TIW | Installation Instructions English Spanish French - Page 31
instrucciones antes de usar este lavadora. Identificación de los símbolos, palabras y avisos de seguridad Las indicaciones de seguridad incluidas en este manual aparecen precedidas de un aviso titulado "ADVERTENCIA" o "PRECAUCIÓN", de acuerdo con el nivel de riesgo. Definiciones Este es el símbolo - Electrolux EFDE210TIW | Installation Instructions English Spanish French - Page 32
32 Requisitos de Instalación Requisitos eléctricos de la secadora eléctrica: NOTA Debido a posibles variaciones en el voltaje, no se recomienda utilizar esta secadora con electricidad generada a partir de generadores a gas, solares, eólicos ni de ninguna otra clase que no sean los empleados por su - Electrolux EFDE210TIW | Installation Instructions English Spanish French - Page 33
Dimensiones de la Secadora 43" (109 cm) para destapar abra la puerta 24" (61 cm) al frente de la puerta cerrada lavadora independiente sobre el piso línea del piso lavadora colocada sobre pedestal opcional línea del piso 43" (109 cm) para destapar abra la puerta 26" (66 cm) al frente de la puerta - Electrolux EFDE210TIW | Installation Instructions English Spanish French - Page 34
34 Instrucciones de Instalación Instalación eléctrica Los siguientes son requisitos necesarios para la instalación eléctrica segura y correcta de su secadora. El no seguir estas instrucciones puede producir una descarga eléctrica y/o incendio. ADVERTENCIA PELIGRO DE DESCARGA ELÉCTRICA • Este - Electrolux EFDE210TIW | Installation Instructions English Spanish French - Page 35
Instrucciones de Instalación 35 Conexión eléctrica (fuera de Canadá): trifilar Receptáculo trifilar (tipo NEMA 10-30R) 30 AMP NEMA 10-30 Neutro (cable central) ADVERTENCIA PELIGRO DE DESCARGA ELÉCTRICA El no desconectar el suministro eléctrico antes de realizar cualquier reparación puede - Electrolux EFDE210TIW | Installation Instructions English Spanish French - Page 36
36 Instrucciones de Instalación Conexión eléctrica (fuera de Canadá): tetrafilar Receptáculo tetrafilar (tipo NEMA 14-30R) 30 AMP NEMA 14-30 Neutro Tierra (cable BLANCO) (cable VERDE) ADVERTENCIA PELIGRO DE DESCARGA ELÉCTRICA El no desconectar el suministro eléctrico antes de realizar - Electrolux EFDE210TIW | Installation Instructions English Spanish French - Page 37
Instrucciones de Instalación 37 Kit de Desagüe Directo (en algunos modelos) Si su modelo incluía un kit de desagüe directo, puede realizar las instrucciones siguientes para instalarlo en la secadora y desaguar cómodamente el agua condensada. 1 Localice el conducto rojo y el accesorio de plástico en - Electrolux EFDE210TIW | Installation Instructions English Spanish French - Page 38
38 Instrucciones de Instalación Kit de Desagüe Directo, continuación 6 Para dirigir el tubo de desagüe hacia la izquierda de la secadora, fije el tubo con el soporte en forma de "P" del kit a la parte trasera de la secadora utilizando el tornillo señalado a continuación. 8 Instale el colgador de - Electrolux EFDE210TIW | Installation Instructions English Spanish French - Page 39
Instrucciones de Instalación 39 Instalación general 1 Utilice un nivel de carpintero para nivelar todos los costados de la secadora. 2 Utilice la pinzas ajustables para ajustar las patas niveladoras de modo que la secadora esté nivelada en relación con todos sus lados, atrás/adelante y derecha/ - Electrolux EFDE210TIW | Installation Instructions English Spanish French - Page 40
40 Inversión de la Puerta 1 Proteja las superficies de trabajo planas, como la parte superior de la secadora o el piso cerca de ésta utilizando un paño o toalla suave. 2 Abra la puerta de la secadora y retire los dos tornillos de la bisagra. Retire el tornillo inferior primero y luego el tornillo - Electrolux EFDE210TIW | Installation Instructions English Spanish French - Page 41
10 Rote la lente interior 180° y vuelva a colocarla en el montaje de la puerta. 180 Inversión de la Puerta 41 14 Rote la cubierta del pestillo de plástico 180° y encájela en su posición en torno al pestillo de la puerta. 1 2 180 11 Reinstale el anillo de la puerta interior con los 12 tornillos - Electrolux EFDE210TIW | Installation Instructions English Spanish French - Page 42
42 Accesorios PEDESTAL DE ALMACENAMIENTO CONCORDANTE* Pedestal de color blanco - Pieza No.. EPWD200QSW Un accesorio de pedestal de almacenamiento, especialmente diseñado para esta secadora, se puede utilizar para elevar la secadora y facilitar su uso. *Es posible que hayan otros colores disponibles - Electrolux EFDE210TIW | Installation Instructions English Spanish French - Page 43
Notas 43 - Electrolux EFDE210TIW | Installation Instructions English Spanish French - Page 44
electrolux.com/shop
-
 1
1 -
 2
2 -
 3
3 -
 4
4 -
 5
5 -
 6
6 -
 7
7 -
8
-
9
-
10
-
11
-
12
-
13
-
14
-
15
-
16
-
17
-
18
-
19
-
20
-
21
-
22
-
23
-
24
-
25
-
26
-
27
-
28
-
29
-
30
-
31
-
32
-
33
-
34
-
35
-
36
-
37
-
38
-
39
-
40
-
41
-
42
-
43
-
44
 |
 |

EN
FRONT LOAD DRYER
FR SÉCHEUSE Á CHARGEMENT FRONTAL
ES SECADORA DE CARGA FRONTAL
INSTALLATION INSTRUCTIONS
INSTRUCTIONS D’INSTALLATION
INSTRUCCIONES DE INSTALACIÓN
136936002 April 2017