Electrolux EI24BC15VS Complete Owners Guide English - Page 11
Warning
 |
View all Electrolux EI24BC15VS manuals
Add to My Manuals
Save this manual to your list of manuals |
Page 11 highlights
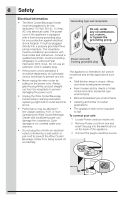
CONCRETE FLOOR installation: Bracket A B Hexagon Bolt 1/4" x 1.2" (1 pc) 3 C Lock Washer (1 pc) D Flat Washer (1 pc) Expansion Screw F 1/4" x 2.4" (1 pc) Installation 11 NOTE If installing on a concrete floor, concrete fasteners are required, (not included with the anti-tip kit). WARNING TIP OVER HAZARD: One of the rear cabinet leveling legs must be engaged under an anti-tip bracket. 1. After you have chosen the installation location, use either hole (3) to secure the bracket into the concrete floor. 2. Using a concrete bit, drill 8mm (3/8") pilot hole 45mm (1.7") deep. 3. Remove the nut, lock washer and washer from the expansion screw (F). 4. Carefully tap the expansion screw into the concrete, using a hammer or mallet. 5. Align bracket hole (3) over the expansion screw threads and replace washer (D), lock washer (C) and nut back on the expansion screw. Fasten bracket to the floor by tightening nut securely. 6. Align lower corner of unit and bracket slot (A), secure with hexagon bolt (B), lock washer (C) and flat washer (D). AD C B F WARNING After installing the bracket, try using light force to tip the unit. If the unit does not tip then the bracket is mounted securely. If the unit does tip, the bracket MUST be reinstalled following these instructions. 1.7" 3/8"
-
 1
1 -
2
-
3
-
4
-
5
-
 6
6 -
 7
7 -
 8
8 -
 9
9 -
 10
10 -
 11
11 -
 12
12 -
 13
13 -
 14
14 -
 15
15 -
 16
16 -
17
-
18
-
19
-
20
-
21
-
22
-
23
 |
 |
